In Part 1 of this two-part series, we walked through how to bypass Ably’s SDKs and connect to Ably’s backend using websocat, where every JSON message has to be typed out by hand.
In this second part, we’ll fix that tedious bit by switching to NodeJS, and we’ll continue our process of building our own minimal Ably (NodeJS) SDK. By the end of this tutorial, we will have implemented basic features of Ably in a simple command line application which will let us connect to Ably and send messages.
If you don't already have NodeJS installed (run node --version if you're not sure) you can download a copy from the NodeJS website.
To cut out some of the boilerplate, I've set up a Git repository at
https://www.github.com/ably/protocol-demo which contains all the code you'll need to get through the rest of this tutorial. If you're not sure how to clone a Git repository, check out the “Cloning a repository” guide.
Setting up the project
Once you have cloned the project, you need to install its dependencies from NPM. You can do this by running the npm install command in the root of the project. This project uses a few NPM dependencies to make life a bit easier:
- ws — A simple WebSocket client for NodeJS.
- chalk — Makes it easy to print out colorful output to the console.
- commander — Parses command line arguments and auto-generates help pages. Very useful for building command line interfaces in NodeJS.
- dotenv — Allows us to load environment variables from a
.envfile. We will use this to provide our Ably API key to the program. - inquirer — Allows us to prompt for interactive input on the command line.
Lastly, in order for the program to be able to authenticate with Ably, we need to create a .env file with our Ably API key. Create a file called .env in the root of the project and add the following to it, making sure to replace the <your_api_key> string below with your own Ably API key (You can modify, revoke or create new API keys at any time from the Ably Dashboard)
ABLY_API_KEY=<your_api_key>
Inspecting the project code
The src directory contains four files:
index.js— This is the basic entry point of the program, it has some simple code:- to parse the
.envfile and the command line arguments it receives; and - to launch the program with the right options.
- to parse the
App.js— This is where the bulk of the code is. The main purposes of this file are:- to handle keypress events; and
- to print out messages we receive from Ably.
protocolActions.js— This is just an object which contains a mapping of protocol message action numbers to their names.Ably.js— This file just contains an empty class at the moment, but by the end of this tutorial we will have turned it into a class which can:- connect to Ably;
- attach and detach from channels;
- publish realtime messages; and
- enter/leave channel presence.
Running the program (with errors)
There are a few ways you can run the program. If you want to add the program to your global PATH then you can run npm link in the project directory, after which you can simply run it using the ably-cli command. If you don't want to add the program to your PATH, then you can run the following inside the project directory:
node .
When you run the program for the first time, you should see an error message saying this.ably.listen is not a function. This is because the program calls the listen method on an instance of the Ably class (see App.js line 23), which doesn’t have that method implemented yet. We can easily bypass this error by adding an empty implementation:
class Ably {
   listen() {}
}

module.exports = Ably;
Once you've added an implementation for listen you should be able to run the program without any errors. It should show you a help message like the screenshot below. You can press q at any time to exit the program and return to the shell.
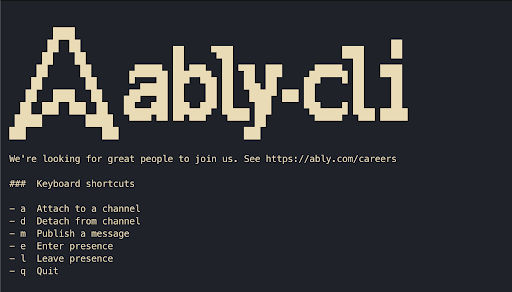
With the exception of q, none of these keyboard shortcuts are implemented yet, but we will implement all of them throughout the rest of this tutorial.
Constructor
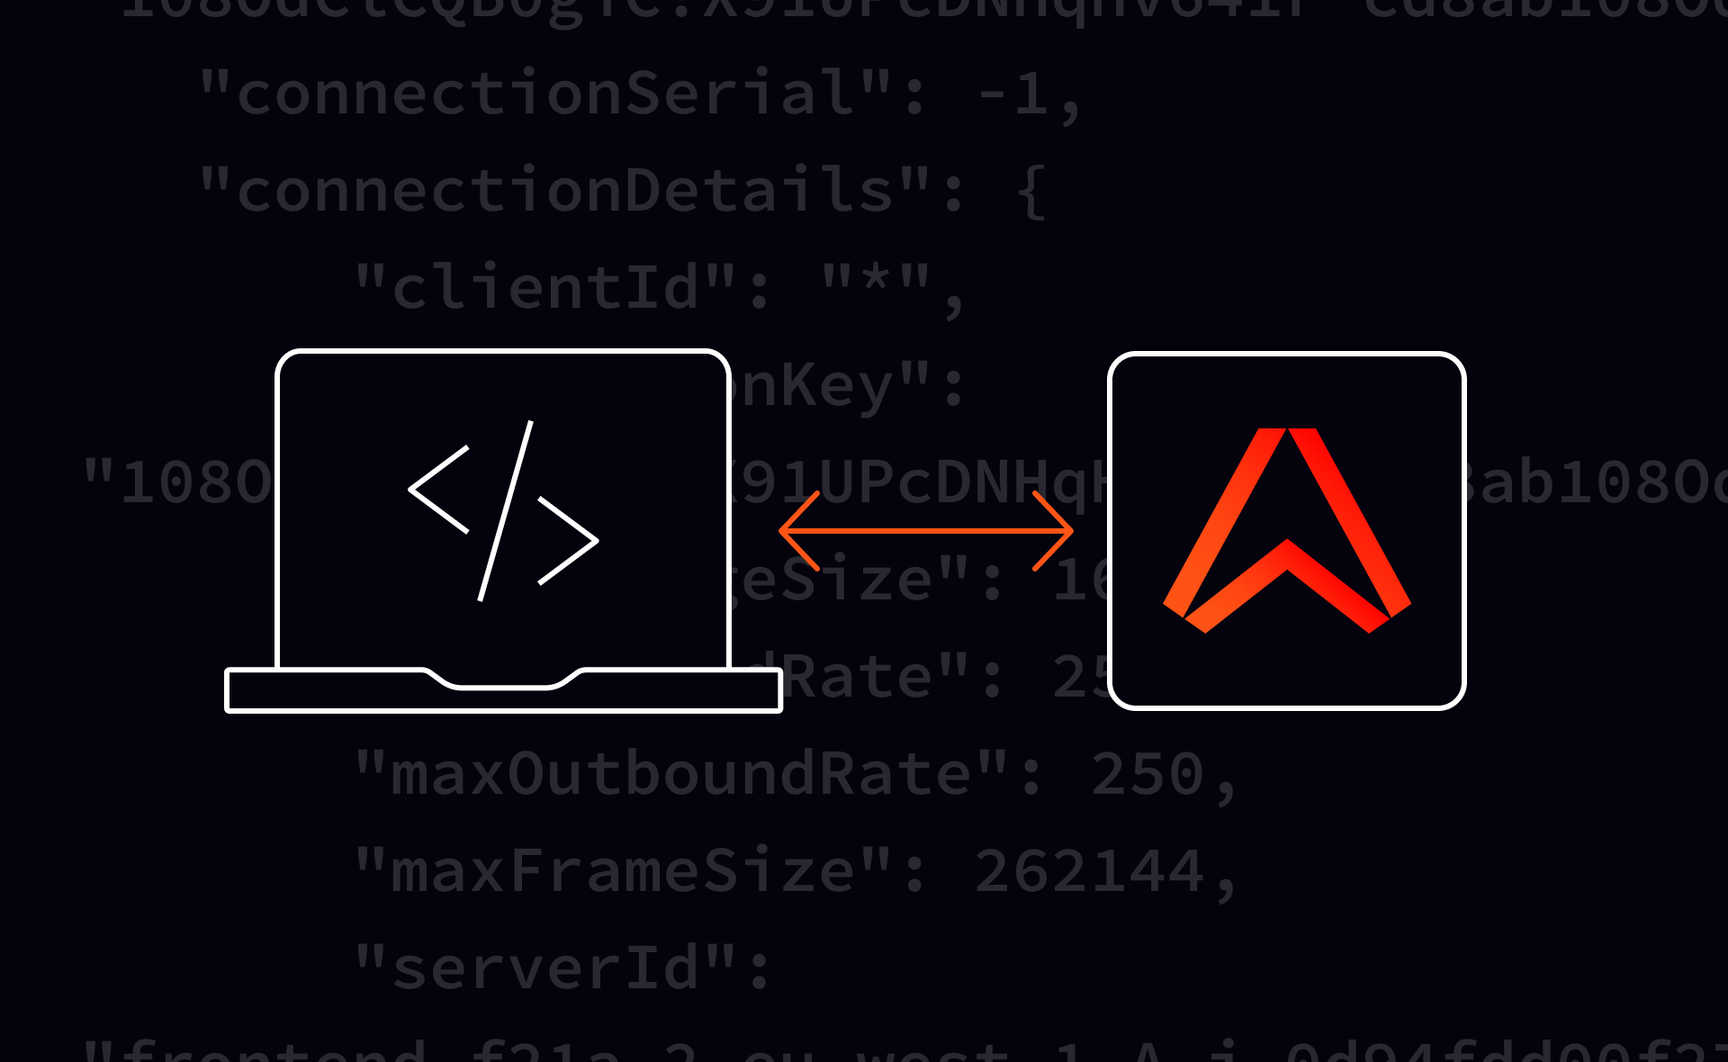
The first thing we need to do to end up with an Ably class with all the above Ably features implemented is to set up a WebSocket connection. The Ably class takes an object of connection parameters as an argument. For example, to connect with an API key and no heartbeats, you would call the constructor this way:
new Ably({
 key: '<your api key>',
 heartbeats: 'false',
});
The program automatically takes the API key that we’ve placed inside .env so we don't need to deal with calling the constructor ourselves. However, we need to take these connection parameters and create a WebSocket URL like the one we used to connect to Ably using websocat.
First things first: we need to import the ws NPM module. To do this, we simply need to add a require statement to the top of our Ably.js file:
const WebSocket = require('ws');
The WebSocket class from ws takes a WebSocket URL as a constructor argument, so we need to construct a URL and pass it in. There are a few ways to do this. For example, you could use NodeJS’s built-in URL library. However, the way you do it is not particularly important, so here is a simple example of an implementation we could use:
constructor(options) {
       let url = 'wss://realtime.ably.io?';
       url += Object.entries(options).map(([key, value]) => `${key}=${value}`).join('&');
       this.ws = new WebSocket(url);
   }
This might look a bit odd if you're not familiar with ES6 JavaScript but all it's doing is taking the base URL,wss://realtime.ably.io (plus the ? connector), adding each of the options as a query parameter, using the resultant URL to call the WebSocket constructor, and finally storing the connection in a class field called ws. Now that the connection is stored as a class field, we can access it from anywhere in the scope of the class using this.ws.
The listen method
Now when we run the program it still won't implement any of the keyboard shortcuts, but behind the scenes it should nonetheless set up a WebSocket connection with Ably. In order to verify that we are connected successfully, we need to implement the listen method.
The listen method takes a callback and every time we receive a protocol message from Ably it should call the callback with that message. In order to run code every time we receive a WebSocket message, we need to use the this.ws.on method. This method takes two arguments: the first is an event type, and the second is a callback that will execute whenever the event is emitted. The event that is emitted when we receive a WebSocket message is called message, and when we receive that message, we need to parse it from JSON into an object so that we can read its properties.
Our implementation of the listen method should look like this:
listen(callback) {
       this.ws.on('message', (msg) => {
           const message = JSON.parse(msg)
           callback(message);
   });
}
Once you've added this implementation to the Ably class, try running the program again. If everything is correct, you should see a CONNECTED message.
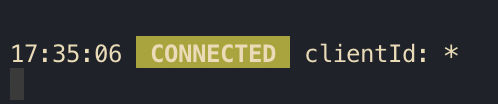
It's not much (yet), but we have now created a JavaScript class capable of connecting to Ably via a WebSocket connection.
Sending protocol messages
Before we make our Ably class capable of attaching to channels, let's add a quick helper method to make it easier to send protocol messages later on. Since we always have to send protocol messages as JSON strings, this method allows us to pass in any protocol message as a JavaScript object to be sent through the WebSocket connection in the right format.
sendProtocolMessage(message) => {
       this.ws.send(JSON.stringify(message));
}
Attaching to channels
Now we are ready to try attaching to a realtime channel. You may have noticed from the initial help message that the keyboard shortcut for attaching to a channel is a. Go ahead and press a with the program running, and it should prompt you to type in a channel name. Type a channel name of your choice and press Enter. Since we haven't implemented attaching to a channel in our Ably class, this will give us an error:
TypeError: this.ably.getChannel is not a function
You can see exactly how the keypress events are handled in the onKeypress method in App.js. In this case, when we press a the program will call ably.getChannel with the name of the channel provided as an argument. getChannel will return a Channel instance and call the attach method on that instance. Finally, the App class will store the channel instance in an array so that we always know which channels we are attached to.
Let's start by creating a simple Channel class inside the Ably.js file:
class Channel {
   constructor(channelName, ably) {
       this.name = channelName;
       this.ws = ws;
   }
   attach() {}
}
For now, this class just stores a channel name and an Ably class instance, and also has an empty attach method.
Now we can implement the getChannel method for the Ably class to be able to return a new instance of the Channel class with the specified name:
getChannel(channelName) {
   return new Channel(channelName, this);
}
Notice how we are passing the Ably instance in to the Channel constructor. This is so that we can access the sendProtocolMessage method to send messages from methods in the Channel class.
We can finally go ahead and implement the attach method. As mentioned in part 1 of this post, the action number for attaching to a channel is 10, and we also need to send the name of the channel in the channel field.
attach() {
       this.ably.sendProtocolMessage({
           action: 10,
           channel: this.name,
   });
}
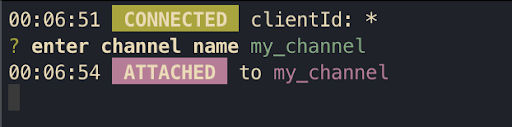
If you implement the attach method in your Channel class as above, you should be able to use the program to attach to a channel. When the program is running, press the a key, and it will ask you to type out a channel name. If you type any valid channel name and press Enter you should see a message saying that you have attached to the channel. You can inspect the code in App.js to see what code is running when you press the a key.
Detaching from channels
Detaching from channels works in pretty much the same way as attaching. We just need to use the action number 12 instead of 10 but other than that the code looks the same:
detach() {
       this.ably.sendProtocolMessage({
           action: 12,
           channel: this.name,
   });
}
Once you add this method to your Channel class you should be able to press d while the program is running and if you are attached to any channels it will prompt you to choose which channel you would like to detach from. Use the arrow keys to select a channel and then press Enter to send the protocol message. Soon after, you should see a message telling you that you have detached from the channel.

Publishing a message on a channel
Remember the message serial from part 1? In order to publish messages, you need to provide a message serial, a unique number sent with each message. Ably uses this number to tell us which of our messages succeeded in publishing. In order to make sure we send a different message serial each time we publish to a channel, let's add a msgSerial field to the Channel class:
constructor(name, ably) {
       this.name = name;
       this.ably = ably;
       this.msgSerial = 0;
}
This msgSerial field will start at 0 and every time we publish a message we will use the current value of the field, and then increment it immediately after use so that we send a different one next time.
Now we are ready to implement the publish method on the Channel class. The action number for publishing a message is 15. We need to make sure to send the channel name and message serial (we can use the ++ operator to return the current value and increment it at the same time), and the message needs to be sent in an array as we did in part 1. We are using { data } as an ES6 shorthand for { data: data }.
publish(data) {
       this.ably.sendProtocolMessage({
           action: 15,
           channel: this.name,
           msgSerial: this.msgSerial++,
           messages: [
           { data
           }
       ],
   });
}
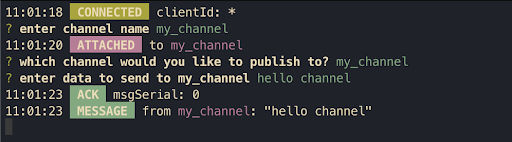
Now if you run the program again and attach to a channel, you can press m to publish a message to that channel. The program will prompt you to choose a channel and type out a message, and then you should see an ACK and the message.
Entering presence
Presence is a core feature of Ably which allows clients to be aware of which other clients are present on a channel.

Normally, with ably-js you would use the channel.presence.enter and channel.presence.leave methods to enter and leave presence on a channel. However, for simplicity this program uses channel.enterPresence and channel.leavePresence.
Before we can go ahead and implement presence features in the program, we need to understand the concept of a presence action. It's actually relatively simple: similar to how we have numbered actions to represent the different kinds of protocol message, when we send or receive a presence message we also send a number to represent which presence action the message represents. There are different action numbers for entering channel presence, leaving it, updating presence data, etc. See the list of all the presence actions in Ably docs.
Sending a presence message is similar to publishing a message. For each message you send, you need to send a message serial so that when Ably acknowledges receiving it back to you, it can be specific about which message was received. You also have to send presence messages in an array, just like you do when publishing to a channel, so that you can send multiple presence messages in one protocol message (but for simplicity we will only send one at a time).
Now we are ready to implement the enterPresence method. The action number for a presence message is 14. It goes in a field called action in the presence message. Meanwhile, the presence action number for entering a channel is 2.
Here's what the resulting implementation should look like:
enterPresence() {
       this.ably.sendProtocolMessage({
           action: 14,
           channel: this.name,
           msgSerial: this.msgSerial++,
           presence: [
           { action: 2
           }
       ],
   });
}
Once you have added that implementation, go ahead and attach to a channel with the program and try entering presence by pressing e. You should see a NACK with the following error message:
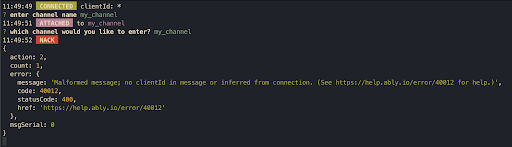
Client ID
The reason for this presence message is that to enter presence on a channel, you need to specify a clientId. Read more about what a clientId means. It is possible to send an explicit clientId as part of a presence protocol message, but you can also send a clientId as a connection parameter.
Fortunately the program is already set up to do this using a command line option. If you are running the program with the ably-cli command just run ably-cli --clientId <your_clientId>. And if you are running the program with node . use node . --clientId <your_clientId> , making sure to replace <your_clientId> with a clientId of your choice. This will send a clientId as part of the initial connection, and that clientId will apply to all protocol messages you send for the duration of that connection.
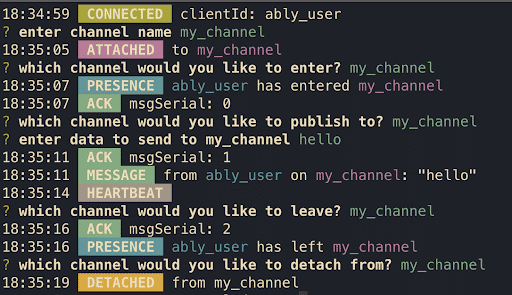
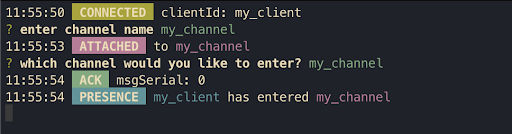
If you run the program with a clientId explicitly specified as above, you should now be able to enter presence on a channel. When you have entered presence on a channel, you should receive an ACK and a presence message from Ably indicating that a presence event has happened on the channel:
Leaving presence
Once you have implemented the enterPresence method leavePresence is nice and easy. The implementation should be almost exactly the same, the only difference being the presence message action for leaving presence on a channel is 4 (entering presence is 2).
leavePresence() {
       this.ably.sendProtocolMessage({
           action: 14,
           channel: this.name,
           msgSerial: this.msgSerial++,
           presence: [
           { action: 4
           }
       ],
   });
}
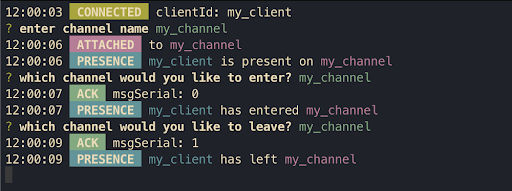
Now try entering presence on a channel using the program and press l (lower-case “L”) to leave presence on the channel. You should receive another ACK and another presence message as shown below:
Putting it all together
If you have followed along with all the code above, then you’ve just implemented a super lightweight Ably SDK of your own, capable of publishing and subscribing to messages, and capable of entering and leaving presence on a channel. You can try opening two terminal windows and verifying that you can send a message from one instance of the program and receive it in the other.
If you didn't code along but want to play around with the final codebase, check out the complete code for this tutorial from the final-program branch on GitHub.
So why do I need an SDK?
Hopefully from reading this you have understood that the underlying protocol that makes Ably work is actually fairly simple and not too difficult to implement yourself. As such, you might be wondering why you need to use one of our numerous (20+) Ably SDKs at all.
There are actually a ton of good reasons why you should use an Ably SDK in production rather than rolling your own solution. Here are just a few:
- Ably SDKs come with quite a bit of logic for resuming a connection if it drops due to any kind of connection problem. It can be quite difficult to account for all the different kinds of network conditions a client might connect from.
- Ably SDKs can fall back to a variety of realtime network protocols for environments where WebSockets aren't supported, for example in older web browsers such as Internet Explorer.
- Ably SDKs are frequently updated with new features, bug fixes, and security patches. If you connect to Ably directly, you would need to do all of this work in-house or miss out. See the Ably SDK feature spec for more information.
In conclusion, connecting directly to Ably without an SDK is a fun way to learn a bit more about how Ably works under the hood. But when you need to build Ably into a real world application, you're much better off using one of our SDKs.
Latest from Ably Engineering
- Conform and monitor with our GitHub repo audit tool ?
- Save your engineers' sleep: best practices for on-call processes
- Migrating from Node Redis to Ioredis: a slightly bumpy but faster road
- The Mysterious Gotcha of gRPC Stream Performance
- No, we don't use Kubernetes
- Balancing act: the current limits of AWS network load balancers
About Ably
Ably is the lowest latency, most secure, scalable, globally distributed, and fault-tolerant pub/sub messaging network in the world. But it’s far more than even that. Ably provides APIs built on top of the core messaging platform to enable developers to quickly build live and collaborative experiences, at any scale.
Building a killer app that has strict requirements for robust realtime infrastructure that just works? Contact us, and we can show you the best way to make that happen.