What is Ably?
Ably is an enterprise-grade pub/sub messaging platform with a suite of integrated services to deliver realtime experiences like interactive learning, logistics GPS tracking, and live sports updates.
What are Ably realtime SDKs?
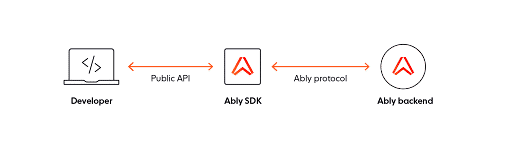
At Ably, we always recommend that application developers who use the Ably realtime service should use one of the Ably client libraries, also known as SDKs. When you use an SDK, you interact with what is known as the “public API”, which is just a technical term we use to describe all the parts of the SDK that we’ve made public for you to interact with as a developer. The public API has methods which let you connect to the Ably backend, publish or subscribe to messages on a realtime channel, and interact with channel presence.
When you use the SDKs’ public API, under the hood the SDK will talk to the Ably realtime backend using the Ably protocol, which is a bespoke protocol used exclusively by the Ably realtime service. The Ably protocol needs an underlying realtime protocol to connect to the backend. We support a number of different realtime protocols but currently the modern standard for realtime networking is WebSockets. This blog post will focus on using the Ably protocol over WebSockets to try to talk to the Ably backend — but directly, without the intermediary of our convenient SDKs and their public APIs.
Connecting to Ably using websocat (a WebSocket client)
To use the WebSocket protocol you either need to implement the protocol yourself or use a WebSocket client. To start off exploring the Ably protocol we're going to use a command line WebSocket client called websocat.
Please refer to the installation instructions on GitHub if you would like to install websocat on your own system, it is available on a wide variety of package repositories such as Homebrew and there are pre-built executables for all major operating systems.
WebSocket schemas
Before we can go ahead and connect to Ably using websocat we need to understand what a WebSocket URL looks like. Fortunately they're pretty much exactly the same as HTTP URLs, the only difference is in the URL schema; in HTTP a URL will begin with http:// (or https:// if you're using TLS). For WebSockets, URLs begin with ws:// (or wss:// if you're using TLS). I recommend that you always use TLS when possible to ensure that eavesdroppers and hackers aren't able to intercept and read the contents of your WebSocket messages.
Every message has an action
Now we can go ahead and connect directly to Ably for the first time. The default endpoint for connecting to Ably is realtime.ably.io. With websocat installed go ahead and enter websocat wss://realtime.ably.io into a shell and you should see something like the following:
{"action":9,"error":{"message":"No authentication information provided. (See https://help.ably.io/error/40101 for help.)","code":40101,"statusCode":401,"href":"https://help.ably.io/error/40101"},"timestamp":1626880805277}
It's worth mentioning at this point that if you have jq installed you can get nicer JSON output at the command line by running the websocat command like this:
websocat wss://realtime.ably.io | jq
Properly formatted, the message returned from Ably above should look something like this:
{
  "action": 9,
  "error": {
      "message": "No authentication information provided. (See https://help.ably.io/error/40101 for help.)",
      "code": 40101,
      "statusCode": 401,
      "href": "https://help.ably.io/error/40101"
  },
  "timestamp": 1626880805277
}
Congratulations, you’ve just received your first protocol message ?
Note: Going forward in this article we’ll display it properly formatted this way for readability's sake.
This protocol message is formatted as JSON and is actually an error message telling us that we haven't provided any authentication information. The first field in every protocol message we receive from Ably is called action which is a number indicating what the purpose of the message is. In our case we received a message with action 9 which indicates that the message contains an error. You can see the full list of actions and their numbers in our documentation for the Ably protocol.
If your shell is stuck in the websocat session you can always press Ctrl+C (Mac/Linux/Windows) to exit the program and return to the shell prompt.
Authentication
There are a few different ways you can authenticate with Ably. As mentioned in the linked authentication documentation, we strongly recommend using token authentication for client-side applications, but for convenience in this blog post, we're going to use basic authentication with an API key. To use basic auth you just need an API key. Before you can create an API key you need to set up a free account with Ably. Once you have created an Ably account you need to grab an API key, see this help article if you need help finding one.
Now that we have our API key, we need to send it to Ably as a connection parameter. The easiest way to do this is using a query string. A query string consists of any number of key-value pairs in the format ?key1=value1&key2=value2... and so on, appended to the end of a URL. For sending an API key to Ably our key is simply called key so we can add this to our URL like so: wss://realtime.ably.io?key=<your_api_key>.
It's also worth mentioning here that this URL will only work if you use the wss:// schema (not the ws:// schema). This is because without using TLS attackers could intercept your messages and see your API key. Ably will automatically reject connections using basic authentication without TLS as an extra security measure.
Now let's use all of this to connect to Ably for this first time. Enter the following command into your shell.
Note: Make sure to replace the<your_api_key>string (which is just a placeholder) with your own Ably API key. And remember the double quotes around the whole address to escape the=character.
websocat "wss://realtime.ably.io?key=<your_api_key>"
If all went well you should see a response like this:
{
   "action": 4,
   "connectionId": "X91UPcDNHq",
   "connectionKey": "108OdClCQB0giC!X91UPcDNHqHv641r-cd8ab108OdClCQB0giC",
   "connectionSerial": -1,
   "connectionDetails": {
       "clientId": "*",
       "connectionKey": "108OdClCQB0giC!X91UPcDNHqHv641r-cd8ab108OdClCQB0giC",
       "maxMessageSize": 16384,
       "maxInboundRate": 250,
       "maxOutboundRate": 250,
       "maxFrameSize": 262144,
       "serverId": "frontend.f21a.2.eu-west-1-A.i-0d94fdd00f27af921.108OdClCQB0giC",
       "connectionStateTtl": 120000,
       "maxIdleInterval": 15000
   }
}
There's a lot of information in this message that is beyond the scope of this tutorial, but to put it simply: this time Ably has sent us a protocol message with action 4, which indicates that we have successfully connected to Ably and we are ready to start attaching to channels and publishing messages.
*hacker voice*

“I'm in.”
Now that we're connected to Ably you can type any string of letters into the terminal and hit Enter to send those to Ably. Go ahead and try! You will probably notice that almost everything you send will get an error back from Ably as a response. This is because Ably expects you to send valid protocol messages.
Heartbeats
If you've stayed connected to Ably using websocat for more than 15 seconds you may have received a message that looks like this:
{"action":0}
This is actually a special type of protocol message called a heartbeat and it's used by Ably to check if the client is still connected. By default Ably sends these every 15 seconds from when you initially connect but when you're trying to type out a message to send to Ably in the shell prompt these heartbeats can get annoying. Fortunately for us there's a connection parameter called heartbeats which allows us to turn these off. Below is a demonstration of how you can connect to Ably with heartbeats turned off:
websocat "wss://realtime.ably.io?key=<your_api_key>&heartbeats=false"
Note: You can also send a heartbeat to Ably manually: once connected simply type out{"action": 0}into the terminal and pressEnter, and Ably should reply with a heartbeat of its own.
Attaching to a channel
Now that we're connected and can send messages over our WebSocket connection with Ably, let's see if we can attach to a channel.
The action number for attaching to a channel is 10. We can go ahead and naïvely send a protocol message like this:
{"action": 10}
However, Ably will respond to action 10 with an error (action 9):
{
   "action": 9,
   "error": {
       "message": "Missing channel identifier. (See https://help.ably.io/error/40000 for help.)",
       "Code": 40000,
       "statusCode": 400,
       "href": "https://help.ably.io/error/40000"
   },
   "Timestamp": 1627392307742
}
This is because you need to specify a channel name to tell Ably which channel you would like to attach to (but of course!).
See the Protocol message fields section of the Ably protocol guide if you want to find out which fields you can send in a protocol message.
In this case, the field we need to send is called channel. Let's try again:
{"action": 10, "channel": "my_channel"}
If you send the above protocol message, you should receive a response like this one:
{
   "action": 11,
   "flags": 983040,
   "channel": "my_channel",
   "channelSerial": "108WbDXYgB0n9X26439312:-1"
}
If all went well, you have now successfully attached to a channel. There are a few circumstances under which you might have received an error instead. For example, you might have chosen an invalid channel name or hit your account's channel creation limit. Reading the error message should tell you what went wrong.
See the Channel errors section of the Ably error codes page for more information.
Publishing a message
Once we have attached to a channel we are ready to publish our first message. When you publish a message, in order to let you know that your message has been published to Ably successfully, Ably will respond with an acknowledgement, or ACK for short. If there is a problem in publishing your message, Ably will respond with a NACK, which is essentially the opposite of an ACK.
One problem with ACKs and NACKs is that if you publish two messages in quick succession and receive one ACK and one NACK in response then you won't know which message was published and which message failed to publish. Ably solves this problem using the concept of a message serial. A message serial is simply a unique number you send each time you publish messages (or gets sent for you when you use our SDKs). When Ably ACKs or NACKs your message, it will send you back the message serial so that you know which message the specific acknowledgement is referring to.
The action number for publishing a message is 15 and the message serial should be sent in a field called "msgSerial". The messages themselves should be in an array in a field called "messages": you can send as many messages as you like in a single protocol message, and the messages themselves can be any valid JSON up to the maxMessageSize (16KB for free accounts).
With all the above knowledge, we can now go ahead and send a message over an Ably channel using websocat. The protocol message you send should look like the following (make sure you're connected to Ably and attached to the channel before you send this):
{
   "action": 15,
   "channel": "my_channel",
   "msgSerial": 0,
   "messages": [
       {
           "hello": "world"
       }
   ]
}
When you send this message, you should receive two messages; one will be the acknowledgement (action number 1) and the other should be the same message being sent back to you. By default, Ably will echo back all messages you publish, but you can turn this functionality off using the "echo" connection parameter (adding &echo=false to your query string).
You can even try opening two shells at this point and attach both shells to the same channel and publish a message. If everything works, you should see the message being received by the client that didn't send the message.
Using NodeJS to implement a minimal "SDK"
Sending protocol messages using websocat is a nice and easy way to get started with connecting to Ably but it gets a little bit tedious typing out every JSON message by hand. In Part 2 of this blog post, we will move over to NodeJS. By the end of Part 2, we will have implemented Ably in a simple command line application which will let us connect to Ably and send messages.
About Ably
Ably is the lowest latency, most secure, scalable, globally distributed, and fault-tolerant pub/sub messaging network in the world. But it’s far more than even that. Ably provides APIs built on top of the core messaging platform to enable developers to quickly build live and collaborative experiences, at any scale.
Building a killer app that has strict requirements for robust realtime infrastructure that just works? Contact us, and we can show you the best way to make that happen.