Spring 2025 Update: We've recently launched Ably Chat, a new product that significantly simplifies building chat experiences on the Ably platform. Ably Chat comes with purpose-built APIs for realtime messaging, presence tracking, typing indicators, and reactions. Explore how you can build engaging chat experiences faster and easier. Learn more about Ably Chat →
In this tutorial, you’ll learn how to build a web based realtime chat app using Laravel, Ably and Vue.js. You’ll use Vue.js to build the frontend/UI and Laravel as a backend to interact with Ably Realtime APIs to facilitate realtime communication. By building this type of application, you’ll learn about the core concepts for building realtime apps using the Laravel-Ably integration.
In general, you can use any frontend framework (React, Angular, Next.js etc.) to build the Laravel chat app, and there is no dependency on any specific framework.
The source code for the project is available in this GitHub repo.
A quick note on the architecture
Before getting started, you should familiarize yourself with the tech stack that you’ll be using in this tutorial to build your chat application.
Laravel: Laravel is a PHP-based web application framework that supports features like queues, dependency injection, unit testing, and integration testing. Laravel is a great choice for building realtime apps, and it already comes with support for Ably to "broadcast" your server-side Laravel events over a WebSocket connection.
Ably: Ably is a pub/sub messaging platform that powers synchronized digital experiences in realtime for millions of simultaneously connected devices around the world. Ably offers WebSockets, stream resume, history, presence, and managed third-party integrations to make it simple to build, extend, and deliver digital realtime experiences at scale.
Vue.js: Vue is a frontend JavaScript framework for building user interfaces. It builds on top of standard HTML, CSS, and JavaScript.
How Laravel broadcasting works in this tutorial
Laravel broadcasting is a way for a frontend client to publish and receive information in realtime through channels. A channel is a logical communication medium that helps to publish and subscribe to information over a WebSocket connection. There are 3 types of channels: public, private, and presence channels.
In this blog we will only look at public channels, where the client doesn't need to be authenticated. The architecture of the chat app will look like this:
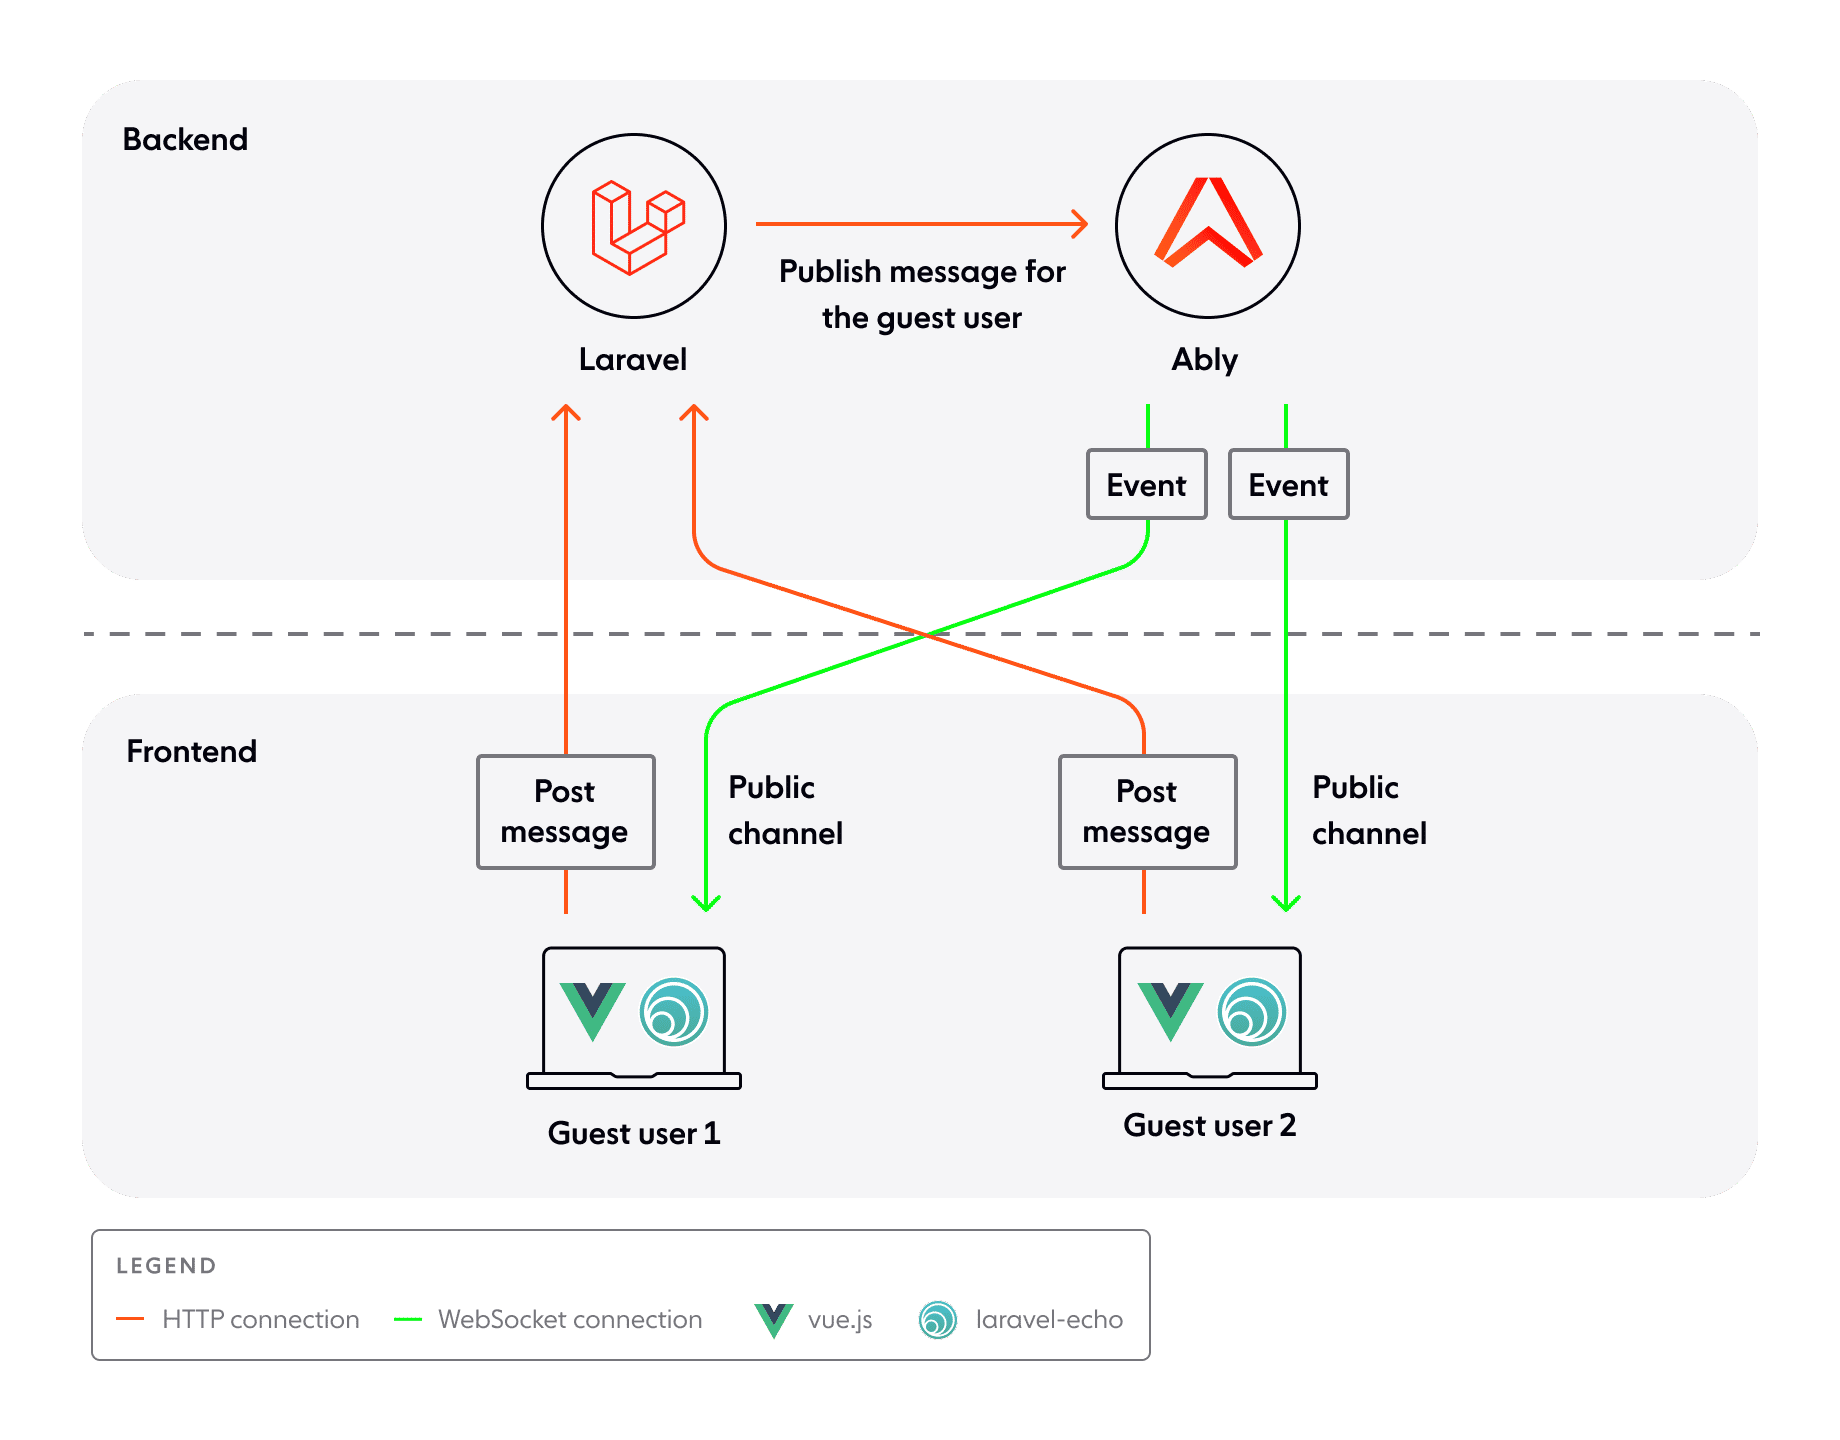
Laravel-server is used for authenticating clients and broadcasting information to Ably on behalf of clients over a given channel. In this tutorial, since public channels don’t need any sort of authentication, it will only be used to broadcast information.
Clients (guest users) use HTTP connections to post a message in a particular channel to laravel-server. Laravel-server publishes the same message to Ably (on the same channel) using a named event. Using the event, Ably sends this information to other clients subscribed to the channel over a WebSocket connection. The subscribed clients then consume this event on the client side through the Laravel Echo library.
In summary, events are the primary method of packaging a message on the channel. When a message is published on a channel with an eventName, it will be received by a subscriber matching the same channelName and eventName.
OK, let's get into it!
Prerequisites
You will need:
- PHP 7.3 -8.1 with Composer 2
- Node.js ≥ 14 & npm
- Laravel 8 global installer (
composer global require laravel/installer) - An Ably account (free tier is fine) and an API key
- Basic familiarity with the command line and Vue single-file components
Backend setup
1. Set up the Laravel project structure
Run the following commands in the terminal to create a new Laravel project:
composer create-project --prefer-dist "laravel/laravel:^8.0" ably-laravel-chat-app
cd ably-laravel-chat-app
php artisan key:generate
Then run the dev servers in a separate terminal:
php artisan serve # http://localhost:8000
npm install
npm run dev
Finally, open localhost:8000 in your browser, and you’ll see your Laravel project running.
2. Set up your Ably account
To start, you need to create an Ably account if you don’t have one. Next, you need to grab the API key from the Ably dashboard:
- Visit your app dashboard and click Create New App with name Chat-App.
- Once the app has been created, go to the API Keys tab. Copy the first key with the name Root. Keep the key safe. The key shouldn't be exposed to the client code.

That’s it. Your Ably account is ready to support realtime messaging.
3. Set up the Ably broadcaster on Laravel
Start by installing the official Ably Broadcaster for Laravel using composer:
composer require ably/laravel-broadcaster
Add the connection settings to .env (replace with your key):
BROADCAST_CONNECTION=ably
ABLY_KEY=xxxx:yyyy
If using Laravel 10 or newer, uncomment or set BroadcastServiceProvider in config/app.php:
'providers' => [
    // ...
    App\Providers\BroadcastServiceProvider::class,
],
Next, follow the Setup section to configure the Ably broadcaster.
4. Create the event that will be broadcast
To send events from Laravel to Ably, create an event file by running the following command in your terminal:
php artisan make:event PublicMessageEvent
This command will create a PublicMessageEvent.php file in the app/Events directory. Replace the content of the files with following:
<?php

namespace App\Events;

use Illuminate\Broadcasting\Channel;
use Illuminate\Broadcasting\InteractsWithSockets;
use Illuminate\Contracts\Broadcasting\ShouldBroadcast;
use Illuminate\Foundation\Events\Dispatchable;
use Illuminate\Queue\SerializesModels;

class PublicMessageEvent implements ShouldBroadcast
{
    public $channelName;
    public $message;

    use Dispatchable, InteractsWithSockets, SerializesModels;

    /**
     * Create a new event instance.
     *
     * @return void
     */
    public function __construct($channelName, $message)
    {
        $this->channelName = $channelName;
        $this->message = $message;
    }

    /**
     * Get the channels the event should broadcast on.
     * https://laravel.com/docs/broadcasting#model-broadcasting-channel-conventions
     *
     * @return \Illuminate\Broadcasting\Channel|array
     */
    public function broadcastOn()
    {
        return [new Channel($this->channelName)];
    }
}
The code above specifies:
- The
PublicMessageEventclass that implements theShouldBroadcastinterface. - The class name, used by default as an event name. This means
eventNamewill bePublicMessageEvent. You can changeeventNameusingbroadcastAs. - The
broadcastOnmethod that is responsible for returning the channel/list of channels on which the event should broadcasted.
5. Add a minimal API route and broadcast
To handle API requests from frontend, open the routes/api.php file and add following route:
Route::post('/public-event', function (Request $request) {
    $channelName = $request->post('channelName');
    $message = $request->post('message');
    broadcast(new PublicMessageEvent( $channelName, $message ));
})->middleware('throttle:60,1'); // 60 requests/minute are allowed.
The code above specifies:
- A new API route to handle POST request from client. This API route will be available at
localhost:8000/api/public-event. - When called, the message is broadcasted to Ably on the given channel, with
eventNameasPublicMessageEvent. - Throttle to 60 requests per minute for each IP address. It will return an error for requests exceeding the given limit. This is mainly to avoid spamming on public channels.
6. (Optional) Verify the code
To check if the code is working correctly so far:
- Restart the server using
php artisan serve. - Attach to channel
public:communityfor new messages using the Ably Dev Console. - Try sending a
POSTrequest to thelocalhost:8000/api/public-eventendpoint using curl, Postman or any other tool withchannelNameandmessagespecified in thePOSTmethod body:
curl --location --request POST 'localhost:8000/api/public-event' \
--header 'Content-Type: application/json' \
--data-raw '{
    "channelName":"public:community",
    "message":"Hi there"
}'
4. Check for this message in the Ably Dev Console under the Channels tab.
Next, let's look at setting up the front end to send and receive messages.
Frontend setup
The following packages need to be installed for proper communication with Laravel and Ably.
- Laravel Echo: This JavaScript library allows clients/users to subscribe to channels and listen to the events sent from ably.
- Axios: This package helps to make HTTP requests from client to
laravel-server.
Install @ably/laravel-echo (wrapper for pluggable lib) and latest version of ably (pluggable lib) using npm.
npm install @ably/laravel-echo ably axios
Initialize Laravel-Echo
Once Echo is installed, you are ready to create a fresh Echo instance in your application's JavaScript. A great place to do this is at the bottom of the resources/js/bootstrap.js file that is included with the Laravel framework. By default, an example Echo configuration is already included in this file; however, the default configuration in the bootstrap.js file is intended for Pusher.
Copy the configuration below to transition your configuration to Ably:
import Echo from '@ably/laravel-echo';

window.Ably = require('ably');

// Create new echo client instance using ably-js client driver.
window.Echo = new Echo({
    broadcaster: 'ably',
});

// Register a callback for listing to connection state change
window.Echo.connector.ably.connection.on((stateChange) => {
    console.log("LOGGER:: Connection event :: ", stateChange);
    if (stateChange.current === 'disconnected' && stateChange.reason?.code === 40142) { // key/token status expired
        console.log("LOGGER:: Connection token expired https://help.ably.io/error/40142");
    }
});
Build the frontend UI
The entire chat interface already lives in resources/js in the repository we're using:
app.js– boots Vue and pulls in Echocomponents/ChatComponent.vue– the main chat screen (rooms, input box, message list)components/MessageComponent.vue– formats each chat bubble
Let's go over the components now:
1. Send a message
Inside ChatComponent.vue, the method broadcastMessageOnPublicChannel() fires whenever you press Enter:
broadcastMessageOnPublicChannel() {
    const message = this.message?.trim();
    if(!message)
        return;
    const publicChannelName = this.getActiveChannel().name;
    const broadcastUrl = window.location.origin + "/api/public-event";
    axios.post(broadcastUrl, { channelName : publicChannelName, message });
    this.message = null;
}
The code above specifies:
publicChannelNameas the active channel.broadcastMessageOnPublicChannel, which sends a message from the client tolaravel-serverat the endpoint/api/public-eventusing axios.axios.post, which sends a HTTPPOSTrequest withchannelNameandmessageas the request body.
2. Receive a message
The listen() helper in the same component wires the browser to Ably:
Echo.channel(channelName)
.subscribed(() => // Do stuff when channel is attached )
.listenToAll(() => // Do stuff when any event is received )
.listen('PublicMessageEvent', (data) => {
    const channel = this.getChannelByName(channelName, 'public');
    this.updateBroadcastNotificationOnUI(channel, data)
})
The code above specifies:
- The public channel, created using
Echo.Channel(channelName). - The method
listenToAll, which registers a handler which gets called for any event received. - The method
listen, which registers a handler for a specificPublicMessageEventand updates the received message on the UI once called.
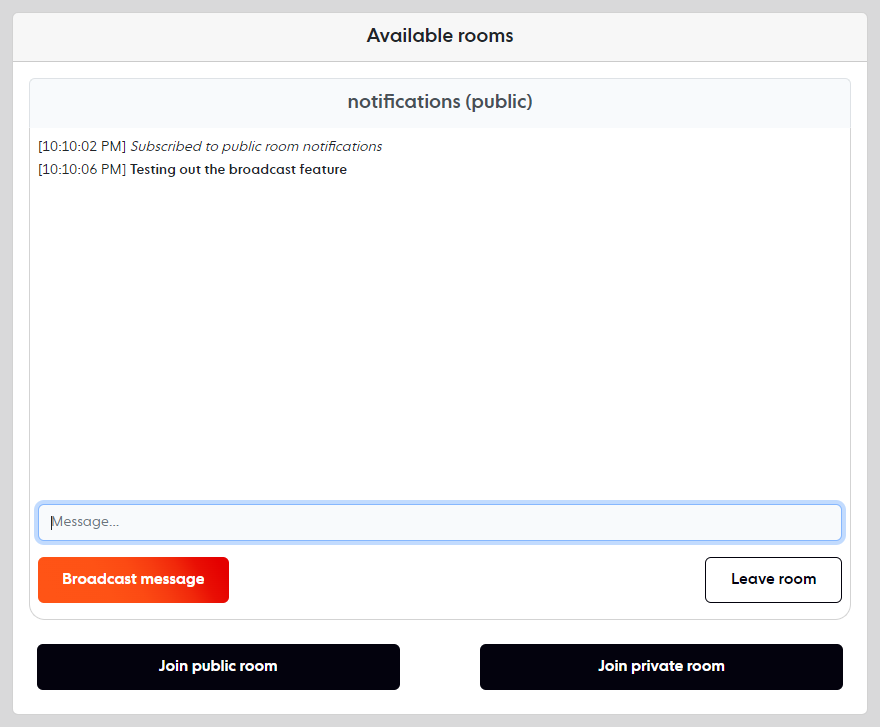
Test the chat app
To test your chat app, open the localhost:8000 in at least two browser tabs. Join the public room in each tab and broadcast messages to each other. For more information, refer to Guest Mode under the Usage Section.
Conclusion
That’s it! In this tutorial, you learned how to create a realtime chat app using Laravel and Ably for guest users.
We would love to hear about how you plan to use Ably in your applications. Join our Discord server to share your ideas, or reach out to us on X and LinkedIn!
Further reading
- Visualize your commits in realtime with Ably and GitHub webhooks
- Ably + React Hooks NPM package now out
- Building a realtime chat app with Next.js and Vercel
- WebSockets and Node.js - testing WS and SockJS by building a web app
- Build your own live chat web component with Ably and AWS
- Building a realtime SMS voting app