WebSockets and Node.js
WebSockets let developers build realtime functionality into their apps by enabling the sending off small chunks of data over a single persistent connection, in both directions. Using WebSockets in the front end is fairly straightforward, as there is a WebSocket API built into all modern browsers. To use them on the server, a backend application is required.
This is where Node.js comes in. Node.js can maintain many hundreds of WebSockets connections simultaneously. Unlike JavaScript in the browser, Node.js does not have a WebSocket solution as-is to handle connection upgrades, fallbacks, header settings, and everything else required to establish and maintain a WebSocket connection. This is why developers commonly use libraries to manage this for them. There are a few common WebSocket server libraries that make managing WebSockets easier – notably WS, SockJS and Socket.IO.
In this post, we will look at implementing both the WS and SockJS libraries with Node.js as the WebSocket server. We'll look at how each library is used, and why you might choose it for your project. We will then talk about the reasons one might choose a third-party service to manage their WebSockets connections.
WS: Introduction and demo
What is WS?
WS is a library for creating WebSocket servers for Node.js. It's quite low level: you listen to incoming connection requests and respond to raw messages as either strings or byte buffers. Since WebSockets are natively supported in all modern browsers, it is possible to work with WS on the server and then the browser's WebSocket API on the client.
In order to demonstrate how to set up WebSockets with Node and WS, we have built a demo app that shares users' cursor positions in realtime.
Building an interactive cursor position-sharing demo with WS
This is a demo to create a colored cursor icon for every connected user. When they move their mouse around, their cursor icon moves on the screen and is also shown as moving on the screen of every connected user. This happens in realtime, as the mouse is being moved.
The WebSocket Server
First, we’ll need to initialize a Node.js project. In the command line in the folder you want your project to exist, run the following:
npm init
For this you can go with the defaults, but set the entry point to be server.js.
You will also need the ‘ws’ npm module added as a dependency:
npm install ws
Next, you’ll need to create ‘server.js’ to hold our server code. You will need to require the WS npm library and use the WebSocket.Server method to create a new WebSocket server on port 7071 (no significance, any port is fine!).
Note: For brevity’s sake we call it wss in our code. Any resemblance to WebSocket Secure (often referred to as WSS) is a coincidence.
const WebSocket = require('ws');
const wss = new WebSocket.Server({ port: 7071 });
Next, create a Map to store a client's metadata (any data we wish to associate with a WebSocket client):
const clients = new Map();
Whenever a new WebSocket client connects to the server, there will be an event emitted called connection. Subscribe to the WSS connection event using the wss.on function, providing the below callback function.
wss.on('connection', (ws) => {
    const id = uuidv4();
    const color = Math.floor(Math.random() * 360);
    const metadata = { id, color };

    clients.set(ws, metadata);
Every time a client connects, we generate a new unique ID, which is used to identify them. Clients are also assigned a cursor color by using Math.random(); this generates a number between 0 and 360, which corresponds to the hue value of an HSV color. The ID and cursor color are then added to an object that we'll call metadata, and we're using the Map to associate them with our ws WebSocket instance.
The map is a dictionary – we can retrieve this metadata by calling get and providing a WebSocket connection instance later on.
Using the newly connected WebSocket connection instance, we subscribe to that instance's message event, and provide a callback function that will be triggered whenever this specific client sends a message to the server.
ws.on('message', (messageAsString) => {
Note: This event is on the WebSocket connection instance (ws) itself, and not on the WebSocketServer instance (wss).
The message will be a String, however, we want to interpret messages between our server and clients as JSON objects. Whenever our server receives a message, we use JSON.parse to get the message contents and load our client metadata for this socket from our Map using clients.get(ws).
We're going to add our two metadata properties to the message as sender and color keys respectively:
      const message = JSON.parse(messageAsString);
      const metadata = clients.get(ws);

      message.sender = metadata.id;
      message.color = metadata.color;
Then we stringify our message again, and send it out to every connected client, so that every client can receive the message from the sending client.
     const outbound = JSON.stringify(message);

      [...clients.keys()].forEach((client) => {
        client.send(outbound);
      });
    });
Finally, when a client closes its connection, we remove its metadata from our Map.
   ws.on("close", () => {
      clients.delete(ws);
    });
});
At the bottom we have a function to generate a unique ID, which we used earlier.
function uuidv4() {
  return 'xxxxxxxx-xxxx-4xxx-yxxx-xxxxxxxxxxxx'.replace(/[xy]/g, function(c) {
    var r = Math.random() * 16 | 0, v = c == 'x' ? r : (r & 0x3 | 0x8);
    return v.toString(16);
  });
}
console.log("wss up");
This server implementation multicasts, sending any message it has received to all connected clients.
We now need to write some client-side code to connect to the WebSocket server, and transmit the user’s cursor position as it moves.
WebSockets on the client side
We're going to start with some standard HTML5 boilerplate in a new HTML file, which you can call index.html:
<!DOCTYPE html>
<html lang="en">
<head>
    <meta charset="UTF-8">
    <meta http-equiv="X-UA-Compatible" content="IE=edge">
    <meta name="viewport" content="width=device-width, initial-scale=1.0">
    <title>Document</title>
Next we add a reference to a style sheet, and an index.js file that we're adding as an ES Module (using type="module"). You can find the contents of ‘style.css’ in this demo’s GitHub repo.
    <link rel="stylesheet" href="style.css">
    <script src="index.js" type="module"></script>
</head>
The body contains a single HTML template which contains an SVG image of a cursor. We're going to use JavaScript to clone this template whenever a new user connects to our server.
<body id="box">
    <template id="cursor">
        <svg viewBox="0 0 16.3 24.7" class="cursor">
            <path stroke="#000" stroke-linecap="round" stroke-linejoin="round" stroke-miterlimit="10" d="M15.6 15.6L.6.6v20.5l4.6-4.5 3.2 7.5 3.4-1.3-3-7.2z" />
        </svg>
    </template>
</body>
</html>
Next, we need to use JavaScript to connect to the WebSocket Server. Create a new file, index.js, to hold our JavaScript code, and add the following:
(async function() {
    const ws = await connectToServer();
We call the connectToServer() function, which resolves a promise containing the connected WebSocket. We will define this function later.
Once connected, we add a handler for onmousemove to the document.body. The messageBody is very simple: it consists of the current clientX and clientY properties from the mouse movement event (the horizontal and vertical coordinates of the cursor within the application's viewport).
We stringify this object, and send it through our now connected ws WebSocket connection instance:
    document.body.onmousemove = (evt) => {
        const messageBody = { x: evt.clientX, y: evt.clientY };
        ws.send(JSON.stringify(messageBody));
    };
Now we need to add another handler, this time for an onmessage event to the WebSocket instance ws. Remember that every time the WebSocketServer receives a message, it'll forward it to all connected clients.
You might notice that the syntax here is slightly different from the server-side WebSocket code. That's because we're using the browser’s native WebSocket class, rather than the npm library ws.
    ws.onmessage = (webSocketMessage) => {
        const messageBody = JSON.parse(webSocketMessage.data);
        const cursor = getOrCreateCursorFor(messageBody);
        cursor.style.transform = `translate(${messageBody.x}px, ${messageBody.y}px)`;
    };
When we receive a message over the WebSocket, we parse the data property of the message, which contains the stringified data that the onmousemove handler sent to the WebSocketServer, along with the additional sender and color properties that the server side code adds to the message.
Using the parsed messageBody, we call getOrCreateCursorFor. This function returns an HTML element that is part of the DOM, and we'll look at how it works later.
We then use the x and y values from the messageBody to adjust the cursor position using a CSS transform.
Our code relies on two utility functions. The first is connectToServer which opens a connection to our WebSocketServer and then returns a Promise that resolves when the WebSockets readystate property is 1 - CONNECTED.
This means that we can just await this function, and we'll know that we have a connected and working WebSocket connection.
    async function connectToServer() {
        const ws = new WebSocket('ws://localhost:7071/ws');
        return new Promise((resolve, reject) => {
            const timer = setInterval(() => {
                if(ws.readyState === 1) {
                    clearInterval(timer)
                    resolve(ws);
                }
            }, 10);
        });
    }
We also use our getOrCreateCursorFor function.
This function first attempts to find any existing element with the HTML data attribute data-sender where the value is the same as the sender property in our message. If it finds one, we know that we've already created a cursor for this user, and we just need to return it so the calling code can adjust its position.
    function getOrCreateCursorFor(messageBody) {
        const sender = messageBody.sender;
        const existing = document.querySelector(`[data-sender='${sender}']`);
        if (existing) {
            return existing;
        }
If we can't find an existing element, we clone our HTML template, add the data-attribute with the current sender ID to it, and append it to the document.body before returning it.
        const template = document.getElementById('cursor');
        const cursor = template.content.firstElementChild.cloneNode(true);
        const svgPath = cursor.getElementsByTagName('path')[0];

        cursor.setAttribute("data-sender", sender);
        svgPath.setAttribute('fill', `hsl(${messageBody.color}, 50%, 50%)`);
        document.body.appendChild(cursor);

        return cursor;
    }

})();
Now when you run the web application, each user viewing the page will have a cursor that appears on everyone's screens because we are sending the data to all the clients using WebSockets.
Running the demo
If you’ve been following along with the tutorial, then you can run:
> npm install
> npm run start
If not, you can clone a working version of the demo
> git clone https://github.com/ably-labs/WebSockets-cursor-sharing.git
> npm install
> npm run start
This demo includes two applications: a web app that we serve through Snowpack, and a Node.js web server. The NPM start task will spin up both the API and the web server.
This should look as follows:
However, if you are running the demo in a browser that does not support WebSockets (eg IE9 or below), or if you are restricted by particularly tight corporate proxies, you will get an error saying that the browser can’t establish a connection:
This is because the WS library offers no fallback transfer protocols if WebSockets are unavailable. If this is a requirement for your project, or you want to have a higher level of reliability of delivery for your messages, then you will need a library that offers multiple transfer protocols, such as SockJS.
SockJS : Introduction and demo
What is SockJS?
SockJS is a library that mimics the native WebSockets API. Additionally, it will fall back to HTTP whenever a WebSocket fails to connect, or if the browser being used doesn’t support WebSockets. Like WS, SockJS requires a server counterpart; its maintainers provide both a JavaScript client library and a Node.js server library.
Using SockJS in the client is similar to the native WebSockets API, with only a few minor differences. We can swap out WS in the demo built previously and use SockJS instead to include fallback support.
Updating the Interactive Cursor Position Sharing Demo to use SockJS
To use SockJS in the client, we first need to load the SockJS JavaScript library from their CDN. In the head of the index.html document we built earlier, add the following line above the script include of index.js:
<script src="https://cdn.jsdelivr.net/npm/sockjs-client@1/dist/sockjs.min.js"></script>
In the index.js file, we then update the JavaScript to use SockJS. Instead of the WebSocket object, we’ll now use a SockJS object. Inside the connectToServer function, we’ll establish the connection with the SockJS server:
const ws = new SockJS('http://localhost:7071/ws');
Note: SockJS requires a prefix path on the server URL. The rest of the index.js file requires no change.
Now to update the server.js file (or if you’re using the snowpack version on GitHub, api/index.js file) to make our server use SockJS. This means changing the names of a few event hooks, but the API is very similar to WS.
First, we need to install sockjs-node. In your terminal run:
> npm install sockjs
Then we need to require the sockjs module and the built-in HTTP module from Node. Delete the line that requires ws and replace it with the following:
const http = require('http');
const sockjs = require('sockjs');
We then change the declaration of wss to become:
const wss = sockjs.createServer();
At the very bottom of this file, we’ll create the HTTPS server and add the SockJS HTTP handlers:
const server = http.createServer();
wss.installHandlers(server, {prefix: '/ws'});
server.listen(7071, '0.0.0.0');
We map the handlers to a prefix supplied in a configuration object ('/ws'). We tell the HTTP server to listen on port 7071 (arbitrarily chosen) on all the network interfaces on the machine.
The final job is to update the event names to work with SockJS:
ws.on('message',                      will become      ws.on('data',
client.send(outbound);          will become      client.write(outbound);
And that’s it, the demo will now run with WebSockets where they are supported; and where they aren’t, it will degrade to use comet long polling over HTTP. This latter fallback option will show a slightly less smooth cursor movement, but it is more functional than no connection at all!
Running the demo
If you’ve been following along with the tutorial, then you can run:
> npm install
> npm run start
If not, you can clone a working version of the demo:
> git clone -b sockjs https://github.com/ably-labs/WebSockets-cursor-sharing.git
> npm install
> npm run start
This demo includes two applications: a web app that we serve through Snowpack, and a Node.js web server. The NPM start task spins up both the API and the web server.
Scaling up the number of connections
You might notice that in both examples we're storing the state in the Node.js WebSocketServer – there is a Map that keeps track of connected WebSockets and their associated metadata. This means that for the solution to work, and for every user to see one another, they have to be connected to the exact same WebSocketServer.
The number of active users you can support is thus directly related to how much hardware your server has. Node.js is pretty good at managing concurrency, but once you reach a few hundred to a few thousand users, you're going to need to scale your hardware vertically to keep all the users in sync.
Scaling vertically is often an expensive proposition, and you'll always be faced with a performance ceiling of the most powerful piece of hardware you can procure. (It’s also not elastic and you have to do it ahead of time.) Once you've run out of vertical scaling options, you'll be forced to consider horizontal scaling – and horizontally scaling WebSockets is significantly more difficult.
What makes WebSockets hard to scale?
To scale regular application servers that don't require persistent connections, the standard approach is to introduce a load balancer in front of them. Load balancers route traffic to whichever node is currently available (either by measuring node performance, or using a round-robin system).
WebSockets are fundamentally harder to scale, because connections to your WebSocketServer need to be persistent. And even once you've scaled out your WebSocketServer nodes both vertically and horizontally, you also need to provide a solution for sharing data between the nodes. Any state needs to be stored out-of-process – this usually involves using something like Redis, or a traditional database, to ensure that all the nodes have the same view of state.
This is just the tip of the iceberg, so if you’re interested in what additional issues you need to be aware of as you scale up your realtime applications, you can read more on the challenges of scaling WebSockets here.
Using Ably to Scale WebSockets
Ably is a realtime PaaS that gives you the tools and infrastructure to build your own live experiences. on top of Ably saves you time and resources as your engineering team won’t need to architect, build, and maintain the complex global realtime infrastructure that live experiences require. Ably handles the complexities of sustaining up to millions of connections, with plenty more useful tooling and functionality.
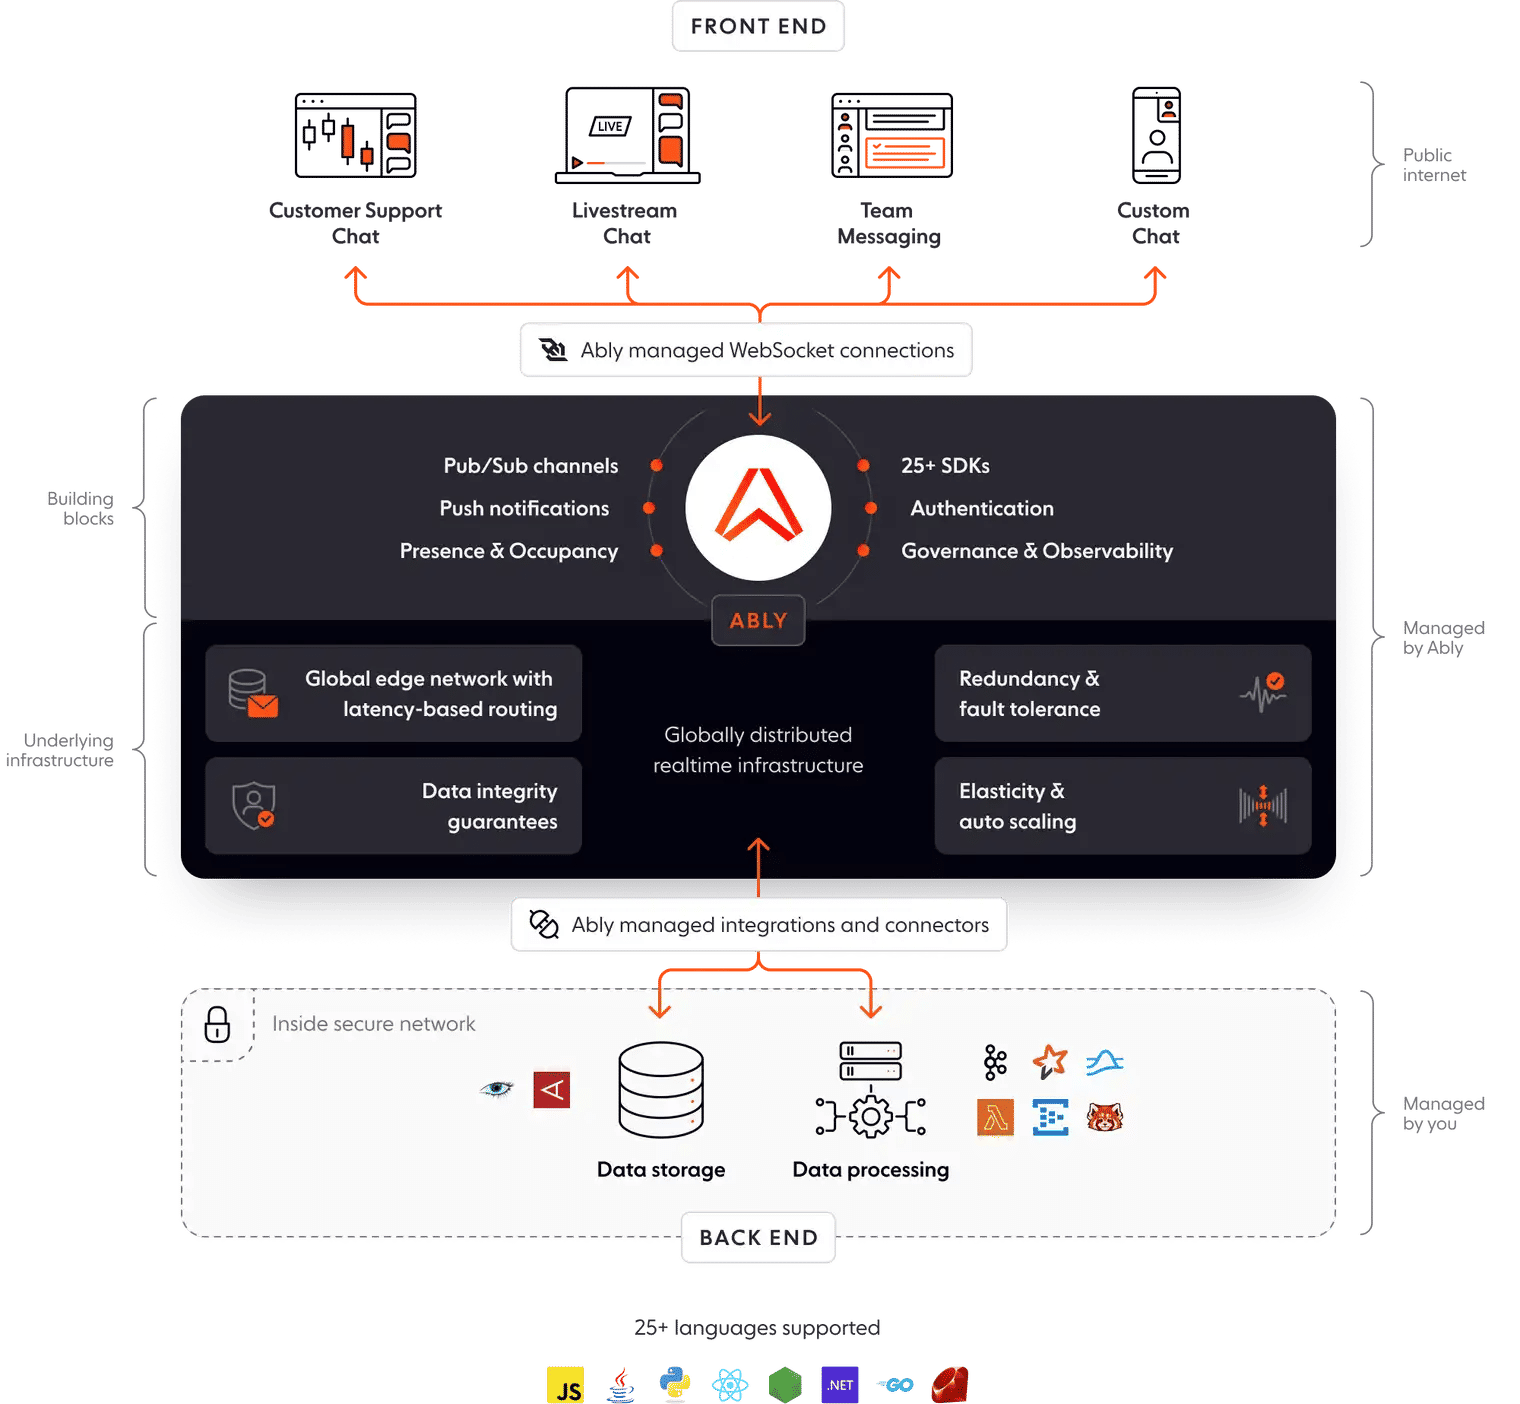
Specifically, working with Ably will give you:
- Predictable low latencies: Ably’s global edge network delivers video and other realtime data efficiently and with a median latency of less than 50 ms, enabling the predictability and stability live commerce demands.
- Highly scalable, highly available infrastructure: Global brands such as Toyota, BlueJeans, and Hubspot have proven that Ably’s infrastructure scale effortlessly and reliably to millions of concurrent users.
- Integrations with common languages and frameworks: With client libraries and tailored documentation for more than 25 languages and frameworks, Ably is ready to integrate with your tech stack.
- Reduced build and maintenance costs: The savings of using Ably are significant, with a typical 21% lower cost and up to $1 million saved in year one.
You can try Ably free to see how our realtime PaaS makes it easier and more cost-effective to build your live commerce platform.