Here at Ably one of our most recent additions has been to introduce support for Unity within our .NET SDK. This has been exciting for us: multiplayer functionalities are at the core of so many games these days, and we’re keen to better support and enable developers in creating these amazing experiences.
Introduction
In order to best demonstrate the usage of Ably in Unity, it made sense to put it into action, going through the core considerations required, the benefits, and the specific implementation details. Rather than creating an entire game from the ground up however, we got in touch with raywenderlich to see if we could extend their Tower Defense tutorial series with multiplayer functionality. It’s an incredibly detailed and informative tutorial of a tower defense game, and I strongly recommend checking it out to fully understand the context of this blog post.
In this tutorial, we take that core single player game, and extend it with multiplayer features to allow for any number of people to participate together in placing monsters (turrets) and watching the ensuing carnage as enemies swarm in. We’ll be digging into the issues you’ll likely encounter when creating a multiplayer game, and going through some design patterns and implementations to handle these issues.
Get started
Firstly, you’ll need to have Unity installed. The best way to do this is to get the Unity Hub from the Unity website, and then from that install the most recent version of Unity. This was originally created for 2020.3.28f1.
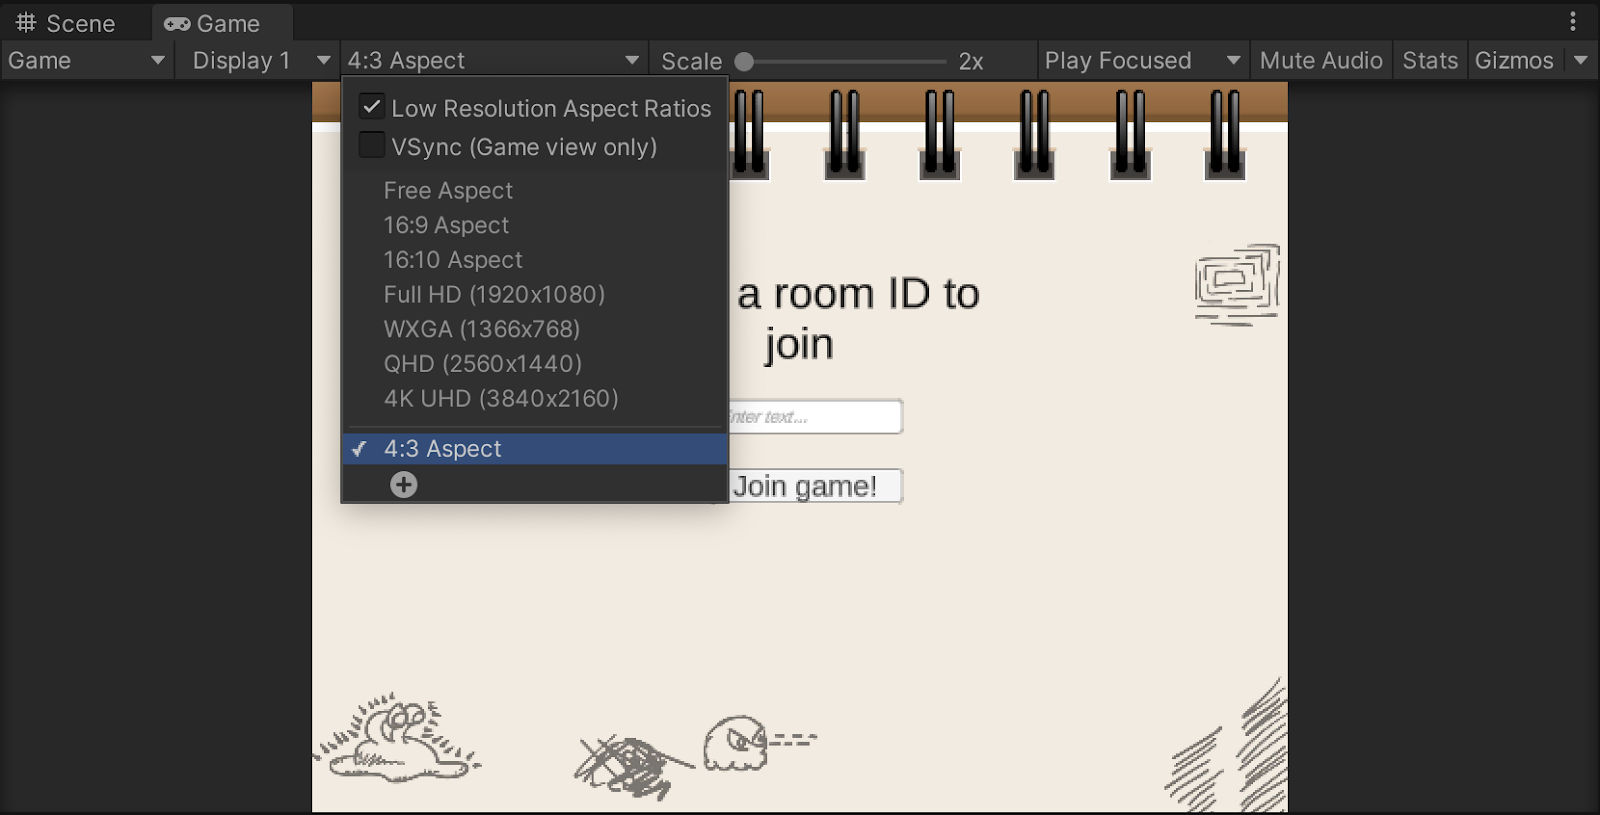
With Unity in hand, download our base project from GitHub on the starting-point branch, then load it up in Unity. Before starting anything, you’ll want to adjust the dimensions of the game window so that it renders correctly. In the main viewer click the ‘Game’ tab at the top, and then change the aspect ratio to 4:3. If you don't have a 4:3 Aspect ratio available, you can click the + button to create it.
Creating a Lobby
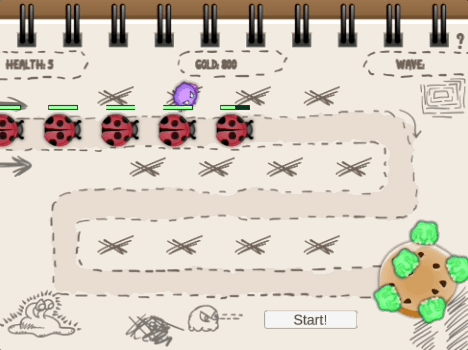
One key thing is that as this game will be multiplayer, we will need a way for players to uniquely identify instances of the game to join, play, and watch. To do this, we’ll create a Scene prior to the actual game in which players can input a unique ID for a game they’d like to join, and then click a button to load the game.
In the base template, there’s already a Scene added in Assets/Scenes called Lobby. This is a simple Scene with a text input to allow for a player to type the game they wish to join (as long as all players input the same ID they’ll enter the same game), and a button to submit this.
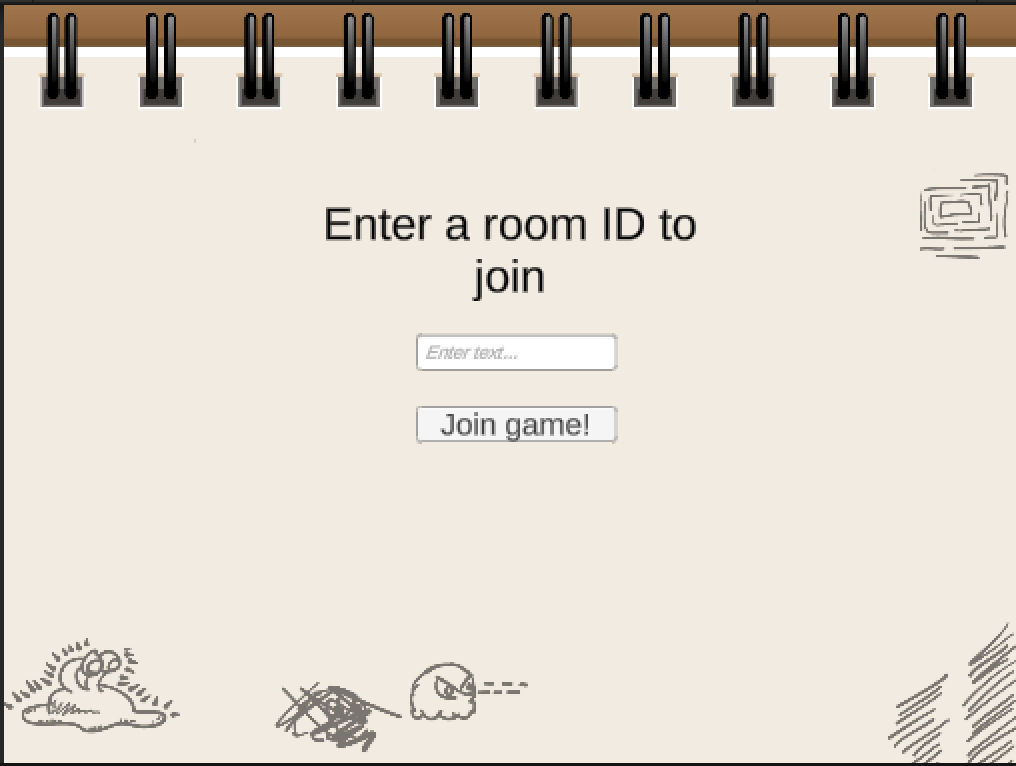
Currently, this button is non-functional however. What we want is for it to run a script, which will load the actual game scene, and convey the unique game’s ID inputted here for the game to use.
Persisting the Game State
To handle the game ID persistence we can create a new C# script which we’ll call StateManagerBehaviour. In this script place the following code:
using UnityEngine;

public class StateManagerBehaviour : MonoBehaviour
{
    public static StateManagerBehaviour Instance;
    public string GameID;

    void Awake()
    {
        if (Instance == null)
        {
            Instance = this;
            DontDestroyOnLoad(gameObject);
        }
        else if (Instance != null)
        {
            Destroy(this.gameObject);
        }
    }
}
Here we have a script that will stop whatever it is attached to from being destroyed between Scenes. This means that any variables set, such as the current game’s ID, can be placed here and persisted.
Within the Lobby Scene, create an Empty GameObject and call it StateManager. Attach the StateManagerBehaviour script to it. This object and the script attached will now persist between scenes!
Changing scenes
Now that we can persist a game ID, we need to make the submit button functional. The button will need to:
- Update the value of GameID in the StateManagerBehaviour to match what is put into the input box
- Load the game’s scene
To do this, create a new script attached to the button called JoinGame, and add the following code to it:
using UnityEngine;
using UnityEngine.SceneManagement;
using UnityEngine.UI;
using TMPro;

public class JoinGame : MonoBehaviour
{
    [SerializeField]
    private Button startButton;

    [SerializeField]
    public TMP_InputField gameIDField;

    void Start()
    {
        startButton.onClick.AddListener(() => {
            if (gameIDField.text == "") return;
            StateManagerBehaviour.Instance.GameID = gameIDField.text;
            SceneManager.LoadScene("GameScene");
        });
    }
}
Select the JoinGameButton in the Hierarchy, and drag and drop the InputField into the Game ID field of the JoinGame script, as well as the JoinGameButton itself into the Start Button field.
The button should now be functional! This should now mean we can load up the game scene from this Lobby scene when we build the project!
Before testing it however we’ll need to check that both scenes are added to our build settings. Go to File -> Build Settings, and add both scenes to the Scenes in Build section.
With that, you can try running the Lobby scene, and if all is well you should be able to input a value for the game ID, and hit the button to load in the Tower Defense game!
Adding in multiplayer capabilities
With the lobby added, we can start looking at how to include multiplayer functionality. As the core user interaction is the placement of monsters to defeat the hordes of enemies, we’ll look at communicating that first between clients.
For our communication layer, we’ll be using Ably. Ably’s a realtime pub/sub platform, which is an incredibly powerful paradigm for any form of fan-in or fan-out messaging. From the game, each client will send messages to one of Ably’s servers, and other clients in the game who have subscribed for updates will receive these messages.
To use Ably you’ll need to sign up for a free account. Once you have the account, you can get an API key from your account dashboard, which will allow clients to make use of Ably programmatically. For this section, we’ll be using the API key within our code just to get going, but you should eventually replace it with Token Authentication, which ensures users only ever have access to short-lived tokens which you have full control over in terms of permissions granted.
Getting the Ably Unity Package
With an account created and an API key in hand, we now need to get one of the client libraries Ably provides in order to easily interact with the system. Ably provides a Unity client library as part of their C# library. If you go to the Ably C# GitHub repository, you can download the most recent version of the Unity Package from the releases.
The most up-to-date version of the Ably Unity package can be downloaded here.
With the unitypackage in hand, we need to import it into our Unity project. In the top menus, select Assets -> Import Package -> Custom Package…, and select the unitypackage you just downloaded. In the options, untick the JsonNet items if they're present. If you forget to at this step, just delete the folder that’ll appear in the UnityPackages directory.
If you get errors about the JsonNet being the wrong version, go to Edit - Project Settings. In here go to the Player tab, and then under ‘Configuration’, ‘Assembly Version Validation’ untick it.
Sharing turret upgrades between clients
With the Ably library added, we can now use it to share the addition of monsters between clients. As we’ll be using Ably in multiple scripts, let’s create an object to hold a single instance of the Ably client library for us. In the GameScene scene, add an empty game object called AblyManager, and create a script to attach to it called AblyManagerBehaviour. Within this script, add the following:
using IO.Ably;
using IO.Ably.Realtime;
using UnityEngine;

public class AblyManagerBehaviour : MonoBehaviour
{
    private AblyRealtime realtime = new AblyRealtime(
        new ClientOptions { Key = "INSERT_ABLY_API_KEY_HERE" }
    );
    public IRealtimeChannel gameChannel;

    // Start is called before the first frame update
    void Awake()
    {
        gameChannel = realtime.Channels.Get(StateManagerBehaviour.Instance.GameID);
    }
}
Make sure to replace the INSERT_ABLY_API_KEY_HERE text with the Ably API key you got earlier from your account dashboard.
Here, we are connecting to Ably with the API key to authenticate us and then instantiating an Ably Channel. Ably Channels are the means by which clients can indicate the clients they wish to communicate with over Ably. They’re uniquely identified by a name, in this case, specified as StateManagerBehaviour.Instance.GameID.
We’re using the state object we specified earlier to ensure that only clients who wish to participate in a certain game, identified by the GameID, will be using the Ably Channel.
Sending and receiving messages
The Ably instance we’ve instantiated will be able to be used by our other scripts to communicate between clients. Open up the PlaceMonster script, and add in the following to the top of the class:
private AblyManagerBehaviour ablyManager;
We can instantiate this reference to the AblyManager within the Start function:
ablyManager = GameObject.Find("AblyManager").GetComponent<AblyManagerBehaviour>();
With this reference to the AblyManager, we can now make use of its Ably Channel. What we need is to send a message whenever a player clicks to add or upgrade a monster, so that clients will be able to subscribe and represent these actions themselves.
Publish player input
To do this, we’ll need to change up the process of adding a monster. Instead of adding it as part of a click, we will want the click to send a message. Replace the contents of the onClick function with the following:
void OnMouseUp()
{
    if (CanPlaceMonster())
    {
        ablyManager.gameChannel.Publish("spot:" + name, “0”);
    }
    else if (CanUpgradeMonster())
    {
        MonsterData monsterData = monster.GetComponent<MonsterData>();
        Debug.Log(monsterData.levels.IndexOf(monsterData.getNextLevel()));
        ablyManager.gameChannel.Publish("spot:" + name, monsterData.levels.IndexOf(monsterData.getNextLevel()).ToString());
    }
}
Here we are checking on the clientside if we can actually perform the action we’re attempting, in order to avoid sending unnecessary messages. Assuming we can, we send a message to the Ably Channel, with a name field corresponding to the spot we’re interacting with, and a data field containing the level we’re wanting to set the monster to. The name field is useful as the Ably Client library can filter incoming messages by name, which will make it easier to only handle messages intended for each monster in each monster’s script.
Subscribe to player input
With the actions being sent to the Ably Channel, we also need to have our clients subscribe to receive these messages. To hold messages as they arrived, we’ll be using a queue.
The main reason for doing this over just handling messages as they come in is due to the fact the Ably Subscribe functionality will make use of a thread to actively listen for messages. This means that when a message is received, the handling of that message would occur on this new thread rather than the main thread, which means we won’t have access to any of Unity’s code paths or components from it. By using a queue, we can handle the messages we receive from the main thread at a later time from the Update function.
Let’s add a queue at the top of the class:
private Queue actions = new Queue();
Now we have a queue to hold our messages in, let’s add a subscribe function to listen to the Ably Channel within the Start function, just after the ablyManager allocation:
ablyManager.gameChannel.Subscribe("spot:" + name, message =>
{
    // Need to uniquely identify actions to avoid unintentional upgrade when trying to place, etc.
    actions.Enqueue(message.Data);
});
Here we’re subscribing to the Ably Channel, and only acting on messages with the name corresponding to “spot:” + name. This means we’ll only be running adding messages to the queue if they’re intended for this monster with this monster’s name.
Now that we should be receiving messages, we need to act upon them. Within the Update function we can start to go through the queue:
// Update is called once per frame
void Update()
{
    if (actions.Count == 0) return;
    PlaceOrUpgradeMonster(int.Parse((string)actions.Dequeue()));
}
Here we’re checking if the queue has any actions to be performed, and if so we’ll be calling a new function, PlaceOrUpgradeMonster, passing the level of monster that’s been requested for the location. This is important due to the fact we may have multiple clients requesting to upgrade the same tile at the same time, so we want to ensure that the intended level of upgrade is considered to avoid unintentional further upgrades to a tile.
For the contents of PlaceOrUpgradeMonster, we can just slightly adjust the old contents of OnMouseUp, taking into consideration the intended level of upgrade and if it’s still possible or not.
private void PlaceOrUpgradeMonster(int index)
{
    if (CanPlaceMonster() && index == 0)
    {
        monster = (GameObject)Instantiate(monsterPrefab, transform.position, Quaternion.identity);
        AudioSource audioSource = gameObject.GetComponent<AudioSource>();
        audioSource.PlayOneShot(audioSource.clip);

        gameManager.Gold -= monster.GetComponent<MonsterData>().CurrentLevel.cost;
    }
    else if (CanUpgradeMonster())
    {
        MonsterData monsterData = monster.GetComponent<MonsterData>();
        if (monsterData.getNextLevel() == monsterData.levels[index])
        {
            monster.GetComponent<MonsterData>().increaseLevel();
            AudioSource audioSource = gameObject.GetComponent<AudioSource>();
            audioSource.PlayOneShot(audioSource.clip);

            gameManager.Gold -= monster.GetComponent<MonsterData>().CurrentLevel.cost;
        }
    }
}
This is a great moment to run the game and see if it works! Hopefully with a single client the game should work much the same as before, where a click on a tile places a monster. If you have two clients running however using the same game ID, the actions of each client should now (hopefully) affect the other client!
Synchronizing clients
One useful feature of Ably is that all messages in a channel are guaranteed to be ordered the same way for all subscribers, which means that you can be certain that all clients will receive the same messages in the same order, ensuring you won’t have any desynchronization due to that.
However, there are still various other synchronization issues that we need to address:
- How do we ensure that all clients start the game at the same time
- How do we handle latency, which can result in messages being received at different times for different clients
Synchronizing start time
Ensuring that all the players start at the same time is a fairly easy one to handle; we can add a button to the UI which players can use to start the game. This will send a message to all clients, indicating to start the game. Each message sent through Ably will also have a timestamp attached to it, which can be used to ensure all clients are in agreement as to when a game should have started.
Add a button to the UI of the game, and call it ‘StartButton’. Edit the text element attached to it to have the text ‘Start!’.
As this will be an aspect game’s flow, add the following to the top of the AblyManagerBehaviour script:
public bool started = false;
public Button startButton;
public void StartGame()
{
    startButton.enabled = false;
    started = true;
}
Within the Inspector of the button we created, select the AblyManager within the On Click section of the Inspector. From there, go to the AblyManagerBehaviour dropdown for the function dropdown, and select the StartGame function. The button should now on click set paused to false.
We will now need to check if the game has started within the SpawnEnemy script. Firstly, add the Within the SpawnEnemy script’s Update function, add the following to the top:
if (!ablyManager.started)
{
    // This doesn't account for any time previously passed
    lastSpawnTime = Time.time;
    return;
}
If the game hasn’t started yet, we simply keep the lastSpawnTime set to the current time to avoid enemies eventually instantly spawning, and then skip trying to place any enemies.
We also need to instantiate the ablyManager within SpawnEnemy, so at the top add the following line:
private AblyManagerBehaviour ablyManager;
Next, replace the contents of Start:
void Start()
{
    lastSpawnTime = Time.time;
    gameManager = GameObject.Find("GameManager").GetComponent<GameManagerBehaviour>();
    ablyManager = GameObject.Find("AblyManager").GetComponent<AblyManagerBehaviour>();
}
If you run the game now, locally the game should only start once the player clicks the start button. We still need to share this start action with all other players however.
To do this, let’s create a function within the AblyManagerBehaviour class which will send a message when the button is clicked, and another function which will call the StartGame function once a client receives the message:
public void SendStartGame()
{
    gameChannel.Publish("start", "");
}
Within the Awake function in the AblyManagerBehaviour we can then add a subscribe function to listen for this message, much as we did in the PlaceMonster class:
gameChannel.Subscribe("start", (msg) =>
{
    StartGame();
});
If you now change the StartButton’s On Click Behaviour to use this new SendStartGame function, you should hopefully now have the same Behaviour as you had previously locally, but all clients should now react to any client pressing the button.
Ensuring synchronization is maintained
Whilst the above indicator to start is quite easy to set up, ensuring that all clients remain synchronized for the entire game is a much harder challenge. There are a few base scenarios you need to consider:
- What if a client lags/freezes, resulting in it falling behind in terms of gameplay?
- What if a message is delayed in reaching some clients, to the point it’ll result in different outcomes between clients?
Both these scenarios can result in different outcomes in a game between clients, which isn’t something that’s acceptable. There are a few ways to overcome these issues.
Full state communication
Imagine you have a central server which is responsible for running the ‘true’ version of the game, and is trusted as the defacto truth of what happens. Whenever something happens on it, it can communicate the new state of the game, such as where enemies are, where monsters are, and the health of both the cookie and the enemies.
If a client were to fall behind, it can then simply check what the most recent version of the state is that was communicated, and adjust the local representation of the game to match.
There will be small periods of time where clients can fall out of sync, but the moment the current state of the game is communicated again, all clients can quickly adjust to the current state and resync. This means that even if there’s latencies in communication resulting in some ‘sync’ states reaching clients out of sync, they’ll simply be out of sync for a small period, but this won’t impact what they can do in the game, nor the final outcome all clients will see, as that’s determined and communicated by the server.
This is however fairly heavy on the communication side of things in comparison to our current approach of only sending messages for players actually interacting with the game.
Fast-forward and delayed inputs
One of the simplest things we can do to ensure a fairly reliable synchronized state is a combination of 2 techniques.
Firstly, if a client falls behind in terms of actions due to their machine freezing momentarily say, it can continue to simulate the game as normal up until the point it receives messages which are actions from other players. These actions will have a timestamp attached to them, indicating when the message was received by Ably. If we compare the timestamps of these messages to the timestamp attached to initial ‘start’ message, we can see how much time has passed from our defacto source of truth, the Ably servers, which is shared by all clients.
If we’re tracking how many times the Update function has been called since the start of the game, we can interpret how far behind the local game is behind the ‘true’ state of the game. If we then loop through the ticks of the game rapidly up until we’re back to the ‘true’ state, applying the updates received by messages at the appropriate times, we should then have our delayed client back in sync.
To handle the likelihood of a message arriving with a delay for some users, we can handle this for the vast majority of cases by simply introducing a delay in the game itself on placing monsteer down and them becoming operational (aka able to fire). If we make this say 1 second, then it doesn’t matter if a monster’s placement message is delayed by any time up to 1 second in reaching a client, as all the other clients will already be waiting for 1 second from the timestamp attached to the message before allowing the monster to shoot, so they’ll all start interacting with enemies at the same time.
This isn’t perfect, and if you wanted to ensure for any amount of delay that clients can maintain synchronization you’d need to implement some form of rewind mechanism to play back through actions from the last ‘synced’ point in time, storing the exact state of the game at these moments locally to play on from implementing ‘delayed’ actions at the correct times to ensure they’ve happened when they should happen. For this blog though, we’ll be going with the above implementation.
Allowing clients to catch up with the current state
The easiest way to allow for clients which have fallen behind the current state to catch up is to make use of the Time.timeScale variable that’s part of Unity, which effects how often Update and FixedUpdate run. We can scale this up when we need a client to catch up to quickly run through events until the client has caught up with the current state, and then returning back to normal speed.
To detect if a client has fallen behind though, we’ll need to start tracking how many ticks have occurred since a game has started locally, and also when according to Ably the game started. Add the following to the AblyManagerBehaviour class to start tracking the number of ticks since starting:
public int ticksSinceStart = 0;

void FixedUpdate()
{
    if (started)
    {
        ticksSinceStart++;
    }
}
With that added, we also can start tracking the start time according to Ably by checking the timestamp attached to the ‘start’ message all the clients receive. Change the StartGame and Awake functions in AblyManagerBehaviour to be the following:
public DateTimeOffset? startTimeAbly;

// Start is called before the first frame update
void Awake()
{
    gameChannel = realtime.Channels.Get(StateManagerBehaviour.Instance.GameID);
    gameChannel.Subscribe("start", (msg) =>
    {
        StartGame(msg.Timestamp);
    });
}

public void StartGame(DateTimeOffset? timestamp)
{
    if (!started) startTimeAbly = timestamp;
    started = true;
}
With this startTimeAbly should contain the timestamp the game started at.
Now that the elapsed ticks are being tracked since the start of the game, in addition to the time according to Ably the game started, we need to start using the timestamps of messages which come in from Ably to the client to determine if our current game state is correct for the elapsed time.
The first thing we need for that is to start passing the timestamp from messages from Ably that come in to the PlaceMonster class to the queue we consume from. Let’s create an object within the PlaceMonster file to represent both the existing level of monster to upgrade to, in addition to the timestamp:
public class PlaceMonsterData
{
    public int monsterID;
    public DateTimeOffset? timestamp;
}
Let’s replace the subscribe call in the Start function in PlaceMonster to use the new structure:
ablyManager.gameChannel.Subscribe("spot:" + name, message =>
{
    PlaceMonsterData pmd = new PlaceMonsterData();
    pmd.monsterID = int.Parse((string)message.Data);
    pmd.timestamp = message.Timestamp;
    actions.Enqueue(pmd);
});
Next, change the Update function to make use of the new data structure:
void Update()
{
    if (actions.Count == 0) return;
    PlaceMonsterData pmd = (PlaceMonsterData) actions.Peek();
    DateTimeOffset? startTime = ablyManager.startTimeAbly;
    DateTimeOffset? msgTime = pmd.timestamp;
    TimeSpan? diffTime = msgTime - startTime;
    int ticksSince = ablyManager.ticksSinceStart;
    float timeFromTicks = ticksSince * (1000 * Time.fixedDeltaTime);

    if (!diffTime.HasValue)
    {
        PlaceOrUpgradeMonster(pmd.monsterID);
        return;
    }

    if (timeFromTicks < diffTime.Value.TotalMilliseconds)
    {
        Time.timeScale = 20;
        return;
    }
    else
    {
        Time.timeScale = 1;
        actions.Dequeue();
        PlaceOrUpgradeMonster(pmd.monsterID);
    }
}
Let’s break down what we’re doing here. We’ll check the start time and current tick from the AblyManagerBehaviour class, and compare that to the current next element in the queue. We make use of Peek to check the next element as we may not want to consume it if we’re out of sync in this current update loop.
We work out the amount of time that’s passed since the start of the game by comparing the start timestamp and the action’s timestamp and storing it in diffTime.
We can then work out how much effective time has elapsed since the start of the game by counting the number of ticks that’ve occurred, and multiplying it by the amount of time each tick should occur (by default once every 20ms). This value is held in Time.fixedDeltaTime, so we can just use that to calculate timeFromTicks.
We can then compare the actual time elapsed (diffTime) and the local game time elapsed (timeFromTicks). If the game time is behind, we can speed up the rate of the game using Time.timeScale. Here it’s set to 20, but you can fiddle with it to match whatever feels best to you.
If we reach a time elapsed in which the game has caught up with the true ‘state’, we can finally enact on the message by placing a monster, and also ensuring that the timeScale is returned to 1.
You should now be able to test this out by running the game. Start in the Lobby scene, enter a room code, and hit the start button. You should find that at first the enemies should move at a normal pace, and monster placement works the same as usual.
If you perform an action which causes the game to pause however, such as say tasking to another application, when you return you should see the game progressing as normal up until you try to place a new monster. The game should then pick up pace to catch up with the true state the game should be in!
This works for ensuring we become eventually consistent with the main state, but is dependent on a new action occurring to bring the client back to the real present state. As the current only way to invoke an action is with a monster placement, this sync could happen right away, or not at all before the end of the game. An easy fix for this would be to just introduce a fairly regular ping from a client to ensure all the clients are consistently receiving timestamps from Ably to sync on.
Delaying monster placement
We’ve handled the scenario of a client falling behind, but we’ve yet to address messages being delayed, and thus say a monster not existing for one client when it does for another, resulting in a desync of damage done to enemies.
Ideally we’d have a foolproof way to handle this scenario, such as by making use of checkpoints in the game state locally to rewind to moments which can cause a desync, such as a monster being placed, and replaying the game quickly from that point forward.
In this demo however, we’re going to do something far simpler, but which will work for the vast majority of scenarios; delaying the placement of a monster from when the action occurs. That is to say that, if we receive a message to place a monster with timestamp ‘1000’, we wouldn’t place the turret in the game until say ‘2000’ in the local game. That means that so long as all the clients receive this message in the 1 second period between the true occurrence of the message and any of them actually enacting on it, they should all perform the action at the exact same time in the game.
To do this, we can adjust the shooting logic to not shoot until a second after the timestamp associated with the upgrade/placement. This should from the player’s perspective make the actual placement of monsters still feel smooth and instantaneous, with the actual ‘delay’ in action being hidden by a delay in a monster firing.
First, we’ll need to get the timestamp added to the ShootEnemies class. Add the following variables to the top of the class:
private AblyManagerBehaviour ablyManager;
public DateTimeOffset? Timestamp;
Next, add a reference to the AblyManagerBehaviour in the Start function:
ablyManager = gameObject.GetComponentInChildren<AblyManagerBehaviour>();
Finally, add a consideration for the timestamp to the start of the Update function:
if (timestamp.HasValue)
{
    DateTimeOffset? startTime = ablyManager.startTimeAbly;
    DateTimeOffset? msgTime = timestamp.GetValueOrDefault();
    TimeSpan? diffTime = msgTime - startTime;
    int ticksSince = ablyManager.ticksSinceStart;
    float timeFromTicks = ticksSince * (1000 * Time.fixedDeltaTime);
    if (timeFromTicks >= diffTime.Value.TotalMilliseconds + 1000)
    {
        timestamp = null;
    }
    else
    {
        return;
    }
}
With that added, we need a way to pass the timestamp to a monster’s ShootEnemies class. Update the PlaceOrUpgradeMonster function in PlaceMonster to be the following:
private void PlaceOrUpgradeMonster(int monsterLevel, DateTimeOffset? timestamp)
{
    if (CanPlaceMonster() && monsterLevel == 0)
    {
        monster = (GameObject)Instantiate(monsterPrefab, transform.position, Quaternion.identity);
        monster.GetComponent<ShootEnemies>().timestamp = timestamp;
        AudioSource audioSource = gameObject.GetComponent<AudioSource>();
        audioSource.PlayOneShot(audioSource.clip);

        gameManager.Gold -= monster.GetComponent<MonsterData>().CurrentLevel.cost;
    }
    else if (CanUpgradeMonster())
    {
        MonsterData monsterData = monster.GetComponent<MonsterData>();
        if (monsterData.getNextLevel() == monsterData.levels[monsterLevel])
        {
            monster.GetComponent<MonsterData>().increaseLevel();
            monster.GetComponent<ShootEnemies>().timestamp = timestamp;
            AudioSource audioSource = gameObject.GetComponent<AudioSource>();
            audioSource.PlayOneShot(audioSource.clip);

            gameManager.Gold -= monster.GetComponent<MonsterData>().CurrentLevel.cost;
        }
    }
}
With this we are allowing for the timestamp to be passed from the Update function, and we then use it to assign the timestamp value in the ShootEnemies class.
Finally, change the Update function in PlaceMonster class to pass a the timestamp to the PlaceOrUpgradeMonster function:
…
if (!diffTime.HasValue)
{
    PlaceOrUpgradeMonster(pmd.monsterID, msgTime);
    return;
}

if (timeFromTicks < diffTime.Value.TotalMilliseconds)
{
    Time.timeScale = 20;
    return;
}
else
{
    Time.timeScale = 1;
    actions.Dequeue();
    PlaceOrUpgradeMonster(pmd.monsterID, msgTime);
}
With that, we should now have decent handling for clients both falling behind the current state, in addition to clients receiving delayed messages.
Conclusion
We have a multiplayer Tower Defense game which can handle network and client instability. There’s a load of additional features, improvements, and fixes that can still be applied at this stage, but it’s a strong starting point to take further and experiment with. A few things I’d recommend trying out are:
- Making use of Token Authentication for clients, to keep authentication details away from untrusted users
- Having a central server to further coordinate users, and perform additional validation, provide scoreboards, and more
- Extending the synchronization work to support rewinding the state of a game to a previously known state
- Giving clients names so players can uniquely identify themselves
- Providing players their own money to buy monsters with rather than a shared bank
There is a version of the game available from the browser if you’d like to give it a try. It's worth noting this version of the game makes use of the Ably JavaScript client library rather than the Unity one.
If you create anything based on this work, we’d love to hear about it on Twitter, or even directly via email.