Spring 2025 Update: We've recently launched Ably Chat, a new product that significantly simplifies building chat experiences on the Ably platform. Ably Chat comes with purpose-built APIs for realtime messaging, presence tracking, typing indicators, and reactions. Explore how you can build engaging chat experiences faster and easier. Learn more about Ably Chat →
The joke used to be that no piece of software was complete until it could send and receive email. Fast forward to today, replace email with realtime chat, and actually you might not be too far from the truth.
Whether you’re delivering customer service, connecting community members, or helping colleagues communicate, realtime chat is quickly becoming a standard part of the web developer’s toolkit. Here we’ll look at what you need to consider when building a realtime chat application using WebSockets with Angular and Firebase.
Let’s start with the nuts and bolts of how to use WebSockets with Angular and Firebase to create a basic realtime chat app.
How to build a realtime chat application using WebSockets with Angular and Firebase
Before we get started with the tutorial itself, here’s what you’ll need in order to follow along:
- A Firebase account
- Angular CLI
- At least NodeJS 16
- A basic familiarity with Angular and Typescript
And it’s worth mentioning here that this tutorial will step through the basics only. If you want to build a realtime chat application using WebSockets with Angular and Firebase for production then, of course, you’ll need something a bit more robust.
That’s where managed solutions like Ably Chat come in. It’s a fully featured realtime messaging platform that handles delivery, ordering, presence, and scaling for you—so you don’t have to wire it all together manually. But if you want to understand the moving parts under the hood, this tutorial is a great place to start.
What our realtime Angular chat app will do
As we’re keeping things simple, our app will let anyone use the chat simply by providing a username and the text they want to share. All users connected to the chat app will receive text sent by any other users.
How our realtime Angular chat app will work
When you create the Firebase app, you’ll add a realtime database as its backend. You’ll then connect your Angular app to Firebase using the Firebase SDK. The Firebase SDK will recognise that your app is using the realtime backend and so will automatically use WebSockets for communication between your Angular app and the Firebase backend.
Step by step instructions for building your realtime chat application
1. Creating the realtime database in Firebase
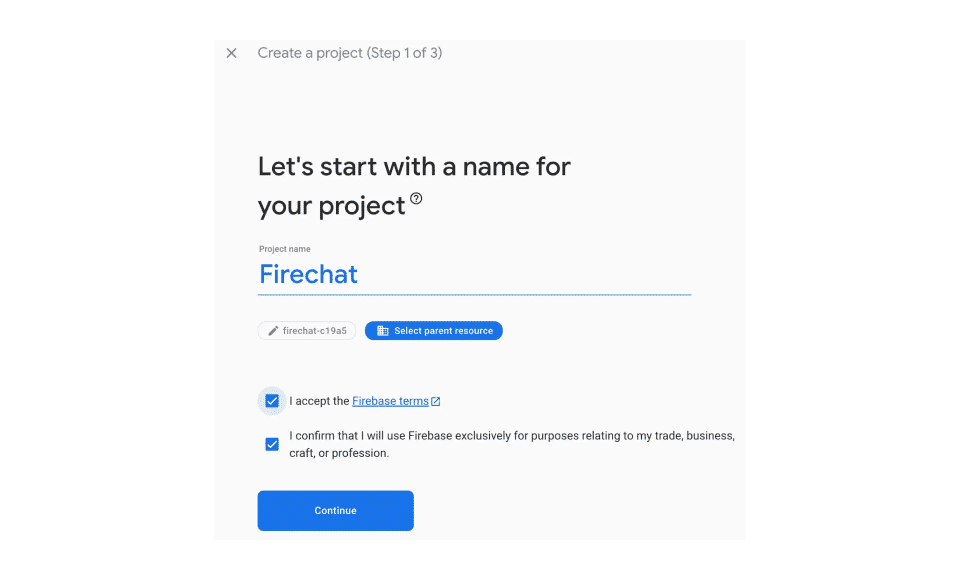
Get started by heading to Firebase and creating your new app. The Firebase wizard will ask if you want to use Google Analytics. You don’t need it for this project but it won’t make too much difference either way.
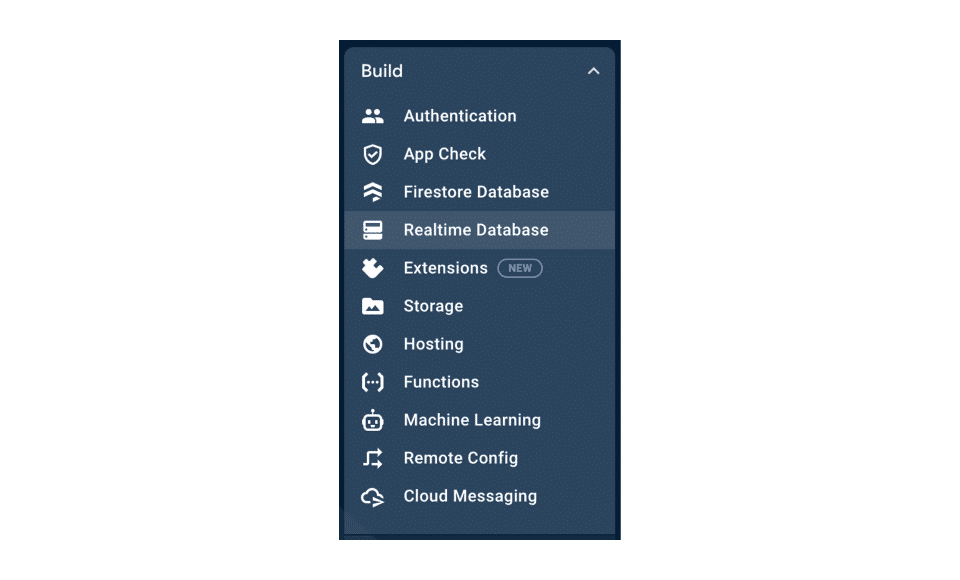
Once your new Firebase app is available, you’ll need to select a datastore. Firebase gives us a couple of options: Firestore Database or Realtime Database. Head to the Build menu on the left hand side and select the realtime option.
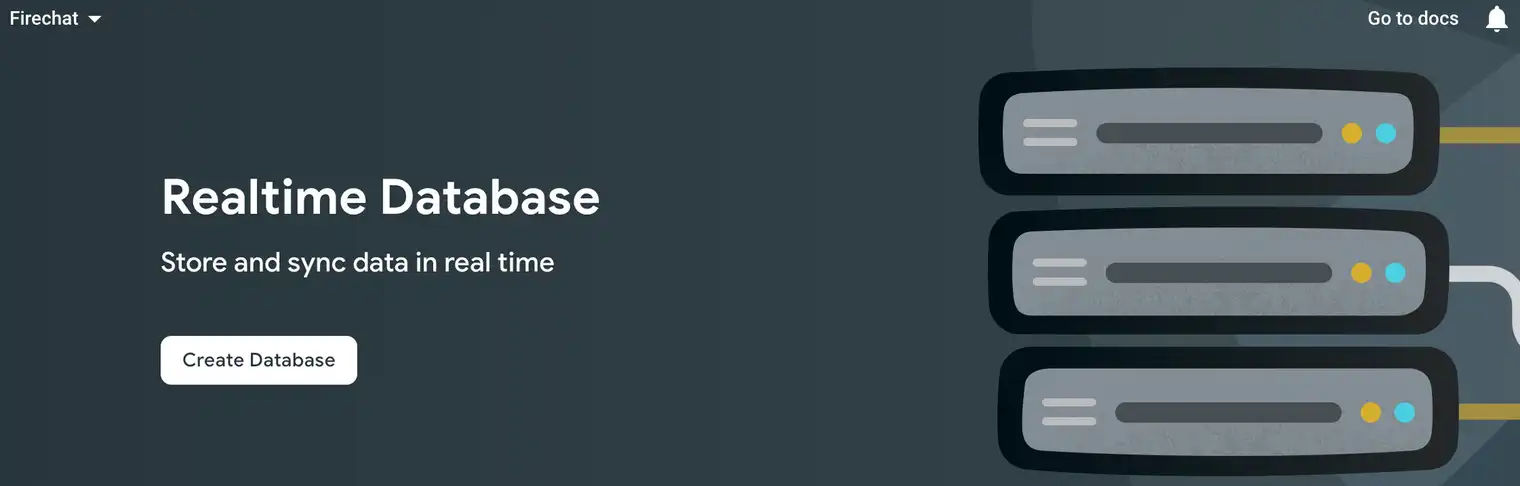
Firebase will check that you’re sure a realtime database is right for your project. Go ahead and click Create Database and then select the region closest to you.
Next, Firebase will ask you about securing your new database. We want to keep things simple for the sake of this tutorial so you can select Start in test mode.
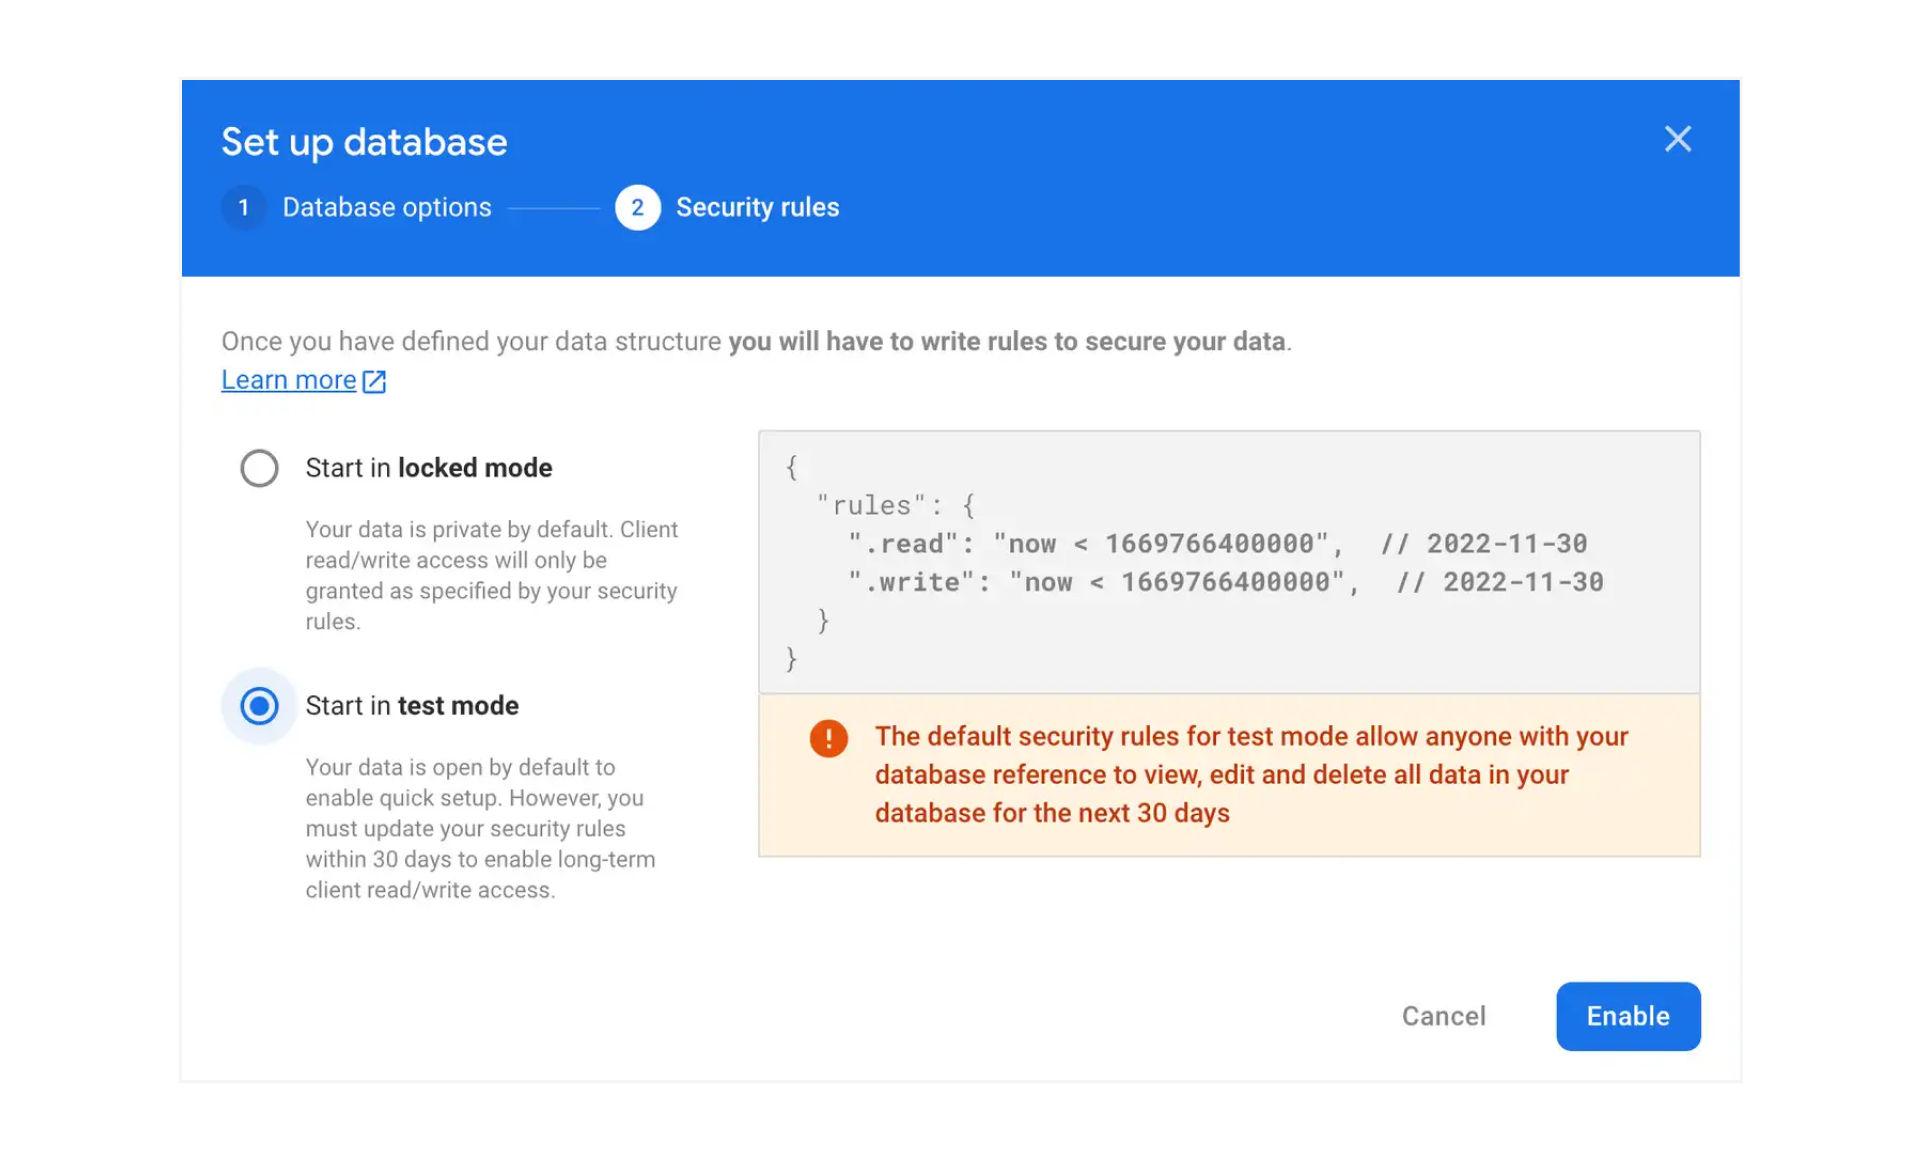
Once the database is available, Firebase will show you a management screen. Click the Rules tab.
Obviously you wouldn’t do this in production but we’re going to make the permissions as liberal as possible:
{
  "rules": {
    ".read": "true",
    ".write": "true"
  }
}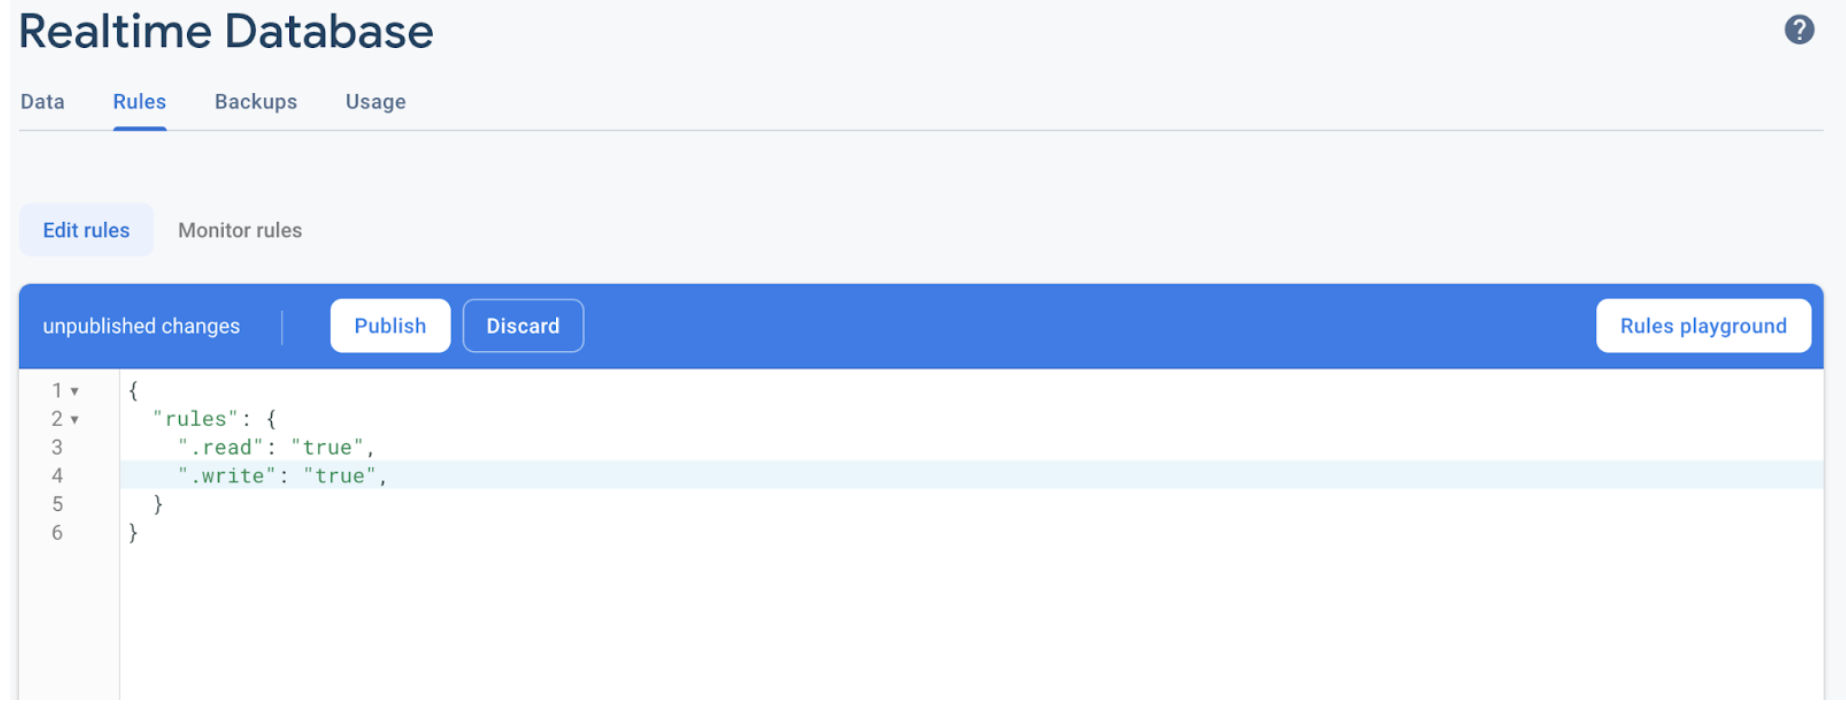
Click Publish to make the access rules live and that’s all we need to do in Firebase for now.
2. Setting up the Angular app for realtime chat
Head into a terminal and use the Angular CLI tool to create a new Angular app called firechat.
> ng new firechatThe tool will ask you a couple of questions. You should say “no” to Angular routing, and select “CSS” when asked which stylesheet format you want to use.
Once the app is ready, switch to its directory and install the Material UI library:
> cd firechat
> ng add @angular/material
The Material installer will ask you three questions:
1. Which theme you want to use - choose any
2. Whether you want to set up typography styles: yes, you do
3. How you want to handle the Angular animations module: select 'Include and enable animations'
That’s the basic Angular app and the UI library sorted. Now we need to connect Firebase and your Angular app.
3. Integrating Angular and Firebase
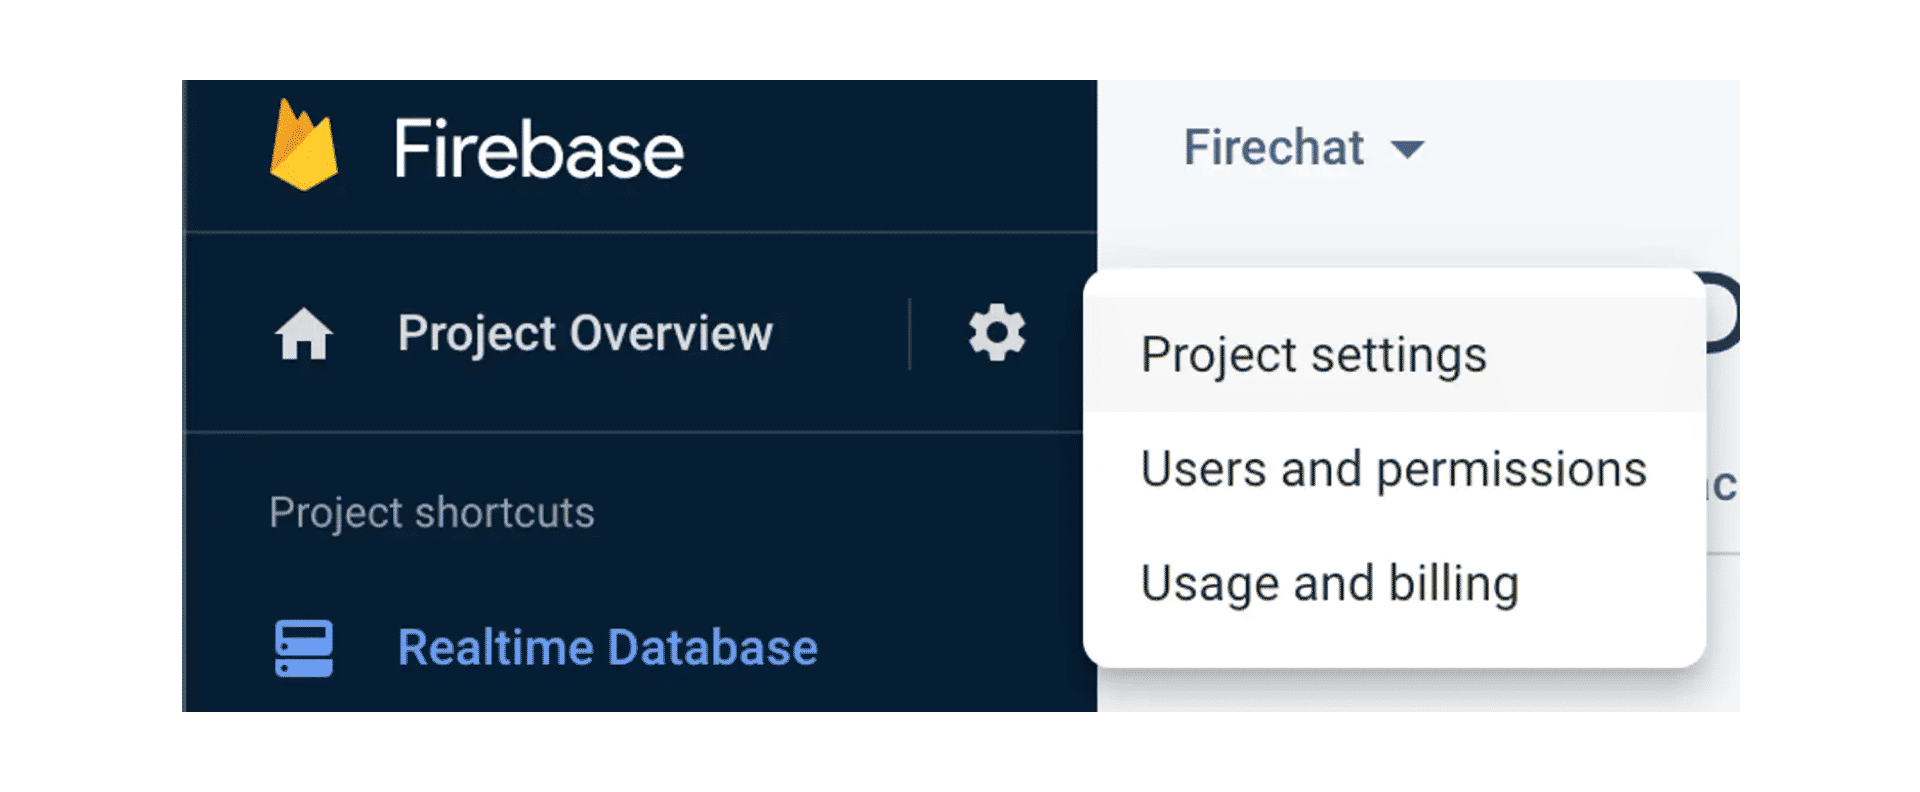
Back in the Firebase web console, click the cog next to Project Overview and select Project settings.
Scroll down the General tab on the Project settings page and click the </> icon to create a web app.
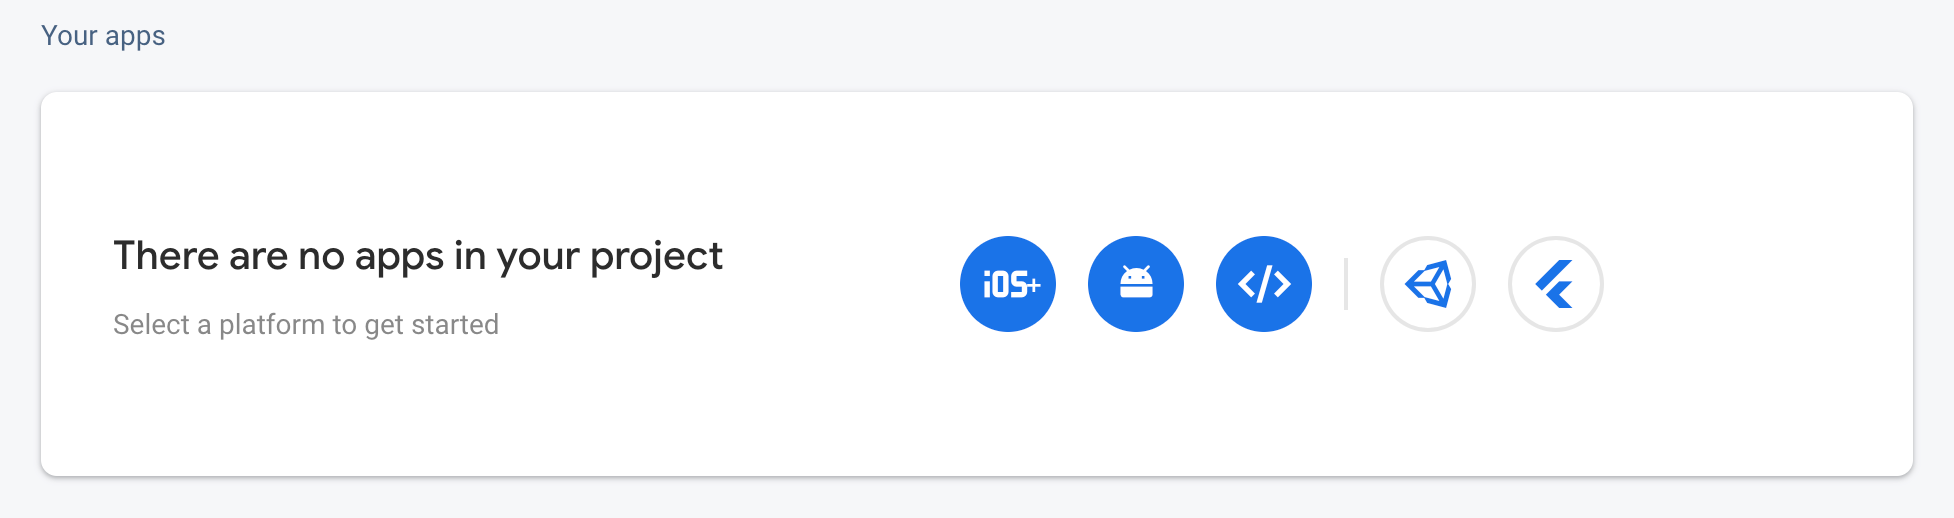
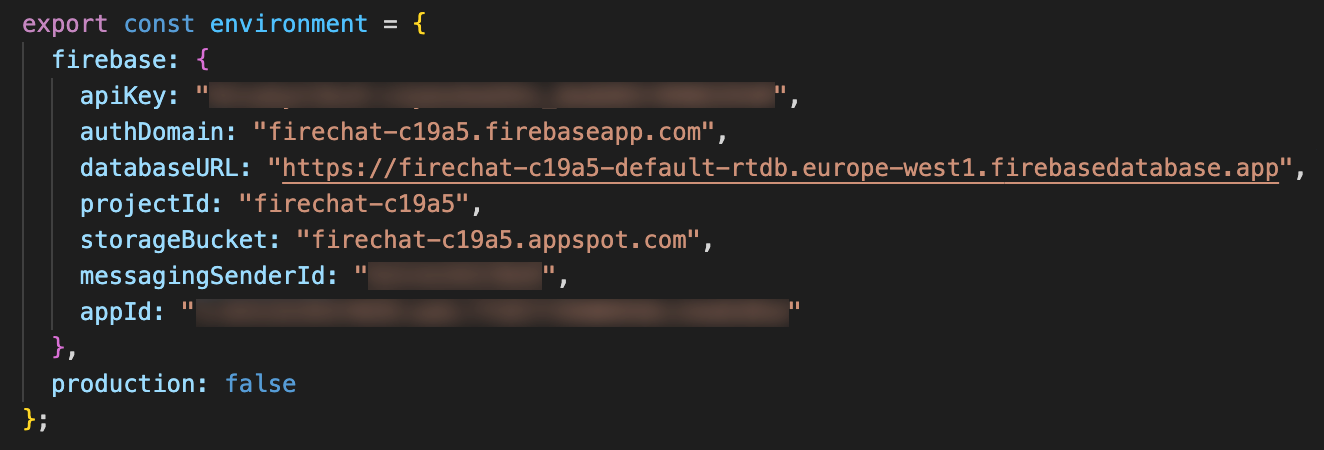
Once Firebase has created the app, you’ll see configuration instructions. First, copy the Firebase configuration object only.
Next open your terminal and install the Firebase SDK:
> npm install firebaseLastly, open src/environments/environment.ts and paste the Firebase configuration object into the environment object.
4. Setting up the app module
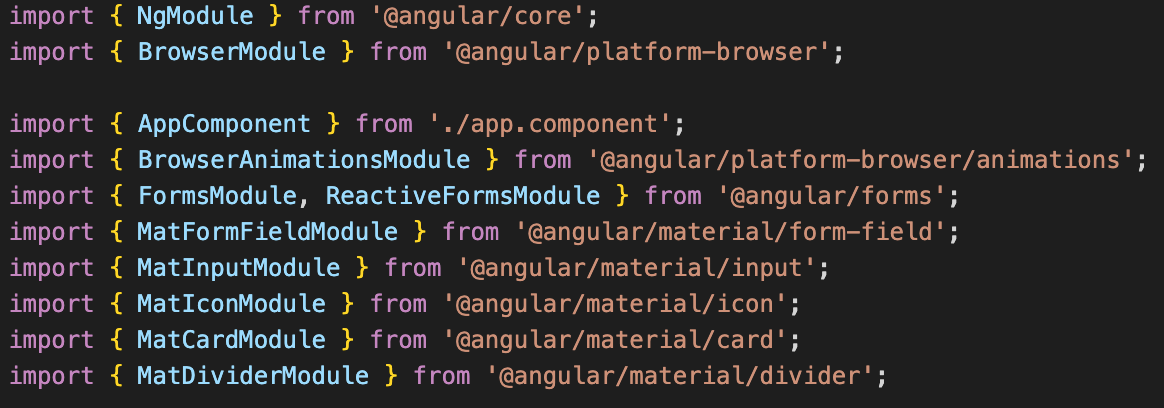
We need to import the various Material UI elements so that we can build our chat app’s interface. To do that, open src/app/app.module.ts and add the following:
import { FormsModule, ReactiveFormsModule } from '@angular/forms';
import { MatFormFieldModule } from '@angular/material/form-field';
import { MatInputModule } from '@angular/material/input';
import { MatIconModule } from '@angular/material/icon';
import { MatCardModule } from '@angular/material/card';
import { MatDividerModule } from '@angular/material/divider';
Then, further down in the same file, you’ll find an Imports array. There you’ll need to add the form building and Material UI modules.
imports: [
    BrowserModule,
    BrowserAnimationsModule,
    FormsModule,
    ReactiveFormsModule,
    MatInputModule,
    MatIconModule,
    MatCardModule,
    MatDividerModule,
    MatFormFieldModule,
  ],
5. Creating the chat type
Okay, so far it’s all been about setting up Firebase and Angular but now you’re going to get into the specifics of your chat app by creating a chat type. To do that, create a new file at src/chat/chat.ts and add the following to it:
export interface Chat {
  id?: string;
  username: string;
  message: string;
  timestamp: Date;
}
Each message will have a unique id, a username, the message text itself, and a timestamp to show when the message was sent. To make sure the id is unique, install the UUID type by entering the following in your terminal:
> npm install uuid @types/uuid6. Configuring the Angular components
Angular components allow you to set up some functionality and then associate it with a particular element in the UI. Your realtime Angular chat app is going to be pretty simple, so you won’t have too much to do here.
Let’s start off with some imports. Open src/app/app.component.ts in your editor and paste the following at the top:
import { environment } from '../environments/environment'
import { FirebaseApp, initializeApp } from 'firebase/app';
import { Database, getDatabase, ref, set, onValue  } from "firebase/database";
import { FormControl, FormGroupDirective, FormBuilder, FormGroup, NgForm, Validators } from '@angular/forms';
import { v4 as uuidv4 } from 'uuid';
import { Chat } from '../chat/chat'
Now specify the properties of a chat message. Find the AppComponent class in the same file and add the following:
title = 'firechat';
  app: FirebaseApp;
  db: Database;
  form: FormGroup;
  username = '';
  message = '';
  chats: Chat[] = [];
To keep things simple for this tutorial, you’re not going to set up a full user system. Instead, each message is sent with the username, message, and timestamp.
Just below the properties, add a constructor that will set up the form your users see and also connect to the database:
constructor(private formBuilder: FormBuilder) {
    this.app = initializeApp(environment.firebase);
    this.db = getDatabase(this.app);
    this.form = this.formBuilder.group({
      'message' : [],
      'username' : []
    });
  }
Now you’ve created the chat type and the backend of the form. When you run the app, it will connect to the realtime Firebase database
But there isn’t anything yet for users to interact with. And even if there were, there’s no code here to actually send messages or handle those that are pushed in from other users.
7. Sending and retrieving realtime messages
Firebase’s SDK will automatically use WebSockets to send and retrieve the messages in your realtime Angular chat app. However, there’s still a little bit of work to do in wiring it all up.
First, let’s take care of pushing messages over to Firebase. In the AppComponent class, add a form submit callback:
onChatSubmit(form: any) {
    const chat = form;
    chat.timestamp = new Date().toString();
    chat.id = uuidv4();
    set(ref(this.db, `chats/${chat.id}`), chat);
    this.form = this.formBuilder.group({
      'message' : [],
      'username' : [chat.username],
    });
  }
This takes the chat object and passes it over to Firebase. As it’s a tutorial, we’re not doing any of the input validation that you’d need for a production system.
When another user sends a message, Firebase will push it automatically from the realtime database to your Angular app over a WebSocket connection. All you need to do is push that message over to the user’s web interface, filtering out any duplicate messages that may exist:
ngOnInit(): void {
    const chatsRef = ref(this.db, 'chats');
    onValue(chatsRef, (snapshot: any) => {
      const data = snapshot.val();
      for(let id in data) {
        if (!this.chats.map(chat => chat.id).includes(id)) {
          this.chats.push(data[id])
        }
      }
    });
  }
8. Adding an Angular web interface to our realtime chat app
Now all that’s left is to add the user interface and then to make sure everything works!
Paste the following into src/app/app.component.html:
<div id="history">
  <div *ngFor="let chat of chats" class="mb">
    <mat-card>
      <mat-card-subtitle>
        <span>{{chat.username}} (Sent: {{chat.timestamp | date:'long'}})</span>
      </mat-card-subtitle>
      <mat-card-content>
        <p>{{chat.message}}</p>
      </mat-card-content>
    </mat-card>
  </div>
</div>
<form id="message" [formGroup]="form" (ngSubmit)="onChatSubmit(form.value)">
  <mat-form-field appearance="outline" class="fw">
    <mat-label>Username</mat-label>
    <input matInput
                    formControlName="username" >
  </mat-form-field>
    <mat-form-field appearance="outline" class="fw">
    <mat-label>Enter Chat</mat-label>
      <input matInput
                      formControlName="message" >
                      <button type="submit" matSuffix mat-icon-button aria-label="Submit">
                        <mat-icon>send</mat-icon>
                      </button>
    </mat-form-field>
</form>
And let’s make sure it’s styled nicely. Open src/app/app.component.css and paste these styles:
#history {
  margin-left: auto;
  margin-right: auto;
  padding-left: 1em;
  padding-right: 1em;
  width: 400px;
  height:60%;
  overflow-y: scroll;
}

#message {
  margin-left: auto;
  margin-right: auto;
  width: 400px;
}

.fw {
  width: 100%
}

.mb {
  margin-bottom: 1em;
}
Let’s check if it works!
9. Firing up your realtime chat app using Angular and Firebase
Back in the terminal, start your Angular app:
> ng serve --openIf all has gone well, you should see a simple chat app in your browser.
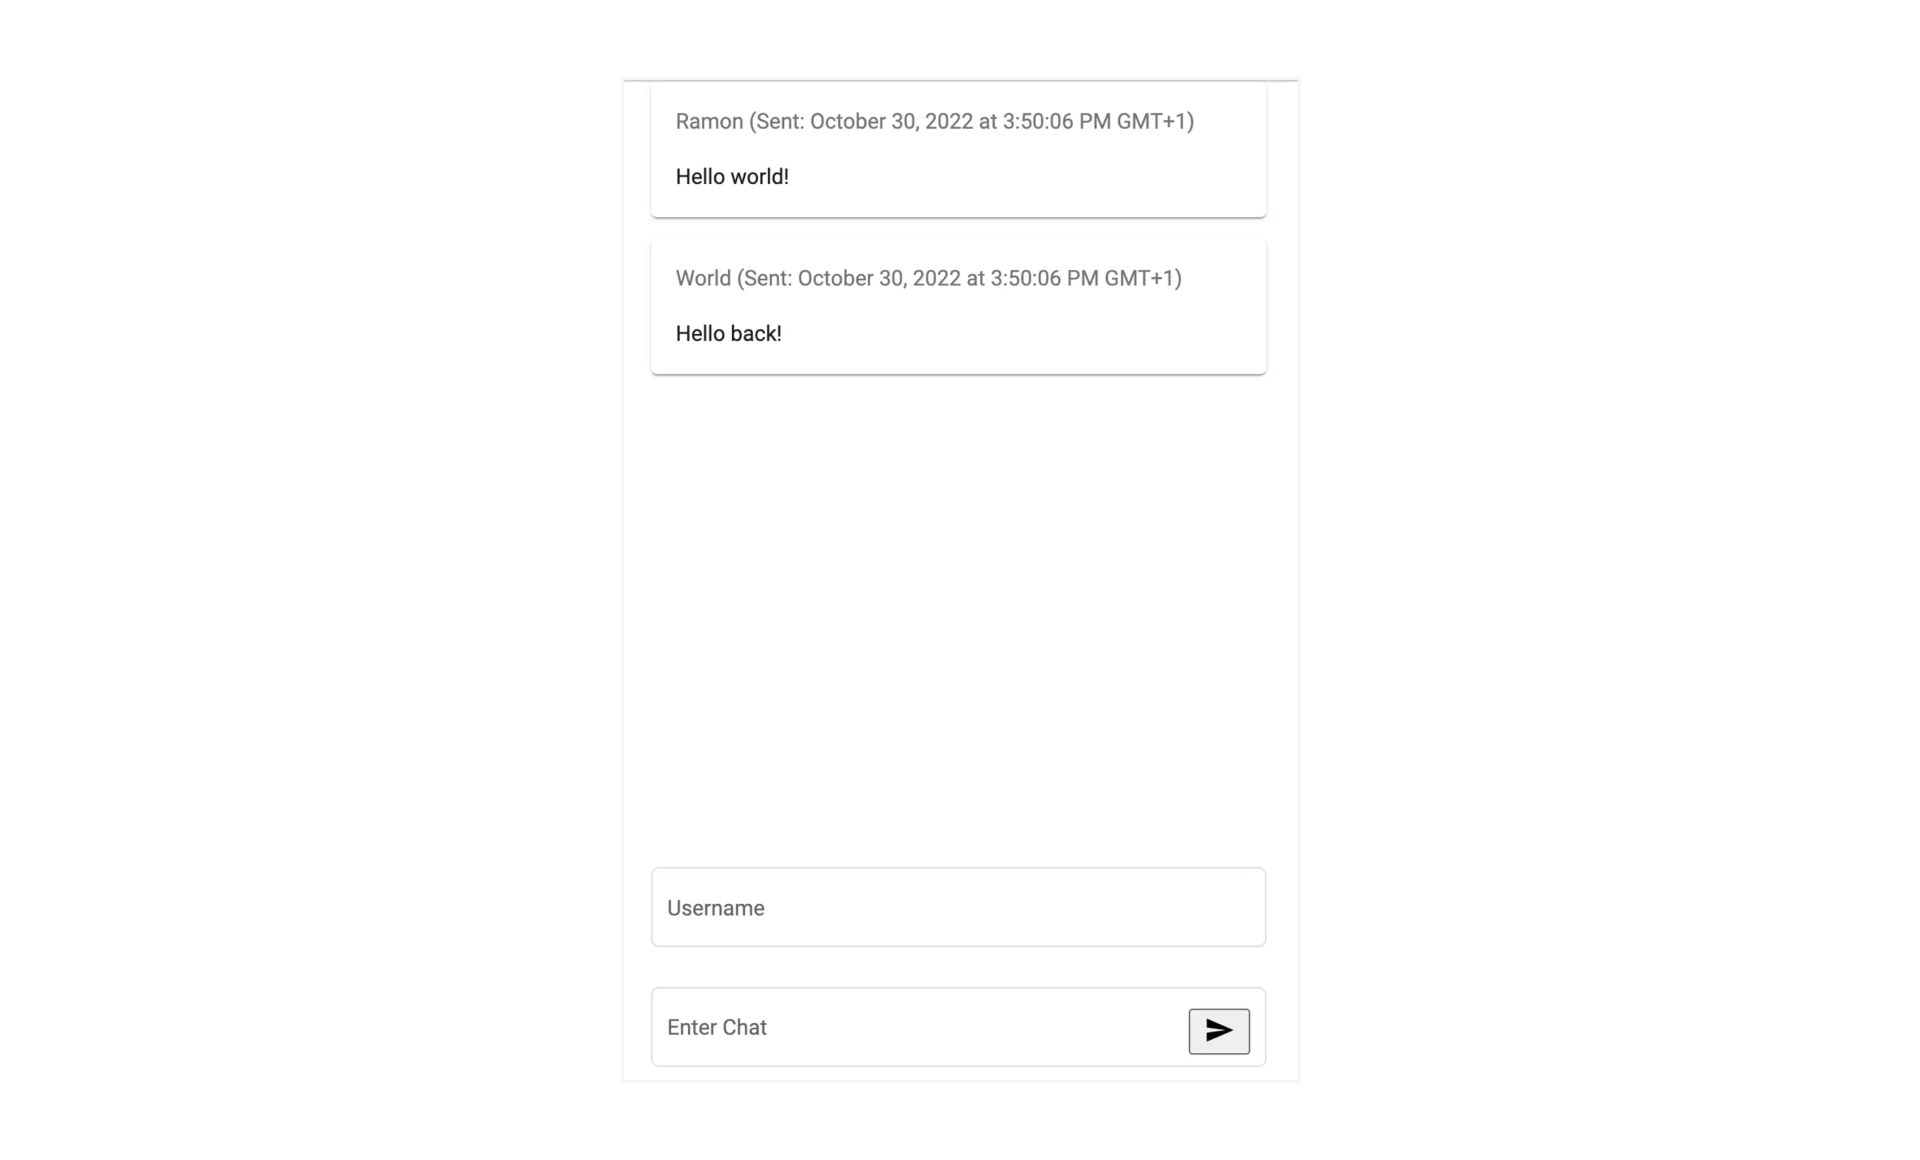
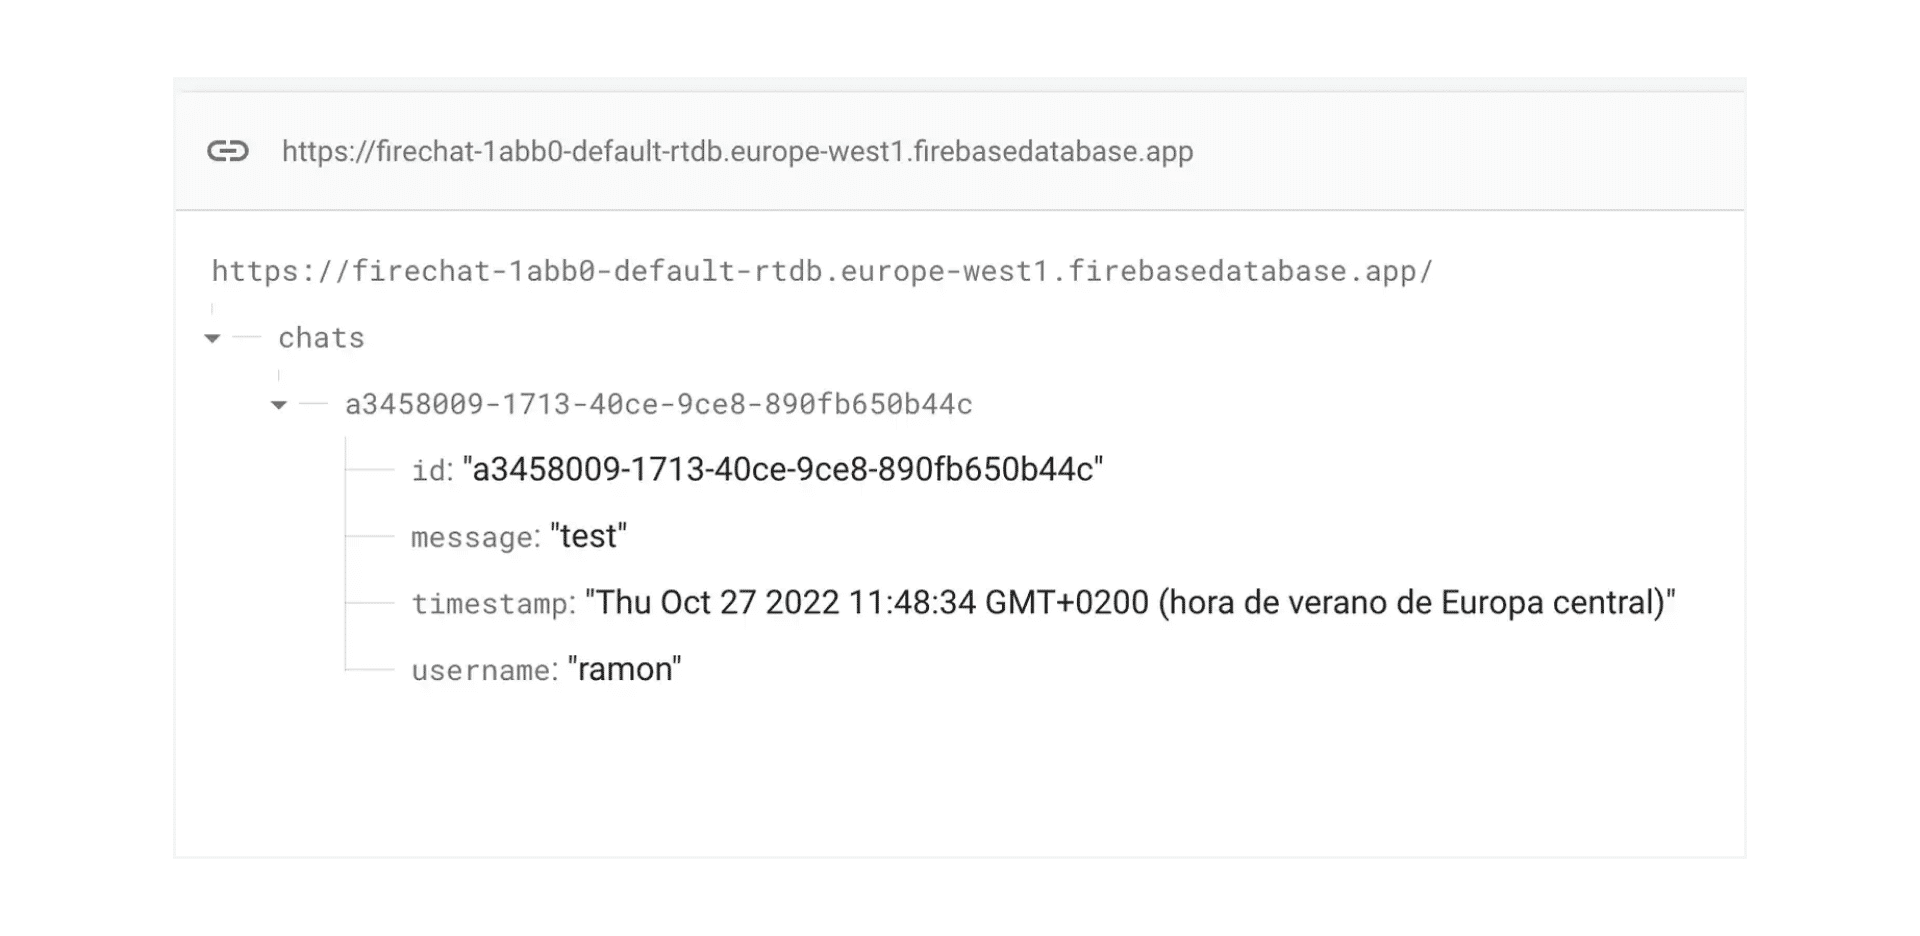
Try sending a few messages and then head over to your Firebase console to check out what’s happening on the backend. In the database view, you’ll see your chat messages in the Firebase realtime database.
After following this tutorial, you have a toy realtime chat app. But is the combination of Angular and Firebase good for a production realtime chat application?
What are the limitations and pitfalls of using WebSockets with Angular and Firebase?
This question is really about the pros and cons of using WebSockets with Firebase. Whether you choose Angular, React, Vue, or something else for your frontend, you’ll find that they are each equally as suited to realtime data as the others.
So, then, how does Firebase stack up when it comes to building applications with WebSockets?
There are some positives. Firebase can be a great way to get an application live without having to think too much about your backend implementation. Out of the box, Firebase supports realtime push messaging using WebSockets between the client SDK and the Firebase realtime database. But if you need more than a simple MVP, you’ll quickly start to hit Firebase’s limitations.
Firebase falls down on delivery guarantees
Even in a simple realtime chat app, message order is important. If one person in a chatroom receives messages in the wrong order, it could lead to misunderstandings.
But what if the stakes are higher? Imagine a flood control system where IoT devices send water flow readings to a central server. Missing or out of sequence messages could impact the system’s ability to protect life and property.
Firebase falls down here because it doesn’t support message queues, which means it can’t guarantee that data is delivered in order and exactly once. The nearest it gets is to track message order within the scope of a single connection. Once that connection is interrupted, messages could go out of sequence. The alternative is to build and maintain your own solution using Google Cloud Functions.When it comes to delivering messages only once, otherwise known as idempotence, Firebase again asks you to roll your own solution. That seems a big risk for something as fundamental as being able to trust that data isn’t duplicated.
Scaling Firebase means compromising your data model
Firebase is first and foremost a database that happens to synchronize with clients using WebSockets. This means that when it comes to scaling, you’re left with the same problems you might have with a traditional relational database.
Each individual Firebase database has relatively modest limits. Hit them and you’ll need to think about how to split your data model across multiple separate databases. Want more than 200,000 concurrent connections? You’ll need another database. Or perhaps you want to consume more than 1,000 messages a second from clients? Well, Firebase can handle only 1,000 writes per second in a single database so, again, you’ll need to split your data across multiple shards.
Firebase lacks important integrations
For a simple prototype or an app that will only ever have a handful of users, you’re unlikely to need too many integrations. However, for real workloads you’ll almost certainly need to connect with other systems.
If you’ve built everything else on Google’s Compute Platform then Firebase could be a good choice. However, if you need to integrate with RabbitMQ, AWS Kinesis, or Microsoft Azure Functions, for example, then Firebase will ask you to create and maintain your own integrations.
Alternative approaches to building a realtime chat application
If Firebase isn’t always the right choice for building a realtime chat application, what other options do you have?
Use open source tools, such as Apache Kafka
Apache Kafka certainly checks the “scalability” box. But is it a good backend for a realtime chat application?
You can read more in our guide to building a realtime chat application with Apache Kafka but let’s look at some of the pros and cons here.
Apache Kafka’s core concepts are well suited to the problem. The chat app’s messages can be represented as events, a particular chat room becomes a topic, and the people chatting are producers (i.e. they create events) and consumers (that is, they receive events).
But there are downsides. Particularly if you’re self-hosting, Kafka will require a significant investment in DevOps to set it up and keep it running. More importantly, Kafka is designed to work in the background. You shouldn’t leave it open to the public internet. That means you’d need an intermediate layer between your chat clients and your Kafka instance, thereby adding complexity.
Create a custom backend using Serverless technologies
At the other end of the spectrum from Kafka is Serverless. Deconstruct your app into microservices and you could run it on a platform such as AWS Lambda.
In that case, the cloud platform’s API gateway would handle WebSocket connections with each chat client. Serverless functions would then process incoming and outgoing messages, while a cloud datastore would take care of conversation persistence.
That lets you focus on writing the code while the platform does the rest. Serverless solutions also tend to be quite scalable as you can simply add more processes to scale out. However, you’ll need to build manual solutions to issues such as idempotence and message ordering. And let’s not forget, any level of success could become expensive quickly.
Conclusion: Consider alternatives before building a realtime chat app with Firebase
Whatever type of realtime application you’re building, you’ll almost certainly rely on WebSockets for client-server communication. However, not all WebSockets solutions are equal.
Firebase can give you a quick start but will make it harder to build resilient, scalable applications. Choose a dedicated realtime platform, such as Ably, and you’ll be able to deliver a fast, reliable experience to your end users.