Closed-captioning for television systems was first demonstrated in the early 1970s. Realtime closed-captioning was developed later in the early 1980s. Here, stenotype operators who type at speeds of over 225 words per minute provide captions for live television programs, allowing the viewer to see the captions within two to three seconds of the words being spoken was developed later in the early 1980s.
As the internet has exploded the ability for anyone to create content, including live video and audio, has also grown. It remains important to consider making that content as accessible as possible not only allowing those with hearing impairment to consume your content, but also those learning to read, learning to speak a non-native language, or those in an environment where the audio is difficult to hear or is intentionally muted.
Sometimes, consumers of your content may simply prefer to read a transcript.
In this blog post, we will build a realtime browser-based closed-captioning system using React, AssemblyAI’s realtime transcription service, and Ably. If you want to jump ahead and check out the completed code, check out this Github repo, otherwise let's get started!
Prerequisites
Before you start coding, you’ll need to make sure you have the following prerequisites.
First, you’ll need to create an AssemblyAI account. We’ll be using their realtime transcription services as part of our project. Realtime transcription is priced at a per-second rate so while you will need to add a payment method to your account to use realtime transcription you’ll only pay for what you use.
Next, you will need a free Ably account. We’ll use Ably to broadcast the transcription to our application users.
Lastly, we will be building the server-side parts of the application in Node including using Nodes native fetch API which is available in Node 18 or newer.
Once you’ve got those accounts, then head on to the rest of the blog post to start to build!
Application setup
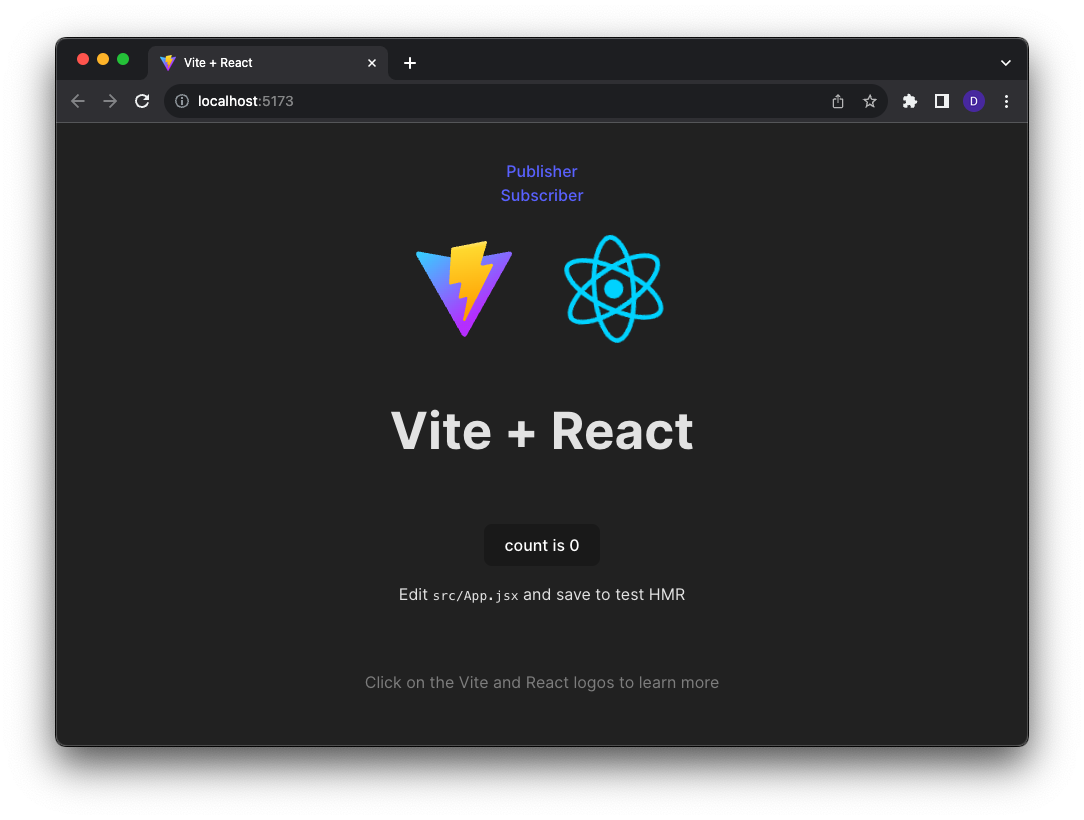
Start your application by using Vite to scaffold a basic React and JavaScript application. Open a terminal and run Vites create command:
npm create vite@latest
Vite will ask you a few questions about your project including the project name, an application framework (select React), and which framework variant you want to use (select JavaScript).
After the scaffolding completes, navigate into the project directory and install the project dependencies using npm. Finally, run the project to verify that the scaffolded project works as expected:
cd react-closed-captioning
npm install
npm run dev
Add application routing
Our closed captioning application will have two modes:
- A publisher mode that records and transcribes the audio.
- A subscriber mode that receives the transcription text.
We’ll need to allow a user to navigate between those modes which we do by adding routing using the react-router-dom package.
Start by creating components in the applications src directory for the publisher (`Publisher.jsx`) and subscriber (`Subscriber.jsx`) modes:
import { useState } from "react";
import './App.css'

function Publisher() {}

export default Publisher
import { useState } from "react";
import './App.css'

function Subscriber() {}

export default Subscriber
Next, install the react-router-dom package using NPM:
npm install react-router-dom
In the main.jsx file import the BrowserRouter object from react-router-dom and wrap the default App component with it:
import React from 'react'
import { BrowserRouter } from 'react-router-dom'
import ReactDOM from 'react-dom/client'
import App from './App.jsx'
import './index.css'

ReactDOM.createRoot(document.getElementById('root')).render(
  <React.StrictMode>
    <BrowserRouter>
     <App />
    </BrowserRouter>
  </React.StrictMode>,
)
In App.jsx, add import statements for the Routes, Route, and Link objects as well as the Publisher and Subscriber components you created earlier:
import { Routes, Route, Link } from 'react-router-dom';
import Publisher from './Publisher'
import Subscriber from './Subscriber'
Finally, add the route links inside of the App components Empty tag:
<div style={{ textAlign: "center", marginBottom: 10, }}>
  <div>
    <Link to="/Publisher">Publisher</Link>
  </div>
  <div>
    <Link to="/Subscriber">Subscriber</Link>
  </div>
</div>
<div style={{ textAlign: "center" }}>
  <Routes>
    <Route path="/publisher" element={<Publisher />} />
    <Route path="/subscriber" element={<Subscriber />} />
  </Routes>
</div>
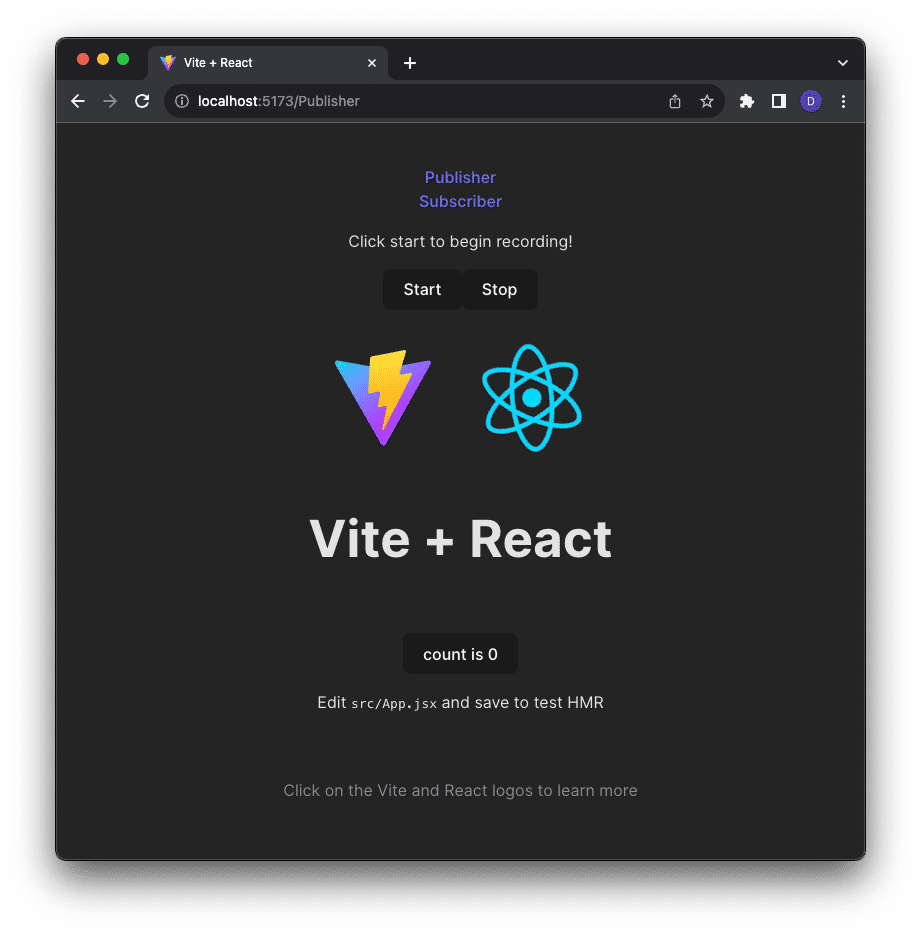
Restart the app if needed by running npm run dev or refresh the page you should see links to the Publisher and Subscriber views.
Generate service authentication tokens
The two services we use in the application, Ably and AssemblyAI, both require the application to authenticate itself with their APIs. To do that we need to create API tokens using server-side code. This lets us keep our service keys safe on the server and instead create temporary authentication tokens our client code can use to authenticate with the services.
To create the server code for the application we’ll use a Vite plugin called vite-plugin-api. This plugin makes it easy to create API endpoints as part of our application.
Use NPM to install the plugin package, express web server package, and the Ably client library:
npm install vite-plugin-api express ably
Add the plugin to your Vite configuration file:
import { defineConfig } from 'vite'
import react from '@vitejs/plugin-react'
import { pluginAPI } from "vite-plugin-api";

// https://vitejs.dev/config/
export default defineConfig({
  plugins: [react(),
    pluginAPI({
      // Configuration options go here
    }),
  ],
})
The application will store those sensitive Ably and AssemblyAI service keys as environment variables. Vite makes it easy to access environment variables stored in a local file named .env.local. Create this file in the root of your project directory and then add the following keys:
VITE_ABLY_API_KEY=[YOUR_ABLY_API_KEY]
VITE_ASSEMBLYAI_API_KEY=[YOUR_ASSEMBLYAI_API_KEY]
Make sure you replace the placeholder values with your actual Ably and AssemblyAI keys.
Next, inside of your project’s src directory create a new directory named api/tokens and add two files to it: realtime.js and transcription.js.
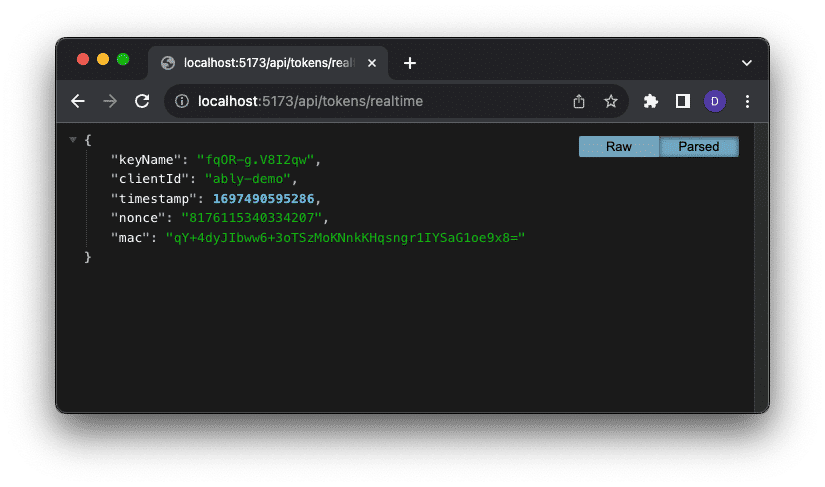
Inside of realtime.js add the following code which uses the Ably client library to generate and return a new Ably authentication token:
import Ably from "ably/promises";

export const GET = async (req, res) => {
  const client = new Ably.Rest(import.meta.env.VITE_ABLY_API_KEY);
  const tokenRequestData = await client.auth.createTokenRequest({ clientId: 'ably-demo' });
  console.log(`Request: ${JSON.stringify(tokenRequestData)}`)
  return res.json(tokenRequestData);
}
Inside of transcription.js add the following code which uses Nodes fetch function to fetch and return a new AssemblyAI authentication token:
export const GET = async (req, res) => {
  const response = await fetch("https://api.assemblyai.com/v2/realtime/token", {
    method: "POST",
    body: JSON.stringify({ expires_in: 3600 }),
    headers: {
      Authorization: import.meta.env.VITE_ASSEMBLYAI_API_KEY,
   "Content-Type": "application/json",
    },
  });
  const token = await response.json();
  console.log(token);
  return res.json(token);
};
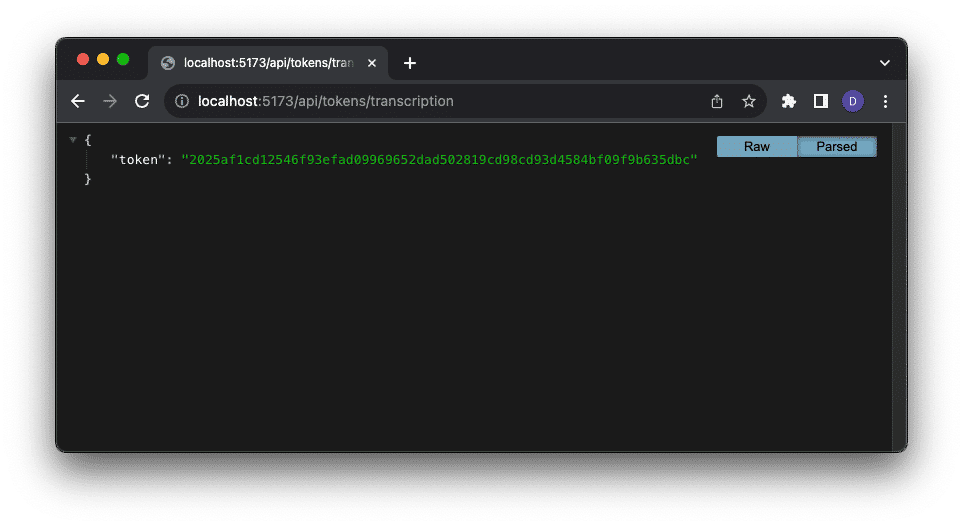
Test your new API endpoints by loading the realtime (http://localhost:5173/api/tokens/realtime/) and transcription (http://localhost:5173/api/tokens/transcription/) routes in your browser. You should see responses similar to those seen in the images below:
Create the publisher component
Now that we can generate tokens, we’ll implement the publisher component of the application. Remember that the publisher's job is to acquire realtime audio, send it to AssemblyAI for transcription, and then broadcast the transcription results to subscribers.
Start by adding some markup to the Publisher component:
function Publisher() {
  return (
    <div>
      <p id="real-time-title">Click start to begin recording!</p>
      <button id="start">Start</button>
      <button id="stop">Stop</button>
      <p id="message"></p>
    </div>
  );
}
This markup adds two buttons to start and stop publishing and an area to display the transcription.
Next, add a variable to store an audio recorder object (which we will create in a future step) and button click handler functions for the start and stop buttons.
const texts = {};
let recorder = null;

async function start(e) {}
async function stop(e) {}
Connect those handler functions to the buttons using their `onClick` event:
<button id="button" onClick={start}>Start</button>
<button id="button" onClick={stop}>Stop</button>
Open an AssemblyAI WebSocket connection
AssemblyAI uses WebSockets as the transport for receiving raw audio and returning its transcription results. To use the AssemblyAI WebSocket endpoint in our React application we’ll use the react-use-websocket library. This library gives us a React-idiomatic way of using WebSockets.
Install react-use-websocket using NPM:
npm install react-use-websocket
Once installed, add another import statement into Publisher.jsx to import the useWebSocket object from the library:
import useWebSocket from "react-use-websocket";
Add two React state properties, one to store the WebSocket URL and a second to toggle opening and closing the WebSocket connection:
const [socketUrl, setSocketUrl] = useState('');
const [shouldConnect, setShouldConnect] = useState(false);
Notice that the default for the shouldConnect property is false. By default, the react-use-websockets library will immediately try to open a WebSocket connection. In our application, however, we only want to open that connection when the Start button is clicked.
Next, use the useWebSocket hook to configure the WebSocket connection.
const { sendJsonMessage, lastMessage, readyState } = useWebSocket(socketUrl,
{
  onOpen: () => {
    console.log('AssemblyAI WebSocket opened');
  }
}, shouldConnect);
The useWebSocket hook accepts three parameters.
- url - The WebSocket URL we want to connect to.
- options - An object containing WebSocket configuration options.
- connect - A boolean value allowing us to control the library's automatic connection behavior.
Notice that our options object is defining a function for the onOpen event. We’ll use this event in just a moment to start recording realtime audio once the WebSocket connection opens.
In the start click handler add code that fetches a new AssemblyAI authentication token, appends that token to the WebSocket URL, and then toggles the shouldConnect value. This last step will trigger the useWebSocket hook to try to open a connection to the WebSocket URL.
async function start(e) {
  const response = await fetch("/api/tokens/transcription");
  const { token } = await response.json();
  setSocketUrl(`wss://api.assemblyai.com/v2/realtime/ws?sample_rate=16000&token=${token}`);
  setShouldConnect(true);
}
Capturing audio in the browser
If the WebSocket connection opens successfully we can start to capture realtime audio and send it to AssemblyAI for transcription. To capture audio we’ll use the browsers built in getUserMedia function. The getUserMedia function is part of the MediaDevices set of APIs that browsers implement in order to provide developers with safe and standardized ways to access local media hardware devices like microphones, cameras, and speakers.
Calling getUserMedia, in our case, asking only to access audio, returns a MediaStream with tracks containing the requested types of media. Once we have the MediaStream we’ll use the RecordRTC library to transform the raw audio track into a format that we can pass to AssemblyAI. RecordRTC is an abstraction over the native MediaRecoder APIs and provides a number of capabilities that simplify recording audio in the browser.
Install recordrtc using NPM:
npm install recordrtc
Once installed add an import statement importing the RecordRTC and StereoAudioRecorder objects from the library:
import RecordRTC, { StereoAudioRecorder } from "recordrtc";
Inside the onOpen event handler call getUserMedia to access an audio MediaStream. Pass that stream to a new instance of a RecordRTC object. Based on the audio requirements of AssemblyAI’s realtime streaming API, configure the instance of the RecordRTC object to encode 250ms of audio as a single channel track using the `pcm` codec at a sample rate of 16000Hz.
onOpen: () => {
  console.log("AssemblyAI WebSocket opened");
  navigator.mediaDevices
      .getUserMedia({ audio: true })
      .then((stream) => {
        recorder = new RecordRTC(stream, {
        type: "audio",
        mimeType: "audio/webm;codecs=pcm", // endpoint requires 16bit PCM audio
        recorderType: StereoAudioRecorder,
        timeSlice: 250, // set 250 ms intervals of data that sends to AAI
        desiredSampRate: 16000,
        numberOfAudioChannels: 1, // realtime requires only one channel
        bufferSize: 16384,
        audioBitsPerSecond: 128000,
        ondataavailable: (blob) => {
          const reader = new FileReader();
          reader.onload = () => {
            const base64data = reader.result;
       // audio data must be sent as a base64 encoded string
           sendJsonMessage({
             audio_data: base64data.split("base64,")[1],
          });
        };
        reader.readAsDataURL(blob);
      },
    })
    recorder.startRecording();
  })
}
Each time RecordRTC records 250ms of data it calls the ondatavailable event passing the recorded audio as a Blob. Use this event to base64 encode the audio and use the sendJsonMessage function of useWebSockets to send the encoded data to AssemblyAI.
Finally, after creating the new RecordRTC object, call the startRecording function which triggers the recording of audio and the process of converting and sending it to AssemblyAI.
Pause the recorder
Starting the recording and transcription process is great, but at some point, you’ll probably want to stop it as well. To do that use the stop button click handler to toggle the shouldConnect value to false, closing the WebSocket connection and pause the RecordRTC recorder.
async function stop(e) {
  setShouldConnect(false);
  if (recorder)
    recorder.pauseRecording()
}
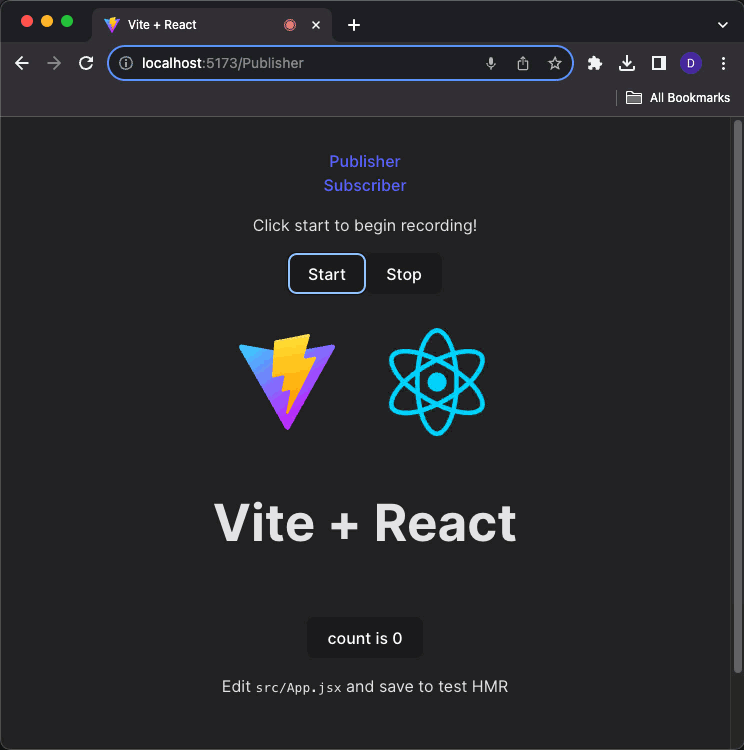
Let’s make sure the application is working as expected. Go ahead and try pressing the Start button. You may be prompted to give your application permission to access the microphone. If you are, go ahead and give permission.
Transcription using AssemblyAI
At this point our application is now capable of sending audio to AssemblyAI for transcription. AssemblyAI will perform that transcription and begin sending it back via the same WebSocket connection transcription data.
Start by adding a new state property to store transcribed text:
const [transcription, setTranscription] = useState('');
And use that state property to display the text on our page:
<p id="message">{transcription}</p>
As AssemblyAI transcribes the audio we’re sending, it uses the open WebSocket connection to send back to us messages containing partial transcription results. Those messages look roughly like this:
{
  "message_type":"PartialTranscript",
  "created":"2023-10-13T18:36:02.574861",
  "audio_start":0,
  "audio_end":2230,
  "confidence":0.805910792864326,
  "text":"this is a test",
  "words":[
    {"start":1430,"end":1465,"confidence":0.999489806225809,"text":"this"},
    {"start":1470,"end":1505,"confidence":0.676980979301034,"text":"is"},
    {"start":1910,"end":1945,"confidence":0.763494430232322,"text":"a"},
    {"start":1950,"end":1985,"confidence":0.783677955698138,"text":"test"}
  ]
}
As AssemblyAI continues to receive additional audio, it may send back partial responses containing some or all of the same audio samples. This means that we have to create a way to detect if we need to replace an existing partial response or if we’ve received a final response for a particular time slide of audio.
We’ll do that by using the audio_start value contained in each message and creating a function called processPartialTranscription that can store and update messages based on that value.
const processPartialTranscription = (source) => {
  let msg = "";
  const res = JSON.parse(source.data);
  if (res.text) {
    texts[res.audio_start] = res.text;
    const keys = Object.keys(texts);
    keys.sort((a, b) => a - b);
    for (const key of keys) {
      if (texts[key]) {
        msg += ` ${texts[key]}`;
      }
    }
  }
  return msg;
}
Each message is added to a dictionary using the audio_start value as the key. If that key already exists then its content is overwritten. Once the data is added to the dictionary it is sorted by its keys (in other words in time order). The sorted keys are looped over to create a single transcription result string.
To receive the WebSocket messages from AssemblyAI the useWebSockets hook gives us access to the last incoming message through the `lastMessage` property. We can use an Effect based on the `lastMessage` property to update the transcription text.
Import useEffect from React:
import { useState, useEffect } from "react";
Create a new Effect which checks if lastMessage is not empty and if not passes the last message through the processing function before setting the value to the transcription property:
useEffect(() => {
  if (lastMessage !== null) {
    setTranscription(processPartialTranscription(lastMessage));
  }
}, [lastMessage]);
Run the app. Start the recording and watch as text transcription shows up.
Broadcasting transcription messages
So far in our application we’ve done everything as the Publisher, meaning the person creating the audio is also receiving the transcription text. But closed-captioning is about broadcasting the audio transcription to a wide audience.
AssemblyAI only gives us a single WebSocket connection. To fan out to many transcription consumers we’ll use Ably.
Start by importing the Ably client library into the App component:
import { AblyProvider } from "ably/react";
import * as Ably from 'ably/promises';
Create a new connection to Ably:
const client = new Ably.Realtime.Promise({ authUrl:'/api/tokens/realtime' });
Enclose the Routes component with an AblyProvider, setting its client property to the Ably client you just created. The AblyProvider holds and manages the Ably WebSocket connection for you and makes it accessible to any child component:
<AblyProvider client={ client }>
  <Routes>
    <Route path="/publisher" element={<Publisher />} />
    <Route path="/subscriber" element={<Subscriber />} />
  </Routes>
</AblyProvider>
To broadcast the transcribed messages from the Publisher to Subscribers we need to access an Ably Channel and publish messages to it. The Ably client library includes a set of React hooks that make using Ably in React applications simple.
In the Publisher component import the useChannel object:
import { useChannel } from "ably/react";
Within the component use the `useChannel` hook to access an Ably channel:
const { channel } = useChannel('closed-captions');
Finally, publish messages to that channel by calling the channels publish method from inside of the processPartialTranscription function:
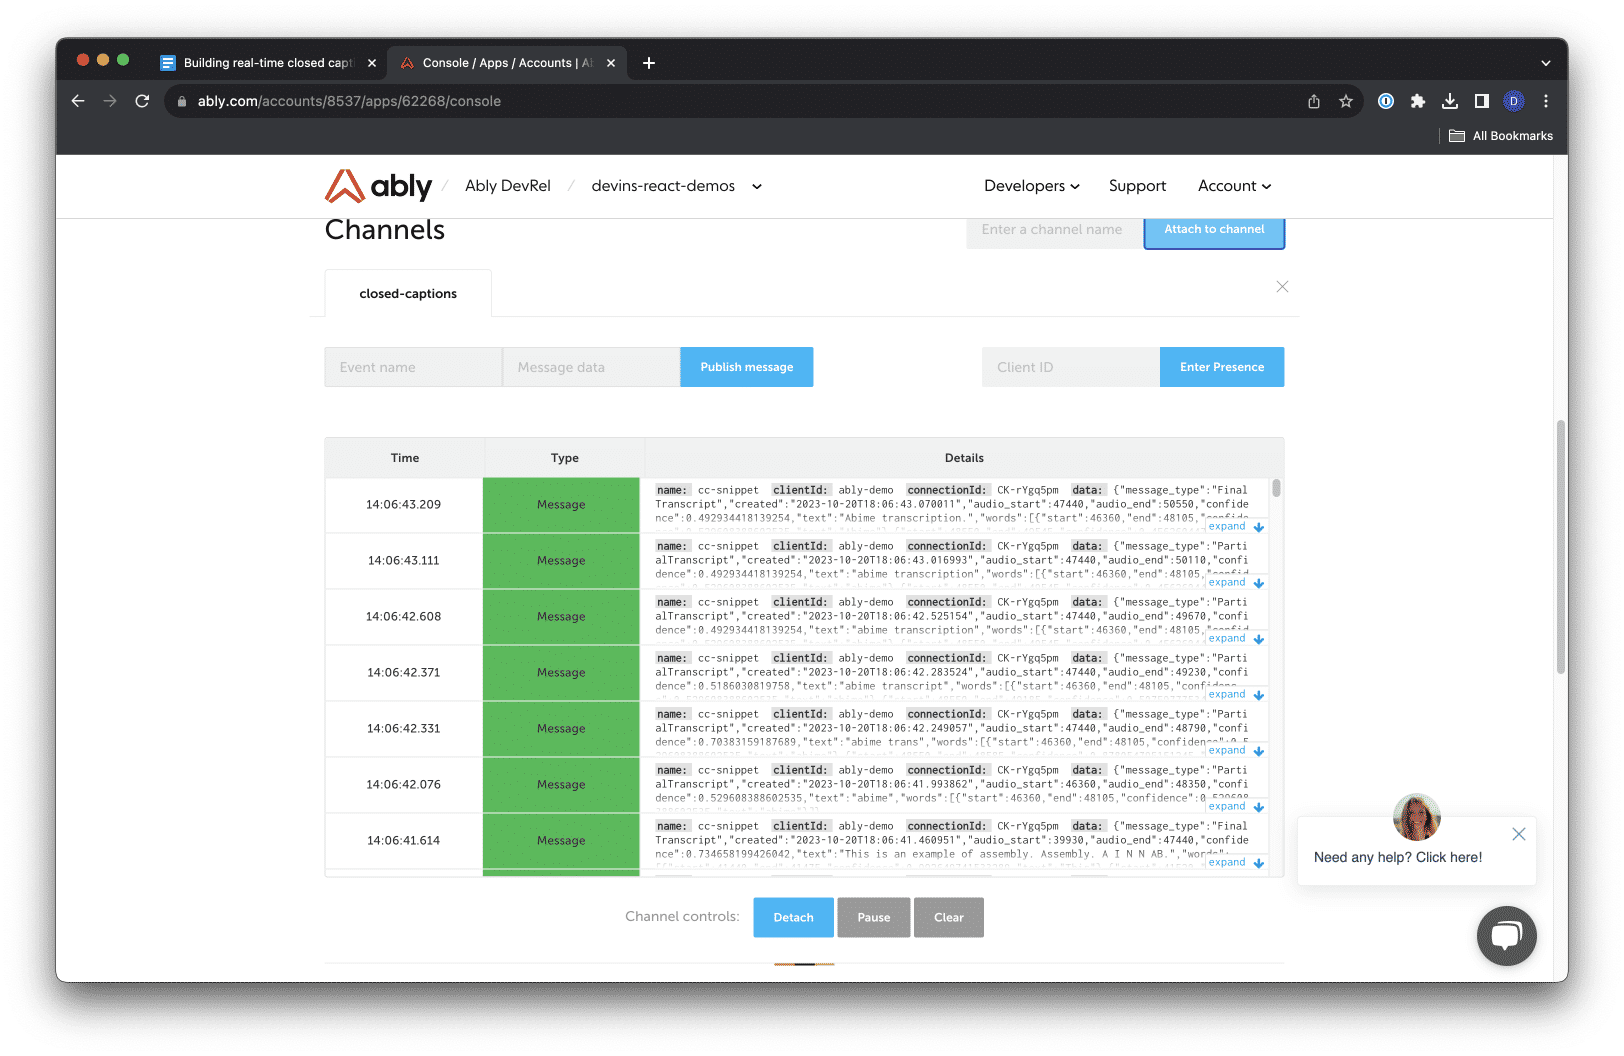
The application should now begin to publish the JSON formatted transcription data that AssemblyAI is sending the publisher. You can validate that this is happening correctly by logging into the Ably dashboard and connecting to the closed-captions channel using the Dev Console.
Create a subscriber component
With messages being published to Ably, we can shift gears to the Subscriber component. We’ll want the application to consume and display the messages being published into the closed-captions channel.
Import the useState hook from React and Ably useChannel hook into the Subscriber component:
import { useState } from 'react';
import { useChannel } from "ably/react";
Add a variable to hold partial snippets and a state value to hold the current transcription message:
const texts = {};

const [transcription, setTranscription] = useState('');
Add some basic HTML markup that defines two buttons and a place to display the transcription text:
return (
  <>
    <div>
      <p id="real-time-title">Listening for transcription messages!</p>
      <p id="message">{transcription}</p>
    </div>
  </>
);
Add the processPartialTranscription method:
const processPartialTranscription = (source) => {
 let msg = "";

 const res = JSON.parse(source.data);
 if (res.text) {
  texts[res.audio_start] = res.text;
  const keys = Object.keys(texts);
  keys.sort((a, b) => a - b);
  for (const key of keys) {
   if (texts[key]) {
    msg += ` ${texts[key]}`;
   }
  }
 }
useChannel has a callback function that gets called when new messages are received. Use that to receive and process incoming transcription messages and update the transcriptions state value:
const { channel } = useChannel("closed-captions", (message) => {
 setTranscription(processPartialTranscription(message));
});
That’s it! Open the application in two separate browser windows, one with the Publisher route loaded and the other with the Subscriber route loaded. In the publisher view, start the recorder and watch as transcription text begins to show in both the publisher and subscriber views.
Wrap up
Congrats on building this realtime closed-captioning application! In building his application you learned how easy it is to capture realtime audio from the browser, send it to AssemblyAI for transcribing and broadcast the transcription to an audience.
Combining AssemblyAI’s realtime transcription with Ably’s realtime message broadcasting gives you a powerful set of tools for your developer toolbelt.
If you’re looking to take this application further, one idea is to allow users of your application to select a language in which to receive the transcribed text, using a service like https://languageio.com/ to translate the text in realtime.
I'm always interested in how developers are combining tools like AssemblyAI or Language.io with Ably. Tell me how you are mashing tools together by hitting me up via email or on X (Twitter)