This blog was updated to include changes to the Ably Go client library.
A common problem that our customers have is event streaming spikey traffic to their clients. For example, imagine a server which needs to stream details on cryptocurrency trades. The quantity of trades happening each second is likely to fluctuate, sometimes nothing could happen, other times perhaps thousands.
In order to ensure reliable communication, it’s important that rate limits are in place on how many messages are to be sent to subscribed clients. If the number of messages being generated spikes beyond acceptable levels for a period of time, how do we ensure that we are able to handle it and provide these messages to clients in a timely manner?
Event streaming is inherently intended to be an implementation of Pub/Sub which has a unidirectional flow of data. That is, data flows from Publishers into Consumers without the consumers ever having to publish anything themselves. This means that we have a lot more control when it comes to rate limiting all potential publishers, as in most event streaming scenarios you’ll have the publishers be servers directly within your control.
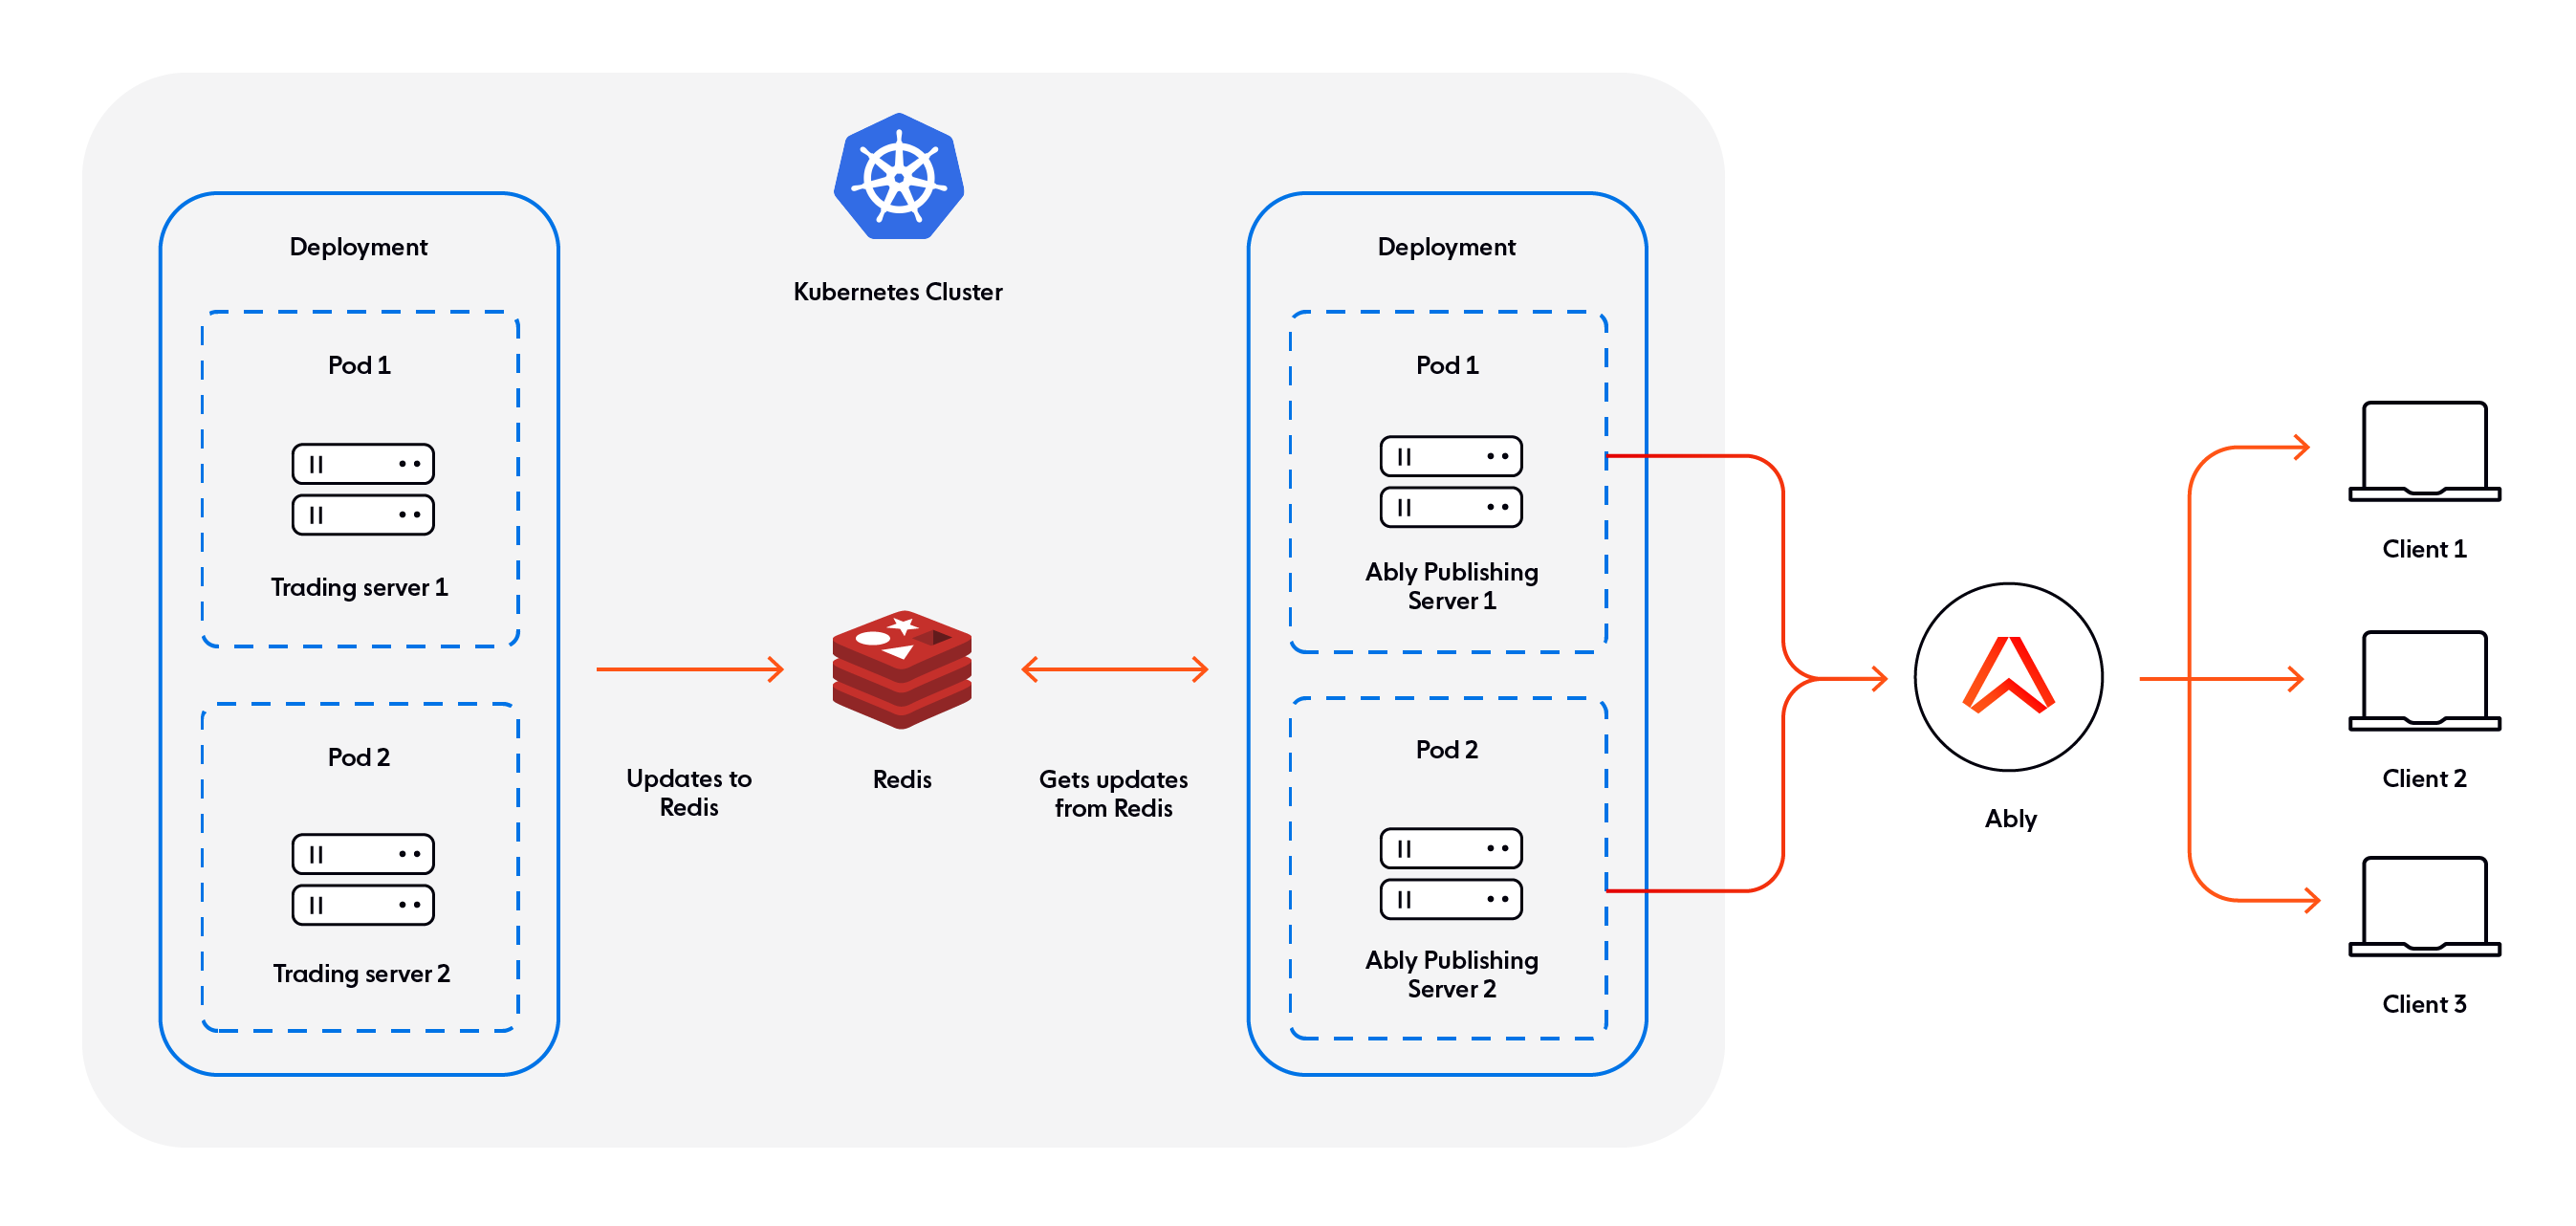
With a combination of Redis and Ably, written in Go, we’ll look to create the following reliable event streaming structure.
- We’ll have our trading server which will have bursts of messages to send to our clients.
- We’ll have a Redis Container which will hold messages from our trading server
- We’ll have a publishing server, which keeps track of the current rate of messages sent and consumes from Redis whenever it can publish to Ably
- Clients are then subscribed to the Ably Channel that the Publisher publishes to and displays the information.
We’ll have our core functionality (server, redis, publisher) all contained within a Kubernetes cluster.
The stack
Before we do that though, let’s go over what each of the tools we’ll be using are, and why we’re using them.
Golang
Go is an efficient, reliable programming language which is at its core based on the premise of scalability and concurrency. Go effectively implements Pub/Sub communication with its own channels to communicate between goroutines, with multiple goroutines able to both publish and subscribe to these channels. This core design to Go makes it one of the most well-fitted languages for extending this Pub/Sub functionality to networked Pub/Sub communication.
Want to learn more about Golang and realtime? We've got you covered:
- Guide to Pub/Sub in Golang
- Building realtime apps with Golang and WebSockets: client-side considerations
- Have fine-grained access control of your server with Golang and AblyD
Redis
Redis is one of the most popular and versatile in-memory data structure stores that exist. Due to being in-memory it’s extremely fast to retrieve messages from, and it is available in most programming languages.
In this tutorial we’ll be using it as a Message Queue, holding messages from our Trading Server until our Publisher Server is ready to handle the messages.
Ably
Ably is a pub/sub messaging platform which handles the entire distribution process of messages, scaling up to billions of users. The main protocol used by the Ably’s client libraries is WebSockets, however Ably is inherently Protocol Agnostic, allowing for any realtime protocols such as SSE or MQTT to seamlessly work as well.
We’ll be using Ably to distribute messages that are held by our Redis instance to as many clients as we want.
Docker and Kubernetes
Docker is an OS-level virtualization tool which allows one to create Images, which are representations of virtual machines in specific states which are set up with a Dockerfile. This is incredibly powerful as it allows for a Docker Image to be made of a specific virtual machine, and anyone who now uses this Docker Image will start with the exact same state. An instance of a Docker Image is called a Docker Container.
Kubernetes takes Docker and makes it even more powerful by allowing for Docker Containers to be grouped together, scaled dynamically, and in general makes managing a collection of Docker Containers considerably easier.
In this tutorial we’ll have a Docker Container for the Trading Server, for the Redis Instance, and three Containers for the Ably Publisher. We’ll manage these containers with Kubernetes, and demonstrate how to easily scale up and down the Ably Publishers as we need.
Starting off
To start, let’s create a logical file structure to hold the various servers, container configuration files and more.
Create a folder on your machine which will contain this project. Within it, create two folders: ably-publishing-server, and trading-server. We’ll be placing our code for both types of server in their respective folders.
my-redis-go-app
- ably-publishing-server
- trading-server
We’ll start by making our trading server. Within the trading-server folder create a go.mod file with the following contents:
module go-redis-trading-server

go 1.16

require (
github.com/go-redis/redis v6.15.9+incompatible // indirect
)
Here we’re specifying that to run our trading server we will need to import the redis module.
Next, create a file called trading-server.go. This will contain our core code for our trading server. What we want from our server is:
- Generate data on trades we want to be sent to all our clients. In this tutorial we’ll be simulating this data, however it should be easy to substitute in a real source
- Send this data to Redis, which will hold the data until our publishing servers are ready to send them to Ably to be streamed to our clients
Within the trading-server.go file, let’s add our basic structure:
package main

import (
"log"
"os"
"fmt"
"sync"
"time"
"math/rand"
"strconv"

"github.com/go-redis/redis"
)

var wg = &sync.WaitGroup{}

func main() {

}
In addition to the usual imports and main function, we’re specifying a WaitGroup. We’ll be using this to stop the script from stopping until we explicitly call for it to.
We’ll be using environment variables to make it easy for us to configure our server whenever we deploy it, so to make setup simpler let’s also create a function which will get an environment variable for us, or make use of a default value if it’s not been specified:
func getEnv(envName, valueDefault string) string {
value := os.Getenv(envName)
if value == "" {
return valueDefault
}
return value
}
Within the main function, let’s connect to Redis using the go-redis library. Create a function, getRedis, which will handle this for us:
func getRedis() *redis.Client {
// Create Redis Client
var (
host     = getEnv("REDIS_HOST", "localhost")
port     = string(getEnv("REDIS_PORT", "6379"))
password = getEnv("REDIS_PASSWORD", "")
)

client := redis.NewClient(&redis.Options{
Addr:     host + ":" + port,
Password: password,
DB:       0,
})

// Check we have correctly connected to our Redis server
_, err := client.Ping().Result()
if err != nil {
log.Fatal(err)
}

return client
}
Once we’ve got our Redis client set up, we’ll need a function to send our fake data through to Redis. Add the following:
func publishingLoop(redisClient *redis.Client) {
	queueKey := getEnv("QUEUE_KEY", "myJobQueue")
	publishRate, _ := strconv.Atoi(getEnv("PUBLISH_RATE", "200"))
	baseTradeValue := float64(200)

	// Send a burst of messages to Redis every 5 seconds
	ticker := time.NewTicker(5 * time.Second)
	quit := make(chan struct{})
	for {
		select {
		case <- ticker.C:
			for i := 0; i < publishRate; i++ {
				// Random test value varying +- 5 around the baseTradeValue
				tradeValue := baseTradeValue + (rand.Float64() * 10 - 5)
				redisClient.RPush(queueKey, fmt.Sprintf("%f", tradeValue))
			}
		case <- quit:
			// If you want a way to cleanly stop the server, call quit <- true
			// So this runs
			ticker.Stop()

			defer wg.Done()
			return
		}
	}
}
All we’ve got here is a ticker which will cause us to send a large number of messages to Redis every 5 seconds. We’re using a burst of messages here so we can simulate a scenario where we have too many messages to handle as they’re generated without also resulting in a queue which continues to grow.
Now let’s add the initialization of the Redis Client and the publishing functions to our main function, as well as our publishing function.
func main() {
    client := getRedis()

    go publishingLoop(client)

    // Add an item to the wait group so the server keeps running
    wg.Add(1)
    wg.Wait()
}
With that we have our trading server, ready to start feeding data into Redis!
Ably Publisher setup
Next, let’s set up a server which will be responsible for taking messages from our Redis queue and streaming them to our clients via Ably. In order to ensure reliable service to subscribing clients Ably enforces a rate limit per channel and per connection on published messages, which for Free Accounts is 50. As part of our publisher, we will need to ensure that we maintain a publish rate of at most 50 messages per second.
So that we can scale up the number of Ably Publishers in the future, the easiest method of enforcing a rate limit here is a Sliding Log. Effectively each time one of the Ably Publishers attempts to get a message to publish from Redis, it will check a log of previous messages sent in the last 1 second period. If the number of messages returned is greater than our limit, we wait a moment and try again.
To get started on the Ably Publisher, within the ably-publisher folder let’s create a go.mod file with the following contents:
module ably-go-publisher

go 1.16

require (
    github.com/ably/ably-go v1.2.0
    github.com/go-redis/redis v6.15.9+incompatible // indirect
)
Here we’re just including the go-redis module so we can interact with the Redis instance, and the ably-go library to interact with Ably.
Next, create a file again in ably-publisher called publisher-server.go. Inside, let’s add our imports and the basic main function. In addition, we’ll include the getEnv and getRedis functions we used for the trading-server as we’ll be needing them:
import (
	"log"
	"os"
	"time"
	"fmt"
	"context"
	"sync"
	"strconv"

	"github.com/go-redis/redis"
	"github.com/ably/ably-go/ably"
)

var ctx = context.Background()

var wg = &sync.WaitGroup{}

func main() {

}

func getRedis() *redis.Client {
	// Create Redis Client
	var (
		host     = getEnv("REDIS_HOST", "localhost")
		port     = string(getEnv("REDIS_PORT", "6379"))
		password = getEnv("REDIS_PASSWORD", "")
	)

	client := redis.NewClient(&redis.Options{
		Addr:     host + ":" + port,
		Password: password,
		DB:       0,
	})

	_, err := client.Ping().Result()
	if err != nil {
		log.Fatal(err)
	}

	return client
}

func getEnv(envName, valueDefault string) string {
	value := os.Getenv(envName)
	if value == "" {
		return valueDefault
	}
	return value
}
Next, to interact with Ably to send messages to clients, we’ll need to instantiate the Ably library. As part of connecting and using Ably, you will need to sign up for a free Ably Account. Once you have an account, you will need to get your API key from one of your account’s apps.
Once you have your API key, add the following function to your code:
func getAblyChannel() *ably.RealtimeChannel {
	// Connect to Ably using the API key and ClientID specified above
	ablyClient, err := ably.NewRealtime(
		// If you have an Ably account, you can find
		// your API key at https://www.ably.io/accounts/any/apps/any/app_keys
		ably.WithKey(getEnv("ABLY_KEY", "No key specified")),
		// ably.WithEchoMessages(false) // // Uncomment to stop messages you send from being sent back
	)
	if err != nil {
		panic(err)
	}

	// Connect to the Ably Channel with name 'trades'
	return ablyClient.Channels.Get(getEnv("CHANNEL_NAME", "trades"))
}
All we’re doing here is instantiating a connection to our Ably App, and then returning an instance of a channel from that app called ‘trades’. We’ll be using this channel to publish our trade updates to.
Now we have functions to set up our connections to both Redis and Ably, we need to write some code to connect the two together with considerations for rate limits.
For rate limit enforcement, we’ll be needing the following Redis commands, which will all be performed as part of a Redis Transaction (ensures that the commands occur sequentially and are atomic):
- ZRemRangeByScore(redisLogName, startScore, endScore) - This will remove any values from our logs which fall within the startScore and endScore value. Our ‘score’ in this context will be timestamps of past publishes, so if we set the startScore to “0” and the “endScore” to 1 second ago, we’ll be removing all logs from before 1 second ago
- ZCard(redisLogName) - ZCard will get the number of messages within a set, in this case the number of logs. If we’ve executed ZRemRangeByScore, this will be the number of messages published in the last second
- ZAdd(redisLogName, {score, member}) - ZAdd adds a new score and member to the specified Redis key. In our case, when we are going to publish a new message to Ably we will add the current timestamp to our log
In order to actually consume from the message queue we’ve created from our trading-server, we’ll need to make use of BLPop(timeout redisQueueName). This will remove the first item in our Redis queue and return it to us. Notably it is blocking, which means that if there are no messages on the queue, it will wait until there is a message to consume before continuing.
After popping a message from the queue, we will then send it to our Ably Channel with a simple channel.Publish(‘trade’, messageData).
Combining these all within a single transaction, we end up with the following function:
func transactionWithRedis(client *redis.Client, channel *ably.RealtimeChannel) error {
	// Redis key where messages from the trading server are stored
	redisQueueName := getEnv("QUEUE_KEY", "myJobQueue")

	// Values to be used for checking our Redis log key for the rate limit
	redisLogName := redisQueueName + ":log"
	now := time.Now().UnixNano()
	windowSize := int64(time.Second)
	clearBefore := now - windowSize
	rateLimit, _ := strconv.ParseInt(getEnv("RATE_LIMIT", "50"), 10, 64)

	err := client.Watch(func(tx *redis.Tx) error {
		tx.ZRemRangeByScore(redisLogName, "0", strconv.FormatInt(clearBefore, 10))

		// Get the number of messages sent this second
		messagesThisSecond, err := tx.ZCard(redisLogName).Result()
		if err != nil && err != redis.Nil {
			return err
		}

		// If under rate limit, indicate that we'll be publishing another message
		// And publish it to Ably
		if messagesThisSecond < rateLimit {
			err = tx.ZAdd(redisLogName, redis.Z{
				Score:  float64(now),
				Member: now,
			}).Err()
			if err != nil && err != redis.Nil {
				return err
			}

			messageToPublish, err := tx.BLPop(0*time.Second, redisQueueName).Result()
			if err != nil && err != redis.Nil {
				return err
			}

			err = channel.Publish(ctx, "trade", messageToPublish[1])
			if err != nil {
				fmt.Println(err)
			}
		}

		return err
	}, redisLogName)

	return err
}
With that done, we have all the functions we need to connect to both Redis and Ably, and send messages from our Redis Queue through Ably to clients! Add the following to the main function to make use of them:
func main() {
    client := getRedis()
    channel := getAblyChannel()

    go func() {
        for {
            transactionWithRedis(client, channel)
        }
    }()

    wg.Add(1)
    wg.Wait()
}
Dockerizing and scaling with Kubernetes
We now have the code we need for both parts of our system, so now we need to work out a logical way to deploy them both together, along with a Redis instance. To do this we’ll be using Docker to wrap each of our services along with a Redis instance, and then use Kubernetes to group this logic up and allow for easy scaling of them.
Docker
Starting this is very simple, we’ll just need to create a Dockerfile for both the trades server as well as the Ably publishing server which defines how each container should be constructed. Within the ably-publishing-server folder, create a file called Dockerfile with the following contents:
FROM golang:latest as builder

WORKDIR /app

COPY go.mod go.sum ./

# Download dependencies
RUN go mod download

# Copy from the current directory to the WORKDIR in the image
COPY . .

# Build the server
RUN go build -o publisher publisher-server.go

# Command to run the executable
CMD ["./publisher"]
Effectively all this is doing is building the publisher code we wrote, and then setting the Docker Image’s ‘run’ command to run the executable generated.
We’ll do the same sort of script as a Dockerfile in the trading-server folder:
FROM golang:latest as builder

WORKDIR /app

COPY go.mod go.sum ./

# Download dependencies
RUN go mod download

# Copy from the current directory to the WORKDIR in the image
COPY . .

# Build the server
RUN go build -o trading trading-server.go

# Command to run the executable
CMD ["./trading"]
That’s all we need to build our Docker Images from our code! Download Docker to your machine, and then from inside the trading-server folder, run the following to build it:
> docker build -t go-redis-trading-server:latest .
You should now have a Docker Image containing your trading server! You can check that the image was created by running docker images to see what images exist on your machine.
Let’s do the same for the Ably publishing server. In the ably-publishing-server folder, run the following:
> docker build -t go-redis-publishing-server:latest .
Kubernetes
Now that we’ve made our Docker containers for our service, we can now use Kubernetes to orchestrate our system.
What we’ll need to do is create a Deployment for a Redis Container, our Trades Container, and our Ably Publishing Container. Within each deployment, we’ll be able to optionally scale the number of Pods and thus the number of containers running of each type.
Additionally, we’ll need to create a Service, which will define access to the Redis Pod from our other Pods.
Let’s first create a file to contain our Redis Container and Service. Create a new folder in our project’s base folder called deployments, and in it add redis.yaml. Add the following to it:
---
apiVersion: apps/v1
kind: Deployment
metadata:
  name: redis-deployment # Unique name for the deployment
  labels:
    app: redis # Label used to select this deployment
spec:
  selector:
    matchLabels:
      app: redis
  replicas: 1 # Number of pods to run in this deployment
  template:
    metadata:
      labels:
        app: redis
    spec: # Spec for the Docker Container inside of the Pod
      containers:
      - name: redis-container
        image: redis # Use the generic Redis Docker Image
---
apiVersion: v1
kind: Service
metadata:
  name: redis-service
  labels:
    app: redis
spec:
  ports:
  - port: 6379
    targetPort: 6379
  selector: # Pods with the 'app: redis' label will use this service
    app: redis
Here we have two sections defined: a Redis Deployment, and a Redis Service. The deployment effectively defines that we will have a single instance of the official Docker Redis Container, pulled from the Docker Hub. We tag this container and its Pods with ‘app: redis’ so the Service can identify them and be applied correctly.
The Service defined below the Deployment specification simply states that the Redis Pod should be made available on the port 6379.
Next, let’s create Deployment specifications for our trades and ably publishing containers. In order for these specs to correctly use the Docker Images you’ve generated you’ll need to have the Image hosted somewhere for the Deployment to pull from eventually. The easiest place to do this is the Docker Hub. If you’d prefer to skip pushing your Images to a repository you can also use the Images of this code which have already been made and are available as ‘tomably/trading-server:latest’ and ‘tomably/go-redis-ably-publisher:latest’ on the Docker Hub.
Let’s create the trading server deployment first. Create a new file in the deployment` folder called trading-deployment.yml with the following contents:
---
apiVersion: apps/v1
kind: Deployment
metadata:
  name: trading-server
spec:
  replicas: 1 # Number of pods to have within this deployment
  selector:
    matchLabels:
      app: trading-server
  template: # Template for Pods within this deployment
    metadata:
      labels: # The label used for pods within this deployment
        app: trading-server
    spec: # Details on the Docker Container to use in each Pod
      containers:
      - name: trading-server
        image: tomably/trading-server:latest
        imagePullPolicy: Always
        env: # Environment variables passed to the container
          - name: REDIS_HOST
            value: redis-service
          - name: REDIS_PORT
            value: "6379"
Here we’re again specifying that we want to have a single instance (replicas) of the Image we’re pulling. We’re also specifying some environment variables that’ll be used by the container.
Create another file in the same folder called ably-publisher-deployment.yml. We’ll use the exact same structure, except we’ll set the replicas to 3. This should mean that when we eventually use this configuration file, we’ll have three instances of our publisher running. If our rate limiter is working correctly, they should respect the shared rate limit between themselves when publishing.
As part of the environment variables we’re also adding our Ably API key. Make sure to replace the placeholder INSERT_API_KEY_HERE text with the API key you obtained earlier in the tutorial.
---
apiVersion: apps/v1
kind: Deployment
metadata:
  name: ably-publisher
spec:
  replicas: 3 # Number of pods to have within this deployment
  selector:
    matchLabels:
      app: ably-publisher
  template: # Template for Pods within this deployment
    metadata:
      labels: # The label used for pods within this deployment
        app: ably-publisher
    spec:
      containers:
      - name: ably-publisher
        image: tomably/go-redis-ably-publisher:latest
        imagePullPolicy: Always
        env: # Environment variables passed to the container
          - name: REDIS_HOST
            value: redis-service
          - name: REDIS_PORT
            value: "6379"
          - name: ABLY_KEY
            value: "INSERT_API_KEY_HERE"
          - name: RATE_LIMIT
            value: "50"
With that done we should have everything we need to run our project! In order to run our Kubernetes Cluster, we’ll need two things: Kubectl to run Kubernetes commands, and Minikube to run the cluster on.
You’ll need to download kubectl as described on the Kubernetes website, and then ensure you’ve done so correctly by running kubectl version --client.
Next, Download Minikube, and then run in your terminal minikube start to start up an instance of it.
Once you have that, we’ll use kubectl to deploy our deployments and service as described in our configuration files! Run the following commands to have kubectl read and use our configuration files to construct our cluster:
> kubectl apply -f redis.yml
> kubectl apply -f ably-publisher-deployment.yml
> kubectl apply -f trading-deployment.yml
If everything has gone according to plan, if you run kubectl get pods, you should see something like the following returned:
NAME                               READY   STATUS    RESTARTS   AGE
ably-publisher-6b6cb8c796-8px6w    1/1     Running   0          10s
ably-publisher-6b6cb8c796-mmh7p    1/1     Running   0          10s
ably-publisher-6b6cb8c796-nrxqp    1/1     Running   0          10s
redis-deployment-6f6964f4c-8gwsm   1/1     Running   0          10s
trading-server-7c5d445747-mrn54    1/1     Running   0          10s
If any of the pods returned aren’t Running, and instead are in a state of Error or CrashLoopBackOff, you can try checking what’s wrong by running kubectl logs POD_NAME, replacing POD_NAME with the name of the pod in question.
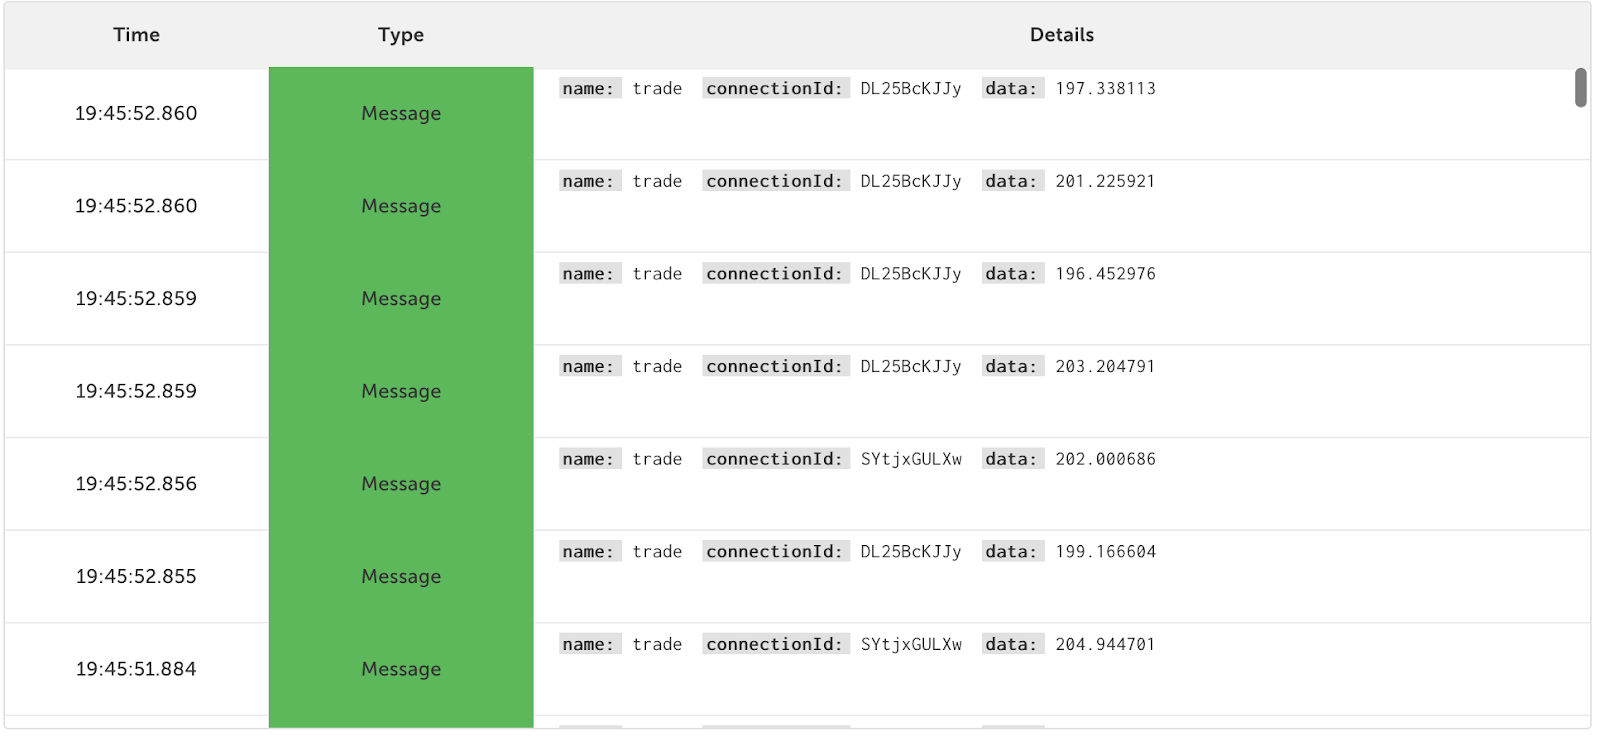
If you go to your Ably App’s Dev Console and connect to the ‘trades’ channel (or whichever channel you’ve renamed it to), you should see the trades coming through.
If you wish to delete any of the deployments, you can run the following command, making sure to change DEPLOYMENT_NAME to the relevant deployment name (trading-server, ably-publisher, or redis-deployment in this tutorial).
> kubectl delete deployment DEPLOYMENT_NAME
Subscribing to the data
Now that we have our data going into Ably, let’s create a very basic webpage to consume from it. Create a new file called client.html, and add the following code to it, making sure to replace the INSERT_API_KEY_HERE text with your Ably API key:
<html>
<body>
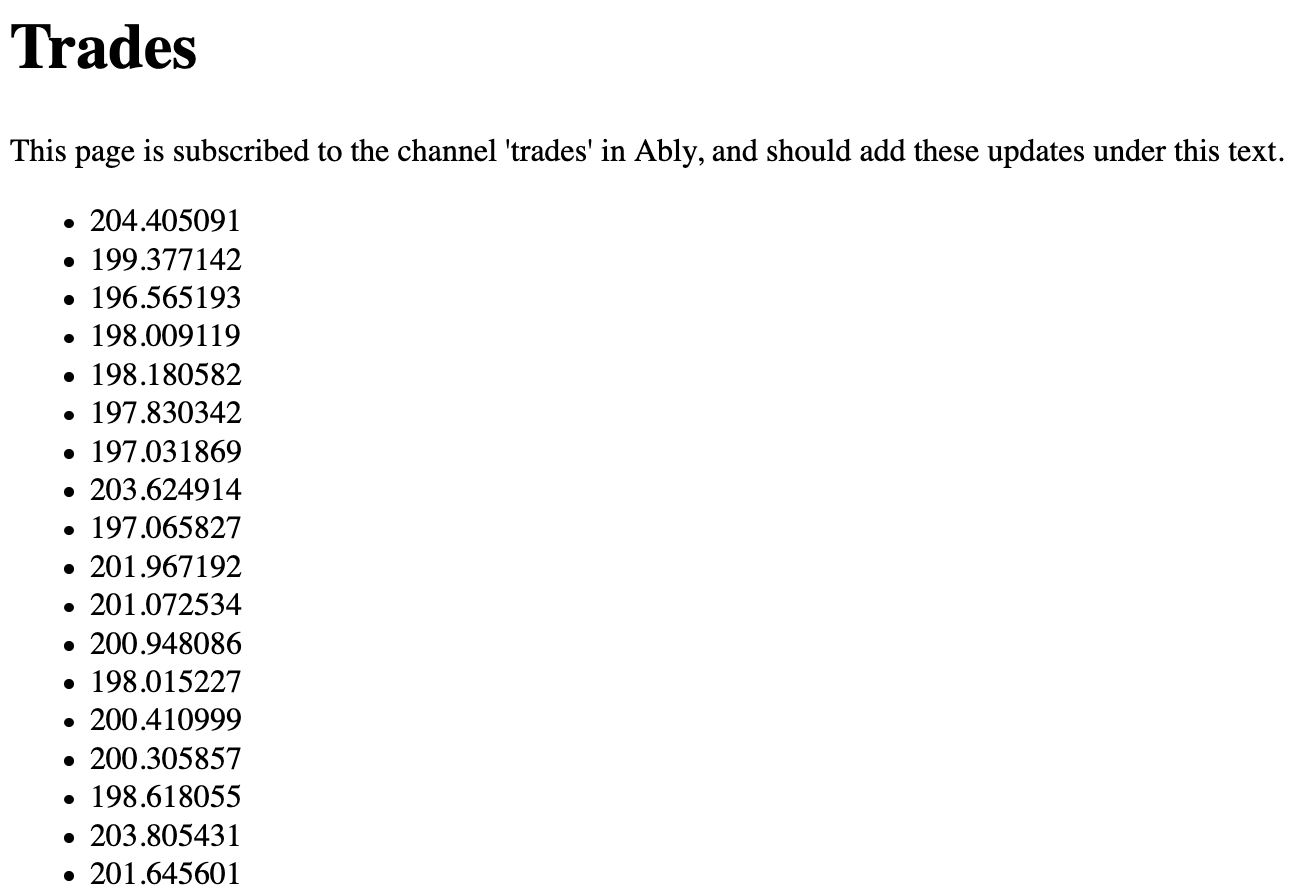
<h1>Trades</h1>
<p>This page is subscribed to the channel 'trades' in Ably, and should add these updates under this text.</p>
<ul class="row" id="messages"></ul>
</body>
<!-- Include the latest Ably Library -->
<script src="https://cdn.ably.io/lib/ably.min-1.js"></script>
<!-- Instance the Ably library -->
<script type="text/javascript">
let realtime = new Ably.Realtime("INSERT_API_KEY_HERE"); /* ADD YOUR API KEY HERE */
/* Subscribe to messages on the trades channel */
let channel = realtime.channels.get("trades");
channel.subscribe(function(msg) {
show(msg.data);
});
function show(msg) {
let list = document.createElement("LI");
let text = document.createTextNode(msg);
list.appendChild(text);
document.getElementById("messages").appendChild(list);
}
</script>
</html>
If you open this it’ll be a very bare web page, which is subscribed to the Ably channel ‘trades’. Assuming you’re publishing data into the channel from our cluster, you should see the trades start coming in.
Conclusion
With that we’re done! We now have an easily scalable infrastructure for streaming large amounts of traffic easily to clients. This is really just scraping the surface of possibilities, but should act as a good starting point for building good tooling.
Event streaming can benefit from many other features, such as checking the presence of clients on channels before publishing or processing data for them, enabling history on channels so clients can check for previous events, or even forwarding events on to Webhooks and Cloud Functions for further processing.
If you’d like to try this with existing real data, you can find real cryptocurrency pricing for free in the Ably Hub.
All of the code for this project can be found on GitHub.