If you’ve ever used Go before, the concepts of Publish/Subscribe should be fairly familiar to you. It is much like how goroutines communicate over channels between each other, the idea boils down to allowing for such a channel to have multiple ‘subscribers’ receive messages sent on the channel.
This paradigm can be powerful when used right, allowing for a cut down of complexity from both the publisher and subscriber side, as well as fast asynchronous communication. This is very similar to Go’s goroutine usage, making the two a powerful combination when put together.
What is Pub/Sub?
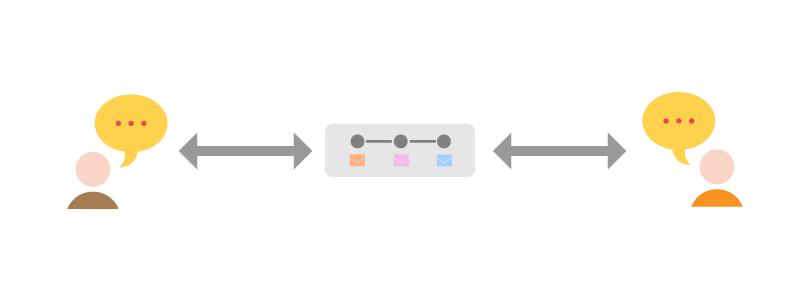
The Publish/Subscribe (Pub/Sub) pattern is one which allows for realtime messages to be sent from one device (a ‘Publisher’) to other devices (‘Subscribers’). This is done through the use of a message broker, which receives messages from Publishers, and then sends them to the relevant Subscribers.
To identify who each message should be sent to, the premise of topics (also known as channels, but we will refer to them as topics to avoid confusion with Go’s channels) is used. This is an ID which represents a collection of communication, to which a publisher can publish to, and subscribers can subscribe to. An example would be to have a topic called ‘sport’, which a publisher will be publishing sports updates to, and subscribers would subscribe to for said sports updates.
There is no inherent need for a publisher to be only a publisher, nor a subscriber to be just a subscriber. Many use cases, such as Chat Applications, require for clients to both publish messages and subscribe to messages. The main concept is that all communication is sent to the broker, identified by a topic ID, and then sent onwards to any client which has subscribed to said topic.
Although Pub/Sub is based on earlier design patterns like message queuing, it is more flexible and scalable. The key to this is the fact Pub/Sub enables the movement of messages between different components of the system without the components being aware of each other’s identity.
When you should use Pub/Sub
Pub/Sub has a few areas in which it particularly excels over other more traditional methods such as polling:
- A publisher doesn’t need to be aware of who they’re publishing to, just which topic they’re publishing to. This allows for dynamic message distribution without any actions on the publisher’s end
- Subscribers don’t need to repeatedly poll a publisher for updates, nor even communicate directly with the publisher at all. Once a connection has been established with the broker, and a topic subscribed to, they’re ready to receive messages
Chat applications are a classic use case of the Pub/Sub pattern. In a chat application, clients can subscribe to chat rooms which have a designated Pub/Sub topic. These clients can then publish messages to this topic, and all other clients subscribed to it will receive their messages.
Pub/Sub works well for this as the clients sending messages don’t need to be aware of who else is in the chat room, just which chat room they want their messages to go to. The broker handles the distribution of messages to the correct clients, and a client can publish messages in the exact same way regardless of who is in the room at any given time.
Benefits for your Golang Apps
Go is at its core based on the premise of scalability and concurrency, and implements Pub/Sub communication with its own channels to communicate between goroutines, with multiple goroutines able to both publish and subscribe to these channels. This core design to Go makes it one of the most well-fitted languages for extending this Pub/Sub functionality to networked Pub/Sub communication.
In general, Pub/Sub is a perfect fit for many of Go’s more common uses.
- Good for health checks. You can distribute any data easily by having any services interested subscribed to a health check topic. Keeps history, can use presence to track active devices, etc.
- Distributed systems was one of the core considerations of Go’s development, and so matches up perfectly with Pub/Sub. Simplified, efficient communication between as many publishers and subscribers as needed, with easily adjusted access to data makes it possible for anyone to start implementing distributed functionality.

Extending Pub/Sub
Although the basic premise of Pub/Sub is powerful by itself, there’s a lot that can be done to elevate it further. Examples of this are ensuring the ordering of messages is consistent for all subscribers, and providing compression methods for communication.
Message Ordering
Inherently a Pub/Sub system won’t ensure that the order of messages sent will match the order that they’re received by clients. Although the order of messages can usually be constructed by a client from each message’s ID, often you’ll have clients needing to process messages as they arrive. This means that even if a client will eventually have the correct order of messages, it can for certain applications be too late.
Delta Compression
Often communication may contain largely identical structures, with just a field changing. For example, a client may send a message containing details of a player performing an action, which contains repeated information such as player name, player ID, and so on. For clients subscribed to these updates, this is a lot of extra data which they already have.
Rather than having clients receive these full updates, it can be better to instead send clients a delta, representing the difference between the new message and the last message sent on a channel. This translation from message to delta can be performed on the broker, allowing for a publisher to send a full message, and clients at their own discretion to request delta messages or full messages.
History
For example, due to all messages being grouped by which topic they’ve been published to, it’s possible for a client to check the History of messages sent on a topic. Using the chat application example, this would allow a user who was offline for an hour to connect and check what messages they’d missed with ease.
Going beyond Pub/Sub
In addition, there are features which can be used to provide even more functionality to Pub/Sub. Being able to retrieve old messages, see who’s currently active, and providing methods of controlling access to topics and channel functionality through forms of authentication are basic examples of such features.
Presence
One popular feature added to Pub/Sub is the ability to check who is present on a topic. Although in many scenarios a publisher won’t need to be concerned with who’s subscribed before publishing, sometimes it can be useful to know. With a chat application, knowing who is online can be useful to users for knowing if someone is available to talk or not.
Push Notifications
It’s common to expect devices to receive updates and notifications, even when their apps are operating in the background or closed. In the background both iOS and Android will usually put any communication on hold until the app is opened again, only allowing for their own Push Notification interactions to be allowed.
Because of this, it’s important to be able to send notifications where required, and makes sense to embed this communication within your existing messaging system. Pub/Sub can be perfect for this due to the fact it separates the publishers from the consumers. A publisher can publish a message in exactly the same way, but the subscriber can indicate to the broker how it wants to receive these messages.
This can be extended further, by allowing the publishers of messages to be using completely different protocols to subscribers. A publisher may use a REST endpoint of the broker to publish a message, and you can then have some subscribers using MQTT, some SSE, and some WebSockets to subscribe. The broker is responsible for translation and ensuring that all of these different systems and protocols can interact seamlessly.
Pub/Sub in Golang
Here at Ably, we have a protocol for pub/sub that is used on top of WebSockets. It allows you to communicate over WebSockets by using a higher-level set of capabilities. To demonstrate how simple it is, here’s how you create a client with Ably:
client, err := ably.NewRealtime(ably.WithKey("xxx:xxx"))
This is how you subscribe to a channel to receive messages (events):
channel := client.Channels.Get("test")

_, err := channel.SubscribeAll(context.Background(), func(msg *ably.Message) {
    fmt.Printf("Received message with data: '%v'\n", msg.ClientID, msg.Data)
})
And here’s how you publish messages to a channel:
err := channel.Publish(context.Background(), "message-name", "message-data")
Ably implements the above features and more, such as supporting communication with MQTT, SSE and REST.
Implementing Pub/Sub in a Golang Chat App
One popular use case for Pub/Sub is a chat application, so to demonstrate the power of Pub/Sub and go let’s try creating our own, scalable, easy to make chat program. We’ll want to allow for users to connect with a ClientID to identify themselves, retrieve the History of chat on the channel to see what they’ve missed, and publish + subscribe to messages.
To get started, you’ll a Ably account, which is free to sign up for. Once you have an Ably account, install the Ably Go library with the following command line:
go get -u github.com/ably/ably-go/ably
Alternatively, creating a go.mod file which contains the external requirements can be useful, especially if you intend to distribute the code:
module ably-chat
go 1.15
require (
    github.com/ably/ably-go v1.2.0
)
Now, create a file called chat.go. Inside this, we’ll put our chat application. To start off, add the following imports at the top of the file. These will be used for some simple terminal inputs, and for Ably:
package main
import (
	"bufio"
	"context"
	"fmt"
	"os"
	"strings"

	"github.com/ably/ably-go/ably"
)
Next, let’s connect to Ably. Add a main function with the following contents:
func main() {
	fmt.Println("Type your clientID")
	reader := bufio.NewReader(os.Stdin)
	clientID, _ := reader.ReadString('\n')
	clientID = strings.Replace(clientID, "\n", "", -1)

	// Connect to Ably using the API key and ClientID specified above
	client, err := ably.NewRealtime(
        // If you have an Ably account, you can find
        // your API key at https://www.ably.io/accounts/any/apps/any/app_keys
		ably.WithKey("INSERT_YOUR_ABLY_API_KEY_HERE"),
		// ably.WithEchoMessages(false), // Uncomment to stop messages you send from being sent back
		ably.WithClientID(clientID))
	if err != nil {
		panic(err)
	}
}
What the above is doing is asking the user to type in their clientID, which is how they’ll be identified to other users of this chat app. We use this as part of initializing the Ably realtime connection.
In this example, we’re using an API key to authenticate with Ably. You’ll need to replace the INSERT_YOUR_API_KEY_HERE text with your own API Key, which you can get for any of your Ably Apps. For any non-trusted clients in a real-world scenario you would usually make use of Token Authentication instead, providing far greater control over each client’s permissions.
There is also a commented out line, NoEcho: true, which if uncommented would result in any messages sent from this client to Ably not being returned to said client due to it subscribing to the channel. For this demo however we’re leaving this commented out such that we can see messages being sent and received from a single client.
These settings are then used to initialize the library in client, err := ably.NewRealtime(...).
Next, let’s make a reference to a channel in Ably. Channels are what clients will publish and subscribe to, much like in Go. Any channel can have any number of publishers and subscribers. For simplicity we’ll only have one, and call it chat:
// Connect to the Ably Channel with name 'chat'
channel := client.Channels.Get("chat")
Now that we’ve instantiated Ably and have a reference to the channel we want to communicate on, we can start setting up our publishing and subscribing. To start, let’s create a function which will allow for publishing of messages:
func publishing(channel *ably.RealtimeChannel) {
	reader := bufio.NewReader(os.Stdin)

	for {
		text, _ := reader.ReadString('\n')
		text = strings.ReplaceAll(text, "\n", "")
		// Publish the message typed in to the Ably Channel
		err := channel.Publish(context.Background(), "message", text)
		// await confirmation that message was received by Ably
		if err != nil {
			err := fmt.Errorf("publishing to channel: %w", err)
			fmt.Println(err)
		}
	}
}
What this is doing is listening for messages to be typed into the terminal, and then publishing them to the Ably Channel we established.
Next, let’s make a function that lets us subscribe to messages:
func subscribe(channel *ably.RealtimeChannel) {
	// Subscribe to messages sent on the channel
	_, err := channel.SubscribeAll(context.Background(), func(msg *ably.Message) {
		fmt.Printf("Received message from %v: '%v'\n", msg.ClientID, msg.Data)
	})
	if err != nil {
		err := fmt.Errorf("subscribing to channel: %w", err)
		fmt.Println(err)
	}
}
All this is doing is creating a subscription to the Ably Channel (letting it know we want it to send us any new messages on the channel), with any messages it receives being sent to our function. These messages contain the data the publisher sent, as well as the ClientID they attached to their connection. We use this to print to the terminal the message and who sent it.
Now let’s try this out. Add the functions to the end of our main function:
// Start subscribing to messages from the channel
subscribe(channel)

// Start publishing to the channel
publishing(channel)
Then, run our code with go run chat.go. You should be prompted to input a ClientID, and then any messages you type in afterwards will be sent right back, ClientID included. You can run this on any other device anywhere in the world, and it’ll all work seamlessly together.
Adding History
The above code shows how you can use Presence to identify a user, and how to publish to and subscribe from a channel. However, there’s often much more that people want from a chat application. As a demonstration, often access to older messages from before a client connects to a channel is desired, so that someone can catch up on current discussion.
Ably’s History can work perfectly for this. We can add the following function which will fetch old messages from the channel, and print them to the terminal.
func getHistory(channel *ably.RealtimeChannel) {
	// Before subscribing for messages, check the channel's
	// History for any missed messages. By default a channel
	// will keep 2 minutes of history available, but this can
	// be extended to 48 hours
	pages, err := channel.History().Pages(context.Background())
	if err != nil || pages == nil {
		return
	}

	hasHistory := true

	for ; hasHistory; hasHistory = pages.Next(context.Background()) {
		for _, msg := range pages.Items() {
			fmt.Printf("Previous message from %v: '%v'\n", msg.ClientID, msg.Data)
		}
	}
}
Call this function just after defining the channel, so that the history is obtained and displayed prior to any new messages.
func main() {
    ...

    channel := client.Channels.Get("chat")

    getHistory(channel)

    subscribe(channel)

    ...
Adding Presence
Another feature that can be really useful is knowing when people enter and leave the chat. This can be done using Presence. Firstly, when a client joins a channel we’ll want them to enter the Presence set. This can be done with the following:
func main() {
    ...
    channel := client.Channels.Get("chat")

    // Enter the Presence set of the channel
    channel.Presence.Enter(context.Background(), "")

    getHistory(channel)
    ...
}
You can change the string to be any context information you’d like, but for this use-case we’ll just be needing the attached ClientID.
Next, let’s create a function to listen for Presence messages:
func subscribePresence(channel *ably.RealtimeChannel) {
	// Subscribe to presence events (people entering and leaving) on the channel
	_, pErr := channel.Presence.SubscribeAll(context.Background(), func(msg *ably.PresenceMessage) {
		if msg.Action == ably.PresenceActionEnter {
			fmt.Printf("%v has entered the chat\n", msg.ClientID)
		} else if msg.Action == ably.PresenceActionLeave {
			fmt.Printf("%v has left the chat\n", msg.ClientID)
		}
	})
	if pErr != nil {
		err := fmt.Errorf("subscribing to presence in channel: %w", pErr)
		fmt.Println(err)
	}
}
This establishes a subscription to Presence messages on the channel, and will print a message for any enter or leave event that occurs. Enter events will happen when a client calls the Presence.Enter function, and leave events will occur once a connection has been disconnected.
With all of this combined, we end up with the following code:
package main

import (
	"bufio"
	"context"
	"fmt"
	"os"
	"strings"

	"github.com/ably/ably-go/ably"
)

func main() {
	fmt.Println("Type your username")
	reader := bufio.NewReader(os.Stdin)
	username, _ := reader.ReadString('\n')
	username = strings.Replace(username, "\n", "", -1)

	// Connect to Ably using the API key and ClientID specified above
	client, err := ably.NewRealtime(
		ably.WithKey("INSERT_YOUR_ABLY_API_KEY_HERE"),
		// ably.WithEchoMessages(false), // Uncomment to stop messages you send from being sent back
		ably.WithClientID(username))
	if err != nil {
		panic(err)
	}

	fmt.Println("You can now send messages!")

	// Connect to the Ably Channel with name 'chat'
	channel := client.Channels.Get("chat")

	// Enter the Presence set of the channel
	channel.Presence.Enter(context.Background(), "")

	getHistory(channel)

	subscribe(channel)

	subscribePresence(channel)

	// Start the goroutine to allow for publishing messages
	publishing(channel)
}

func getHistory(channel *ably.RealtimeChannel) {
	// Before subscribing for messages, check the channel's
	// History for any missed messages. By default a channel
	// will keep 2 minutes of history available, but this can
	// be extended to 48 hours
	pages, err := channel.History().Pages(context.Background())
	if err != nil || pages == nil {
		return
	}

	hasHistory := true

	for ; hasHistory; hasHistory = pages.Next(context.Background()) {
		for _, msg := range pages.Items() {
			fmt.Printf("Previous message from %v: '%v'\n", msg.ClientID, msg.Data)
		}
	}
}

func subscribe(channel *ably.RealtimeChannel) {
	// Subscribe to messages sent on the channel
	_, err := channel.SubscribeAll(context.Background(), func(msg *ably.Message) {
		fmt.Printf("Received message from %v: '%v'\n", msg.ClientID, msg.Data)
	})
	if err != nil {
		err := fmt.Errorf("subscribing to channel: %w", err)
		fmt.Println(err)
	}
}

func subscribePresence(channel *ably.RealtimeChannel) {
	// Subscribe to presence events (people entering and leaving) on the channel
	_, pErr := channel.Presence.SubscribeAll(context.Background(), func(msg *ably.PresenceMessage) {
		if msg.Action == ably.PresenceActionEnter {
			fmt.Printf("%v has entered the chat\n", msg.ClientID)
		} else if msg.Action == ably.PresenceActionLeave {
			fmt.Printf("%v has left the chat\n", msg.ClientID)
		}
	})
	if pErr != nil {
		err := fmt.Errorf("subscribing to presence in channel: %w", pErr)
		fmt.Println(err)
	}
}

func publishing(channel *ably.RealtimeChannel) {
	reader := bufio.NewReader(os.Stdin)

	for {
		text, _ := reader.ReadString('\n')
		text = strings.ReplaceAll(text, "\n", "")
		// Publish the message typed in to the Ably Channel
		err := channel.Publish(context.Background(), "message", text)
		// await confirmation that message was received by Ably
		if err != nil {
			err := fmt.Errorf("publishing to channel: %w", err)
			fmt.Println(err)
		}
	}
}
Run the code again with go run chat.go, and see it all in action. Great, you’ve got yourself a basic chat application!
The source code for this can be found in our GitHub.
Summary
Overall Pub/Sub is an extremely powerful pattern that compliments Go’s inherent distributed bias. It can turn complex communications problems into far more manageable chunks by separating the publishers from subscribers, and is particularly versatile in its use.
If you’re interested in trying it out, try taking the above code and extending it further. If you have any questions or make anything you’d like to shout about, please get in touch and we’d love to help.
Further Reading
- Everything You Need To Know About Publish/Subscribe
- Scalable event streaming with Redis and Golang
- Have fine-grained access control of your server with AblyD
- Ablyeye: How we visualized an Ably SDK with Go and Ebiten
- Building realtime apps with Go and WebSockets: client-side considerations
- Pub/Sub Examples: 5 Use Cases to Understand the Pattern and its Benefits