Spring Boot is a powerful application framework for creating production-grade Spring based Applications. It allows for developers to very quickly and easily get sites up and running, with databases and more.
In this tutorial, we’ll be going over WebSockets, Pub/Sub, and how to make the most out of these in your Spring Boot applications.
What are WebSockets?
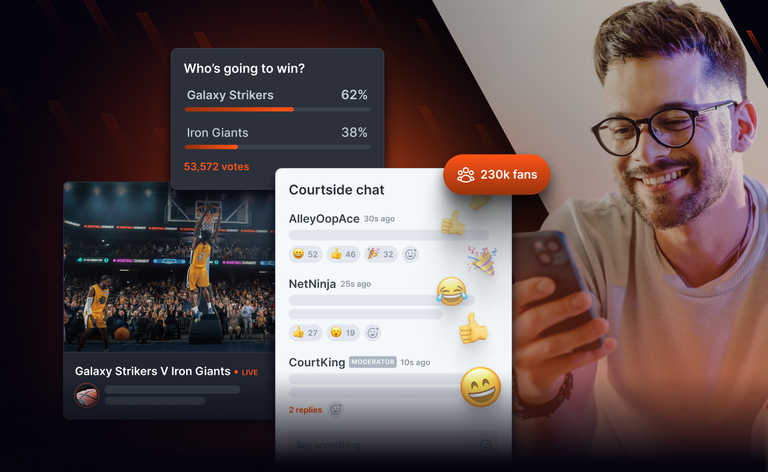
Although traditional REST-based communication can be enough for many use-cases, sometimes it’s not quite enough to provide realtime experiences to your users. Think of chat applications; new updates are constantly occurring, clients are going online and offline, and all of this is expected to be indicated to all the clients as quickly as possible. If we were to rely on the client to make a request for these updates, it’d need to be requesting extremely frequently to maintain a realtime experience, and in doing so consume a lot of resources and bandwidth.
This is where WebSockets come in. WebSockets allow for bi-directional communication between the clients and the server. Once a client established a connection to your server, the server is free to send updates to the clients whenever an update is available. This ends up being far more efficient, and also ensures updates are being sent to clients as soon as possible.

What is Pub/Sub?
Publish/Subscribe (Pub/Sub) is a paradigm in which you decouple clients and servers from one another. Rather than a server having to keep track of which clients to send messages to, you instead have clients subscribe to entities known as ‘channels’, and the server (or clients, depending on your use case!) publish messages to that channel. Some middleware or server is then responsible for routing messages published to a channel to all clients who’ve subscribed to it.
By introducing this middleware, you suddenly don’t have to worry about maintaining state on your Spring Boot server, and are able to have inter-client communication. By separating your publishing server from this central pub/sub server(s), you can easily extend communication to be inter-client, handle multiple servers publishing to clients, and more.
Implementing these concepts
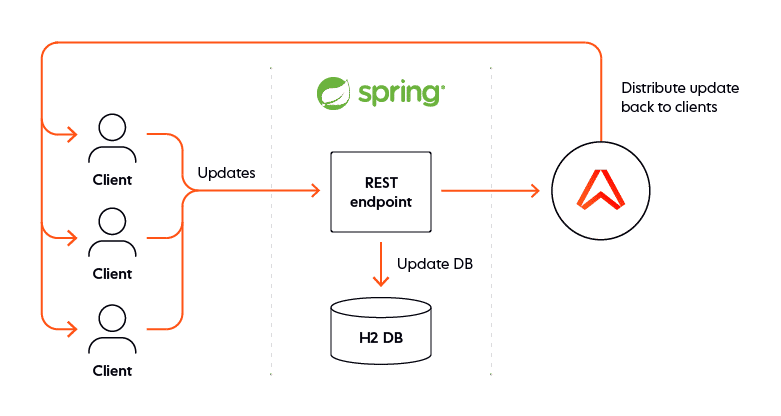
With these concepts in mind, in this blog we’re going to look at creating a simple collaborative TODO list. Anyone will be able to add new TODOs, remove them, and mark them completed/incomplete. These events will be communicated over WebSockets, and make use of Ably to handle our Pub/Sub. We’ll make use of H2 to store our data, and wrap it up in a Docker container to make it easily deployable.
Getting started
Firstly, let’s set up a basic Spring Boot application. We can use the Spring Initializr with Spring Data JPA, H2 Database, Lombok added. H2 Database will provide us with a simple database, and Spring Data JPA will allow us to easily interact with it using Hibernate. Lombok will make it easier to write concise and readable classes.
Generate the base Spring Application using the Spring Initializr and store the output in your local workspace. This application will contain the dependencies we specified, as well as a basic file called DemoApplication.java. This is the entry point to our application. If you want to try running this to make sure it works, just run ./mvnw spring-boot:run. It should successfully build and run, although as we’ve not added anything yet it won’t do anything.
Creating a database
Now we have our template ready, let’s first set up the database. Create a new folder in your Java folder called todoitem. We’ll be putting out database classes into it.
Firstly, we’ll define what a ‘todoitem’ will look like. Create inside the todoitem folder ‘TodoItem.java’, and add the following:
@Entity
@Data
@NoArgsConstructor
@RequiredArgsConstructor

public class TodoItem
{
    @Id
    @GeneratedValue
    private Long id;

    @NonNull
    private String text;

    @NonNull
    private String username;

    private boolean completed = false;
}
To break this down:
- @Entity – This indicates that this class is a JPA entity
- @Data – This is a Lombok annotation that automatically generates getters and more for each value
- @RequiredArgsConstructor – This is another Lombok annotation that automatically generates a constructor which expects values for all variables which aren’t assigned and need a value. In this case, both text and username are marked @NonNull, and so the generated constructor will require both those fields.
- @NoArgsConstructor – Like the above annotation, except it creates a constructor which requires no arguments
The id is simply a unique identifier for the todo item, which is automatically generated and identified as the id for JPA due to the @Id and @GeneratedValue annotations.
Text and username represent the todo item’s content and who made the todo item respectively.
Completed simply represents whether the todo item has been completed or not.
With that small bit of code, we’ve defined our todoitem database item. We now need to generate a JPA Repository to interact with the database. Thankfully JPA makes this easy by providing JpaRepository, which we can extend. This will provide all the interfaces we need to add, remove, and change TodoItems in our database.
Create a new file in todoitem called TodoItemRepository, and add the following code:
@Repository
public interface TodoItemRepository extends JpaRepository<TodoItem, Long> {

}
That’s all we need, all methods we’ll need to interact with the database are automatically generated for us!
Creating a Service for our Database
Although we could now simply make direct usage of this class for making database changes, usually you’d also create a Service class to handle interactions with our repositories. Let’s create TodoITemService.java in todoitem, and add the following to it:
@Service
public class TodoItemService {
    @Autowired
    private TodoItemRepository todoItemRepository;

    public List<TodoItem> findAll() {
        return todoItemRepository.findAll();
    }

    public Optional<TodoItem> find(Long id) {
        return todoItemRepository.findById(id);
    }

    public TodoItem create(String text, String username) {
        TodoItem copy = new TodoItem(text, username);
        return todoItemRepository.save(copy);
    }

    public Optional<TodoItem> updateCompletionStatus(Long id, boolean status) {
        return todoItemRepository.findById(id)
        .map(oldItem -> {
        oldItem.setCompleted(status);
        return todoItemRepository.save(oldItem);
        });
    }

    public void delete(Long id) {
        todoItemRepository.deleteById(id);
    }
}
Within this we’re autowiring the TodoItemRepository we created, and then providing some functions to interact with the repository.
That’s it, we now have everything we need for handling our representation of our todo list’s items!
Creating a REST Controller
With our database made, let’s look at how we can open up interacting with it to the world. To do this, we’ll be creating a REST Controller, which effectively opens up endpoints which clients can GET/POST/PUT/DELETE to. We’ll then perform actions on our database depending on the request and endpoint.
Add TodoItemController.java to our todoitem folder, and start off by adding the following:
@RestController
@RequestMapping("api")
public class TodoItemController {
    @Autowired
    private TodoItemService todoItemService;
}
Here we’ve defined this class a RestController with the annotation, and specified that all the mappings we’re going to provide will fall under ‘api’. For example, if we create a mapping for ‘/getAll’ in this class, the endpoint will actually be ‘/api/getAll’.
We’ve also autowired TodoItemService in, as that’s what we’ll be using from our mappings to interact with our database.
Next, let’s start creating our mappings. Add the following functions:
@GetMapping
public ResponseEntity<List<TodoItem>> findAll() {
    List<TodoItem> items = todoItemService.findAll();
    return ResponseEntity.ok().body(items);
}

@GetMapping("/{id}")
public ResponseEntity<TodoItem> find(@PathVariable("id") Long id) {
    Optional<TodoItem> item = todoItemService.find(id);
    return ResponseEntity.of(item);
}

@PostMapping
public ResponseEntity<TodoItem> create(@CookieValue(value = "username") String username, @RequestBody Map<String, String> json) {
    if (json.get("text") == null)
    {
        return ResponseEntity.badRequest().body(null);
    }
    TodoItem newItem = todoItemService.create(json.get("text"), username);
    URI location = ServletUriComponentsBuilder.fromCurrentRequest()
        .path("/{id}")
        .buildAndExpand(newItem.getId())
        .toUri();

    JsonUtils.JsonUtilsObject object = io.ably.lib.util.JsonUtils.object();
    object.add("text", json.get("text"));
    object.add("username", username);
    object.add("id", newItem.getId().toString());

    return ResponseEntity.created(location).body(newItem);
}

@PutMapping("/{id}/complete")
public ResponseEntity<TodoItem> completed(
    @PathVariable("id") Long id) {

    Optional<TodoItem> updated = todoItemService.updateCompletionStatus(id, true);

    return updated
        .map(value -> {
            return ResponseEntity.ok().body(value);
        })
        .orElseGet(() -> ResponseEntity.notFound().build());
}

@PutMapping("/{id}/uncomplete")
public ResponseEntity<TodoItem> uncompleted(
    @PathVariable("id") Long id) {

    Optional<TodoItem> updated = todoItemService.updateCompletionStatus(id, false);
    return updated
        .map(value -> {
            return ResponseEntity.ok().body(value);
        })
        .orElseGet(() -> ResponseEntity.notFound().build());
}

@DeleteMapping("/{id}")
public ResponseEntity<TodoItem> delete(
    @CookieValue(value = "username") String username,
    @PathVariable("id") Long id) {

    Optional<TodoItem> todoOptional = todoItemService.find(id);
    if (todoOptional.isEmpty()) {
        return ResponseEntity.noContent().build();
    }

    if (todoOptional.get().getUsername().equals(username)) {
        todoItemService.delete(id);
    }
    return ResponseEntity.noContent().build();
}
Here we’re defining various endpoints for our application, and using our todoItemService to update our database.
We’re also replying on a cookie we’ll have on the client-side, username, to determine who the client is. This isn’t providing any real authentication, but will work for now for acting as faux-authentication.
To test is this is working, let’s start the server with ./mvnw spring-boot:run. The server should be running at localhost:8080.
Send the following curl to create a new todo item:
curl -X POST -H 'Content-Type: application/json' -d '{
"text": "Go to the shops!"
}' --cookie "username=Bob" http://localhost:8080/api -i
Then, we can retrieve our todo items with:
curl -X GET http://localhost:8080/api -i
You should get a response of:
[{"id":1,"text":"Make toast!","username":"Bob","completed":false}]
Feel free to try deleting todos and completing/uncompleting them.
Now in order to provide the username cookie to our clients, let’s create a simple Controller called AuthController.js:
@RestController
public class AuthController
{
    /* Set a cookie when the user logs in */
    @RequestMapping(value = "/login", method = RequestMethod.GET)
    public String login(@RequestParam(name = "username", defaultValue = "anonymous") String username, HttpServletResponse response) throws IOException {
        /* Login the user without credentials. This is an over simplified authentication system to keep this tutorial simple */
        response.addCookie(new Cookie("username", username));
        response.sendRedirect("/");
        return "redirect:/";
    }

    /* Clear the cookie when the user logs outs */
    @RequestMapping(value = "/logout", method = RequestMethod.GET)
    public String logout(HttpServletRequest request, HttpServletResponse response) throws IOException {
        for (Cookie cookie : request.getCookies()) {
            if (cookie.getName().equalsIgnoreCase("username")) {
                cookie.setValue(null);
                cookie.setMaxAge(0);
                cookie.setPath(request.getContextPath());
                response.addCookie(cookie);
            }
        }
        response.sendRedirect("/");
        return "redirect:/";
    }
}
All this does it set and unset the username cookie depending on what the client is requesting.
Creating a basic webpage
Now that we’ve created an REST API to interact with our database, we can make a simple webpage which’ll allow users to:
- Choose a username
- Create new TODOs
- Marking existing TODOs complete/not complete
- Able to delete only their own TODOs
We’ll send any changes a client makes to the server to validate + action in the database. We will then have the server publish a message over Ably containing the change. The clients will be subscribed to these updates, and update their UI depending on messages they receive.
In order to dynamically generate the page when first serving it from the server to contain the existing todo items, we’ll be using Thymeleaf. Add Thymeleaf to your dependencies in your pom.xml file:
<!--    Thymeleaf for dynamic html    -->
<dependency>
    <groupId>org.springframework.boot</groupId>
    <artifactId>spring-boot-starter-thymeleaf</artifactId>
</dependency>
Next, create a new folder in your resources/templates folder called todolist, then add a file called index.html to it. Fill it with:
<html>
<head>
    <meta content="text/html;charset=utf-8" http-equiv="Content-Type">
    <meta content="utf-8">
    <link rel="stylesheet" href="/index.css">
    <script src="https://cdn.ably.io/lib/ably.min-1.js" type="text/javascript"></script>
</head>
<body>
<div class="topnav">
    <div id="panel-anonymous" class="login-container">
        <form action="/login">
            <input type="text" name="username" placeholder="Username">
            <button type="submit">Login</button>
        </form>
    </div>
    <div id="panel-logged-in" class="login-container">
        <p><a class="active" href="/logout">Logout</a></p>
    </div>
</div>

<div id="myTODOS" class="header">
    <div id="panel-anonymous-msg" class="login-container">
        <h2>Sign in to create your own TODOs</h2>
    </div>
    <div id="panel-logged-in-msg" class="login-container">
        <h2>Todo List</h2>
        <input type="text" id="message" name="message" />
        <div class="row">
            <input id="publish" class="addBtn" type="submit" value="Add new TODO!">
        </div>
    </div>
</div>

<ul class="row" id="todo-list">
    <li th:each="todoitem: ${todoitems}"
        th:inline="text"
        th:id="${todoitem.id}"
        th:class="${todoitem.completed} ? 'checked' : ''">
        [[${todoitem.text +  ' – Added by ' + todoitem.username}]]
        <span class="close">×</span>
    </li>
</ul>
</body>
<script type="text/javascript" src="/auth.js"></script>
<script type="text/javascript" src="/ably.js"></script>
<script type="text/javascript" src="/todolist.js"></script>
</html>
This page has a reference to the Ably client library which we’ll be using for implementing subscriptions over WebSockets. It also contains a login box, as well as an input for new TODOs. The unordered list is using thymeleaf to populate itself with existing todo items which’ll be provided to it by the server.
It also references 3 js files we’re yet to create: auth.js, ably.js and todolist.js. Let’s add them now to our resources/static folder.
The index.css file should be:
* {
box-sizing: border-box;
margin: 0;
}

.topnav {
overflow: hidden;
background-color: #e9e9e9;
}

.topnav a {
float: left;
display: block;
color: black;
text-align: center;
padding: 14px 16px;
text-decoration: none;
font-size: 17px;
}

/* Navbar links on mouse-over */
.topnav a:hover {
background-color: #ddd;
color: black;
}

/* Active/current link */
.topnav a.active {
background-color: #333333;
color: white;
}

/* Style the input container */
.topnav .login-container {
float: right;
}

/* Style the input field inside the navbar */
.topnav input[type=text] {
padding: 6px;
margin-top: 8px;
font-size: 17px;
border: none;
width: 150px; /* adjust as needed (as long as it doesn't break the topnav) */
}

/* Style the button inside the input container */
.topnav .login-container button {
float: right;
padding: 6px 10px;
margin-top: 8px;
margin-right: 16px;
background-color: #555;
color: white;
font-size: 17px;
border: none;
cursor: pointer;
}

.topnav .login-container button:hover {
background: #ccc;
}

/* Add responsiveness – On small screens, display the navbar vertically instead of horizontally */
@media screen and (max-width: 600px) {
.topnav .login-container {
float: none;
}
.topnav a, .topnav input[type=text], .topnav .login-container button {
float: none;
display: block;
text-align: left;
width: 100%;
margin: 0;
padding: 14px;
}
.topnav input[type=text] {
border: 1px solid #ccc;
}
}

/* Remove margins and padding from the list */
ul {
margin: 0;
padding: 0;
}

/* Style the list items */
ul li {
cursor: pointer;
position: relative;
padding: 12px 8px 12px 40px;
background: #eee;
font-size: 18px;
transition: 0.2s;

/* make the list items unselectable */
-webkit-user-select: none;
-moz-user-select: none;
-ms-user-select: none;
user-select: none;
}

ul li:nth-child(odd) {
background: #f9f9f9;
}

ul li:hover {
background: #ddd;
}

ul li.checked {
background: #888;
color: #fff;
text-decoration: line-through;
}

ul li.checked::before {
content: '';
position: absolute;
border-color: #fff;
border-style: solid;
border-width: 0 2px 2px 0;
top: 10px;
left: 16px;
transform: rotate(45deg);
height: 15px;
width: 7px;
}

.close {
position: absolute;
right: 0;
top: 0;
padding: 12px 16px 12px 16px;
}

.close:hover {
background-color: #f44336;
color: white;
}

.header {
background-color: #ED760A;
padding: 30px 40px;
color: white;
text-align: center;
}

.header:after {
content: "";
display: table;
clear: both;
}

input {
margin: 0;
border: none;
border-radius: 0;
width: 75%;
padding: 10px;
float: left;
font-size: 16px;
}

/* Style the "Add" button */
.addBtn {
padding: 10px;
width: 25%;
background: #d9d9d9;
color: #555;
float: left;
text-align: center;
font-size: 16px;
cursor: pointer;
transition: 0.3s;
border-radius: 0;
}

.addBtn:hover {
background-color: #bbb;
}
The auth.js file contains our very simple login system, where if we have a cookie representing the username we’re considered logged in and update the UI appropriately:
/* Change the display based on logged in status */
let loggedIn = document.cookie.indexOf('username') >= 0;
document.getElementById('panel-anonymous').
setAttribute('style', "display: " + (loggedIn ? 'none' : 'block'));
document.getElementById('panel-anonymous-msg').
setAttribute('style', "display: " + (loggedIn ? 'none' : 'block'));

document.getElementById('panel-logged-in').
setAttribute('style', "display: " + (loggedIn ? 'block' : 'none'));
document.getElementById('panel-logged-in-msg').
setAttribute('style', "display: " + (loggedIn ? 'block' : 'none'));
The todolist.js file contains our logic for sending requests to our server to change todo list items:
/* Create a new list item when clicking on the "Add" button */
function addNewTODO(id, todoText, username) {
    var ul = document.getElementById("todo-list");
    var li = document.createElement("li");

    var t = document.createTextNode(todoText + ' – Added by: ' + username);
    li.appendChild(t);
    li.id = id;
    ul.appendChild(li);

    /* Create a close icon */
    var span = document.createElement("SPAN");
    var txt = document.createTextNode("\u00D7");
    span.className = "close";
    span.appendChild(txt);
    li.appendChild(span);

    span.onclick = () => {
        publishToSpring('DELETE', '/api/' + id);
    }
}

let closeButtons = document.getElementsByClassName('close');
for(let i = 0; i < closeButtons.length; i++) {
    let closeButton = closeButtons[i];
    closeButton.onclick = function() {
        publishToSpring('DELETE', '/api/' + closeButton.parentElement.getAttribute('id'));
    }
}

function removeTODO(id) {
    var div = document.getElementById(id);
    div.style.display = "none";
}

function completeTODO(id) {
    document.getElementById(id).classList.add("checked");
}

function incompleteTODO(id) {
    document.getElementById(id).classList.remove("checked");
}

/* Send new TODO to server */
document.getElementById('publish').onclick = sendMessageToSpring;

const node = document.getElementById("message");
node.addEventListener("keyup", ({key}) => {
    if (key === "Enter") {
        sendMessageToSpring();
    }
});

function sendMessageToSpring() {
    let username = document.cookie.indexOf('username');
    let todoText = document.getElementById("message");
    let message = {
        'text': todoText.value,
        'username': username
    }
    todoText.value = "";
    publishToSpring('POST', '/api', JSON.stringify(message));
}

/* Mark a list element as complete/incomplete */
var list = document.querySelector('ul');
list.addEventListener('click',
(ev) => {
    if (ev.target.tagName === 'LI') {
        clickEvent(ev.target.id);
    }
}, false);

function clickEvent(id) {
    if (document.getElementById(id).classList.contains("checked")) {
        publishToSpring('PUT', '/api/' + id + '/uncomplete');
    } else {
        publishToSpring('PUT', '/api/' + id + '/complete');
    }
}

function publishToSpring(action, url, data) {
    var xhr = new XMLHttpRequest();
    xhr.open(action, url, true);
    xhr.setRequestHeader("Content-Type", "application/json");
    xhr.send(data);
}

getCurrentTodos();

function getCurrentTodos() {
    let request = new XMLHttpRequest();
    request.open('GET', '/api');
    request.responseType = 'json';
    request.send();
}
Finally, our ably.js file contains our Pub/Sub logic. It establishes a connection to the Ably Pub/Sub service using a yet-to-be-implemented auth endpoint to retrieve a token, and then subscribes to the channel ‘default’ for any messages published. This channel is what we’ll be publishing messages to from the server eventually. Depending on the message, we call the appropriate function in our todolist.js file:
/* Set up a Realtime client that authenticates with the local web server auth endpoint */
let realtime = new Ably.Realtime({ authUrl: '/auth' });
let channelName = 'default';
let channel = realtime.channels.get(channelName);

/* Subscribe to changes from an Ably channel */
channel.subscribe(function(message) {
    if (message.name === 'add') {
        addNewTODO(message.data.id, message.data.text, message.data.username);
    } else if (message.name === 'remove') {
        removeTODO(message.data);
    } else if (message.name === 'complete') {
        completeTODO(message.data);
    } else if (message.name === 'incomplete') {
        incompleteTODO(message.data);
    }
});
Great, we now have a web page which can display our existing TODOs in a list, and allows the user to submit requests to our server.
To have the server provide this webpage when the client tries to load localhost:8080/, let’s create a new Controller, TodoListController.js:
@Controller
public class TodoListController {
    @Autowired
    private TodoItemService todoItemService;

    @GetMapping("/")
    public String todoPage(Model model) {
        List<TodoItem> listItems = todoItemService.findAll();
        if (listItems == null) {
            listItems = new ArrayList<>();
        }
        model.addAttribute("todoitems", listItems);

        return "todolist/index";
    }
}
Although we’re yet to implement publishing of messages from our server through Ably so our clients can react and update their UIs, we should be able to still update the server through the webpage. Comment out the ably.js file, and start up the server with ./mvnw spring-boot:run. If you load up localhost:8080, you should see our webpage. Login in the top right panel, and then try sending a message or 2 through the submission box. If you then do curl -X GET http://localhost:8080/api -i in your terminal, you should see the TODOs you submitted with your username attached. Feel free to then try to complete, uncomplete, and delete TODOs and check to make sure the server’s correctly reflected the change.
Implementing WebSocket based Pub/Sub for broadcasting events
Finally, we can start implementing our WebSocket based Pub/Sub solution so that clients are updated in realtime whenever a change is made to the server’s database.
We’ll be using Ably for our Pub/Sub messaging to simplify the implementation. It’ll handle our connection recovery, ensure reliable message delivery, and in general do all of the hard work involved in creating a Pub/Sub distributed system.
To start implementing this, you’ll need a free Ably account, and get your API key for one of your apps. Add this to your application.properties file:
ABLY_API_KEY: YOUR_API_KEY
Next, let’s add Ably to our pom.xml, as well as gson for handling JSON objects:
<!--    Ably    -->
<dependency>
    <groupId>io.ably</groupId>
    <artifactId>ably-java</artifactId>
    <version>1.2.3</version>
</dependency>
<dependency>
    <groupId>com.google.code.gson</groupId>
    <artifactId>gson</artifactId>
    <version>2.8.6</version>
</dependency>
You may remember that when instantiating Ably in our ably.js file, we were attempting to call /auth on our server to obtain a token to authenticate with Ably. Now that we have access to an API key, we can create our auth endpoint. Add the following to the top of your AuthController class:
@RestController
public class AuthController {
    private AblyRest ablyRest;

    @Value( "${ABLY_API_KEY}" )
    private void setAblyRest(String apiKey) throws AblyException {
        ablyRest = new AblyRest(apiKey);
    }

    /* Issue token requests to clients sending a request to the /auth endpoint */
    @RequestMapping("/auth")
    public String auth(HttpServletRequest request, HttpServletResponse response) throws AblyException {
        String username = null;
        Cookie[] cookies = request.getCookies();
        if (cookies != null) {
            for (Cookie cookie : cookies) {
                if (cookie.getName().equalsIgnoreCase("username")) {
                    username = cookie.getValue();
                    break;
                }
            }
        }
        Auth.TokenParams tokenParams = getTokenParams(username);
        return createTokenRequest(tokenParams, response);
    }

    public Auth.TokenParams getTokenParams(String username) throws AblyException {
        Auth.TokenParams tokenParams = new Auth.TokenParams();
        tokenParams.capability = Capability.c14n("{ '*': ['subscribe'] }");
        if (username != null) {
            tokenParams.clientId = username;
        }
        return tokenParams;
    }

    public String createTokenRequest(Auth.TokenParams tokenParams, HttpServletResponse response) {
        Auth.TokenRequest tokenRequest;
        try {
            tokenRequest = ablyRest.auth.createTokenRequest(tokenParams, null);
            response.setHeader("Content-Type", "application/json");
            return tokenRequest.asJson();
        } catch (AblyException e) {
            response.setStatus(500);
            return "Error requesting token: " + e.getMessage();
        }
    }
...
}
This generates a token with permission to subscribe to updates, and passes it back to the client to use.
Finally, we can make use of Ably in our TodoItemController to send messages to our Ably channel whenever a change successfully is applied to our database. Replace the file with the following:
@RestController
@RequestMapping("api")
public class TodoItemController {

    @Autowired
    private TodoItemService todoItemService;

    private AblyRest ablyRest;

    @Value( "${ABLY_API_KEY}" )
    private void setAblyRest(String apiKey) throws AblyException {
        ablyRest = new AblyRest(apiKey);
    }

    private final String CHANNEL_NAME = "default";

    @GetMapping
    public ResponseEntity<List<TodoItem>> findAll() {
        List<TodoItem> items = todoItemService.findAll();
        return ResponseEntity.ok().body(items);
    }

    @GetMapping("/{id}")
    public ResponseEntity<TodoItem> find(@PathVariable("id") Long id) {
        Optional<TodoItem> item = todoItemService.find(id);
        return ResponseEntity.of(item);
    }

    @PostMapping
    public ResponseEntity<TodoItem> create(@CookieValue(value = "username") String username, @RequestBody Map<String, String> json) {
        if (json.get("text") == null) {
            return ResponseEntity.badRequest().body(null);
        }
        TodoItem newItem = todoItemService.create(json.get("text"), username);
        URI location = ServletUriComponentsBuilder.fromCurrentRequest()
            .path("/{id}")
            .buildAndExpand(newItem.getId())
            .toUri();

        JsonUtils.JsonUtilsObject object = io.ably.lib.util.JsonUtils.object();
        object.add("text", json.get("text"));
        object.add("username", username);
        object.add("id", newItem.getId().toString());

        publishToChannel("add", object.toJson());
        return ResponseEntity.created(location).body(newItem);
    }

    @PutMapping("/{id}/complete")
    public ResponseEntity<TodoItem> completed(
        @PathVariable("id") Long id) {

        Optional<TodoItem> updated = todoItemService.updateCompletionStatus(id, true);

        return updated
            .map(value -> {
                publishToChannel("complete", Long.toString(id));
                return ResponseEntity.ok().body(value);
            })
            .orElseGet(() -> ResponseEntity.notFound().build());
    }

    @PutMapping("/{id}/uncomplete")
    public ResponseEntity<TodoItem> uncompleted(
        @PathVariable("id") Long id) {

        Optional<TodoItem> updated = todoItemService.updateCompletionStatus(id, false);

        return updated
            .map(value -> {
                publishToChannel("incomplete", Long.toString(id));
                return ResponseEntity.ok().body(value);
            })
            .orElseGet(() -> ResponseEntity.notFound().build());
    }

    @DeleteMapping("/{id}")
    public ResponseEntity<TodoItem> delete(
        @CookieValue(value = "username") String username,
        @PathVariable("id") Long id) {

        Optional<TodoItem> todoOptional = todoItemService.find(id);
        if (todoOptional.isEmpty()) {
            return ResponseEntity.noContent().build();
        }

        if (todoOptional.get().getUsername().equals(username)) {
            todoItemService.delete(id);
            publishToChannel("remove", Long.toString(id));
        }
        return ResponseEntity.noContent().build();
    }

    /* Publish an update to the TODO list to an Ably Channel */
    private boolean publishToChannel(String name, Object data) {
        try {
            ablyRest.channels.get(CHANNEL_NAME).publish(name, data);
        } catch (AblyException err) {
            System.out.println(err.errorInfo);
            return false;
        }
        return true;
    }
}
Your application should now be fully functional! Make sure you’ve uncommented the ably.js file, and then run the application with ./mvnw spring-boot:run, and start using it from localhost:8080! You should find changes made from one client updates the display of another.
Dockerizing
Finally, let’s dockerize it. Firstly, install Docker.
Next, package our application as a JAR:
./mvnw clean package
We’ll reference this JAR when building our Docker Container.
Now create a Dockerfile in the base directory with the following content:
FROM adoptopenjdk:11-jre-hotspot
COPY ./target/*.jar /usr/app/application.jar
WORKDIR /usr/app
ENTRYPOINT ["java", "-jar", "application.jar"]
All our Dockerfile is doing is taking the JAR we compiled earlier, and defining it as our entrypoint for running this application.
We also want a docker-compose.yml file to define how the structure of our docker container a its settings:
version: '2'

services:
    app:
        image: 'spring-boot-ably:latest'
        build:
            context: .
        ports:
            – "8080:8080"
        container_name: app
        environment:
            – ABLY_API_KEY=INSERT_ABLY_API_KEY_HERE
You’ll want to replace the INSERT_ABLY_API_KEY_HERE with the Ably API key you got earlier.
With this done, you can now run docker compose up, and you should see your basic application running with Docker!
Conclusion
With all this done, we now have our collaborative TODO list! By making use of WebSockets and the Pub/Sub paradigm we’ve made what can be quite a challenging issue, regular updates being transmitted to clients, into something fairly simple. With just the few lines we’ve included for handling our WebSockets, we’ve ensured distribution to all subscribers with no additional load on our server.
Ably itself also ensures ordering or messages, as well as guarantees on message delivery, ensuring that our clients don’t miss messages or receive them in the wrong order.
In our next tutorial, we’ll be implementing a robust authentication system using Auth0. You can find the source code to this tutorial on GitHub.