Aurora is a managed database service from Amazon compatible with MySQL and PostgreSQL. It allows for the use of existing MySQL code, tools, and applications and can offer increased performance for certain workloads compared to MySQL and PostgreSQL.
Being an AWS product, it benefits from the range of tools and services available on AWS, with simple integrations for analytics and processing. Having all of these tools available makes building larger projects easier and quicker.
However, this largely applies to the development and interactions within AWS’s systems. One of the largest requirements for any application being developed is for it to eventually interact with users. Be it a chat app or a multiplayer game, there’s a requirement for a reliable bridge between the user and the backend services.
In order to connect and communicate with end-users in a way that facilitates realtime communication, we need a communication protocol that allows for bidirectional low-latency messaging between devices and backend services.
WebSockets are a protocol ideal for this scenario. Not only are they bidirectional, allowing both clients and servers to send messages as they’re ready, but they also are widely supported across modern browsers and backend stacks.
In this blog post, we will dig into the useful implementations of Aurora and WebSockets across different use cases, and the best architectures to ensure scalability and reliability, followed by an in-depth tutorial on building with two to make a chat app.
We have also produced a short video that showcases the key things you need to consider when developing user-facing applications with AWS and Aurora as a backend.
What scenarios need Aurora and WebSockets?
Almost every user-facing application these days are expected to have a responsive design for users. A couple of examples would be:
- Chat applications, where users expect to see messages and reactions as they happen
- Social media where new posts and comments should load seamlessly
- Games where player positions and actions should be represented as they happen
- Collaborative spaces such as shared text documents, where other user’s changes should be visible instantly to avoid desynchronization
Even experiences that have historically been viewed as fairly static, say an online shop, is expected now to be more interactive. Be it an accurate representation of stock remaining, new deals, or even comment sections and reviews being up to date.
How does Aurora help?
Whilst all the above to the user are happening ephemerally, with messages, positions, and actions all occurring and being superseded by further actions, there still needs to be a source of truth for establishing both the current state, as well as historical state. In a chat application for example, we need somewhere which holds past messages and interactions, which can be queried by users when scrolling through past conversations, or searching for certain terms.
Aurora acts as a scalable solution to this problem, allowing developers to get going with little setup required.
How do WebSockets help?
For all these examples, it’s not just the user needing to receive updates, the user also needs to be able to send updates themselves. With all of these examples, protocols such as WebSockets enable this bi-directional communication, where any device at any time is able to send a message to update others.
Architecture: Ensuring scalable realtime experiences
With Aurora and WebSockets, we have two tools that can enable both realtime communications, as well as persistence. However, we need a pattern that can enable make use of these two tools in a scalable way.
At the core, most systems will consist of many clients, all needing to communicate with one another. These interactions will likely require some form of interaction with an authoritative backend stack, be it for moderation, rate-limiting, or payload manipulation. After some form of processing step, potentially making use of persisted information in a database, the result should be communicated to all other relevant clients, and the message persisted in our database.
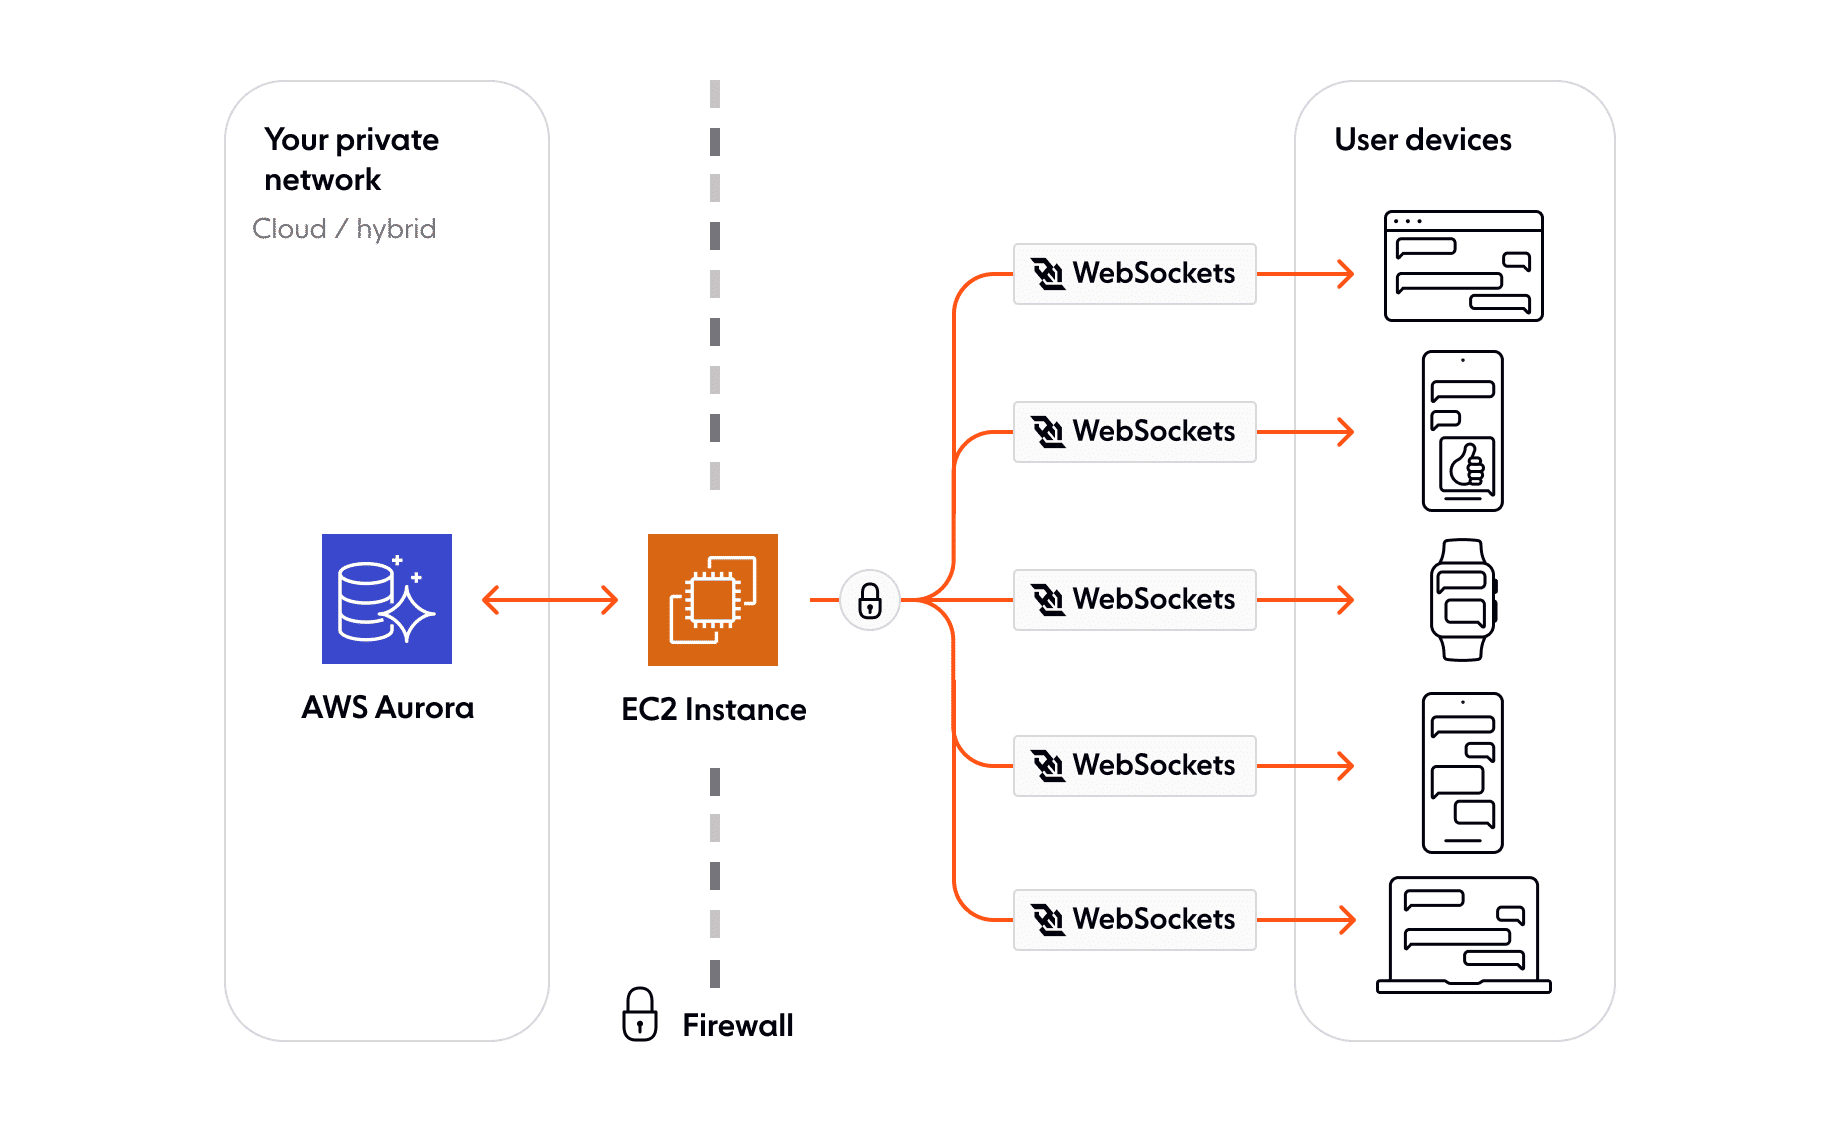
In principle, we can simply have our clients all connect via WebSockets to our server, and have the server handle maintaining the connections and ensuring the delivery of data to clients. As the service scales up, however, the load of maintaining connections, state of clients, on top of performing the processing and database interactions can become too much for a single server.
Much like for HTTP requests, this is the sort of problem where you’d typically want some form of load balancing, where requests coming in require are divided up by some frontend load balancer. This load balancer will also be responsible then for maintaining connections, helping reduce the unnecessary work occurring on our main servers.
WebSockets require a sustained connection however and are stateful, which means that a load balancer cannot work in the same way one would build an HTTP load balancer. Instead, we need these load balancers to maintain a shared state of clients and their connections, with whom these clients are communicating, and also information on what messages have been sent to who. This isn’t to then get started on things such as handling connectivity issues which add far more complexity.
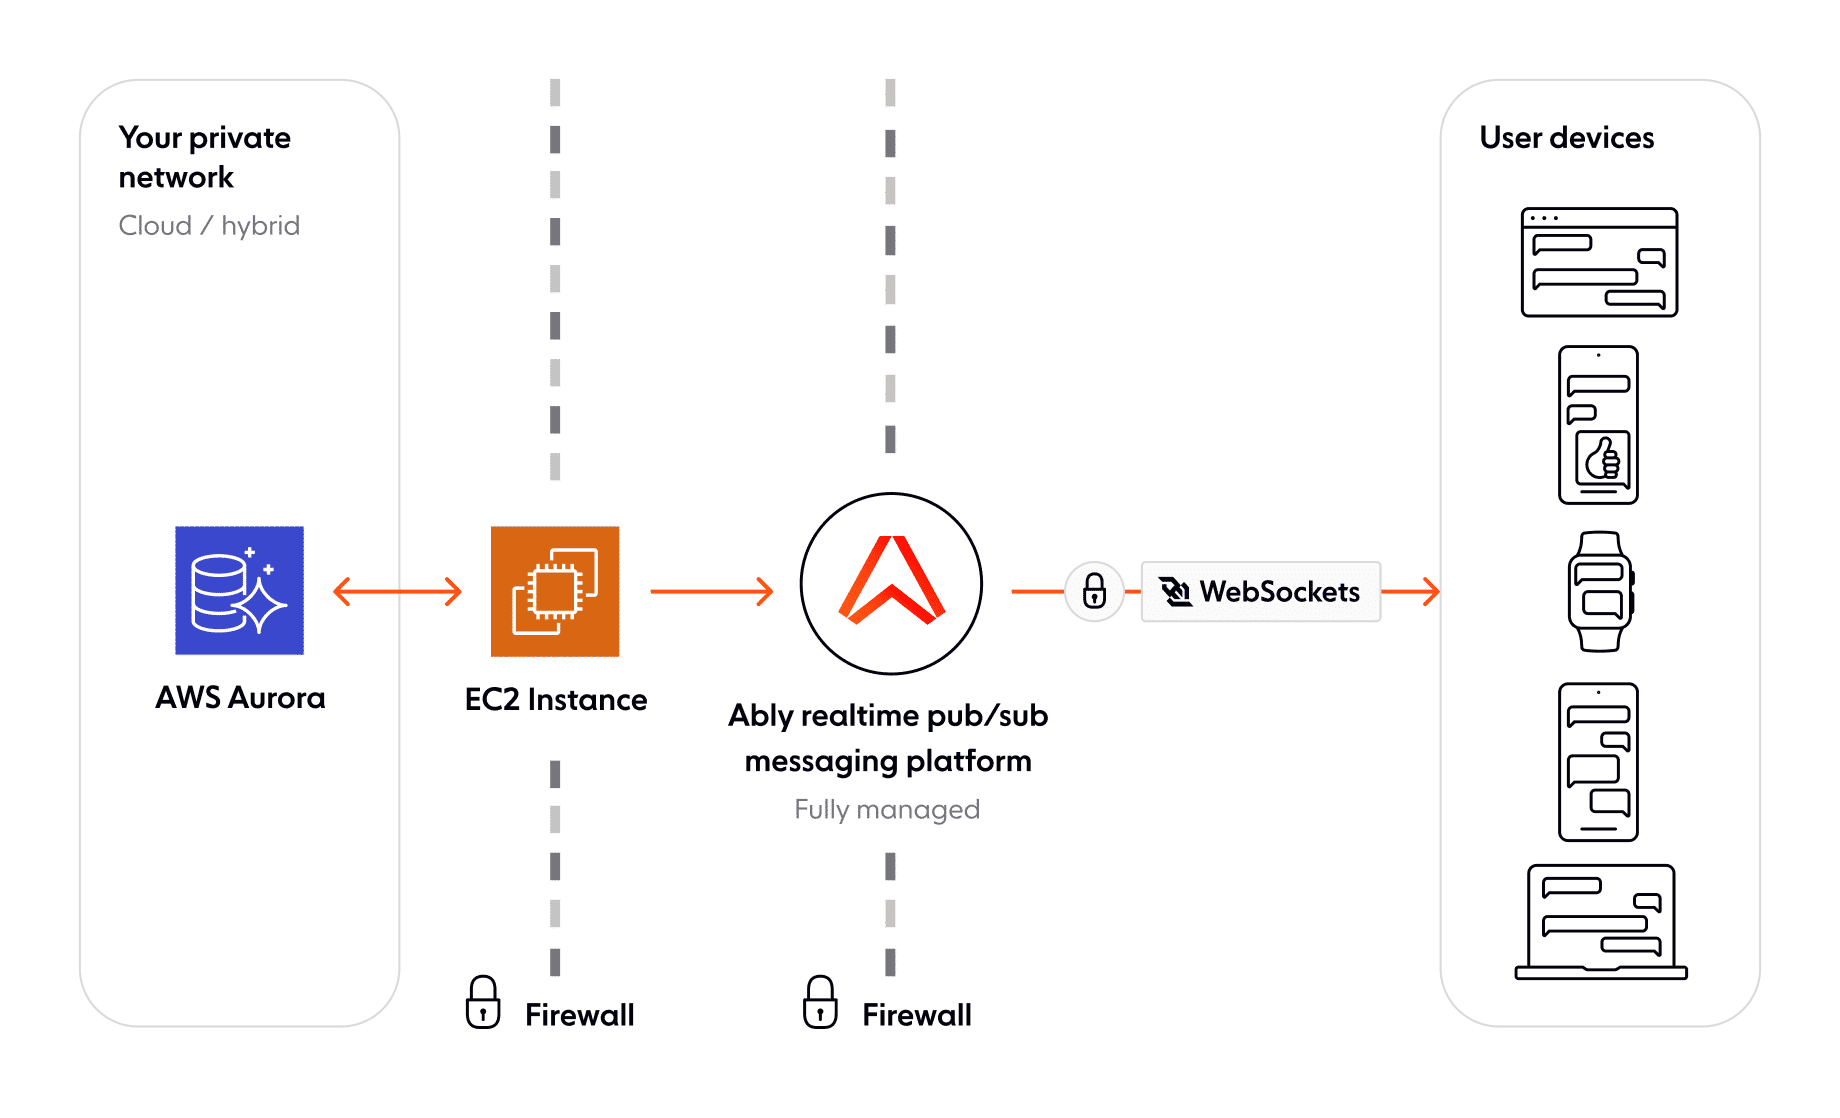
This sort of service, which handles the distribution of messages to many connections, will typically make use of a pattern known as the Publish/Subscribe pattern. This pattern dictates a separation of ‘publishers’ (a client sending a message), and ‘subscribers’ (clients who’ve indicated they wish to receive messages) by a broker server(s). All a client or server needs to know is where to send their message, and any clients who’ve ‘subscribed’ to messages will receive messages from Pub/Sub broker.
With this pattern, we can ensure our end-user devices are connected to the Pub/Sub broker via WebSockets, ready to receive and send messages. Our backend services can also be connected to the broker, ready to process incoming messages and publish new state changes where needed with only a single connection. This separation of focus, with the Pub/Sub broker focused on handling connection states, and our backend focused on the actual processing of data allows for solutions to be scalable.
If there’s a large influx of new connections, but processing requirements are low, we can scale up the number of pub/sub brokers but keep the number of backend servers the same. If the number of connections is the same, but the requests coming in require a larger amount of processing, we can do the reverse.
Architecture example: Chat
As an example of why these tools together are so powerful, consider a chat application that has a room with 100,000 members in it, which is realistic for some of the larger communities on popular chat apps such as Discord. When a user publishes a message to the chat room, it must:
- Be checked for inappropriate content and have media inserted where appropriate
- Be persisted for future retrieval by users, in a database service such as Aurora
- Be distributed to the 100,000 members in the chat room
Each of these steps requires very different tools to handle. Step 1 requires some compute power to be available to run the appropriate checks and changes. Step 2 requires all the guarantees that a database such as Aurora provides.
Step 3 requires a large quantity of compute to handle tracking of who is currently ‘connected’ to a room, and thus needs updates, who’s received which updates, handling of potential connection issues, all while ensuring that data isn’t duplicated, or even worse silently never makes it. Additionally, the ability to resume a connection from clients wanting chat updates and retrieve missed data is important for avoiding unnecessary load and accessing your database.
Step 3 is the domain of realtime brokers. By handling the distribution of data, and providing all the guarantees and functionality you’d eventually expect and need from this communication with client devices, it helps simplify the interactions with your own backend services immensely, in addition to removing a lot of the potential load by providing tooling to effectively act as a cache for realtime data.
Demo: Making a chat app with Aurora and WebSockets
To demonstrate these patterns, we’ll look to create a basic chat application. We’ll use an AWS EC2 instance, which will have a server responsible for interfacing with our Aurora database. We will be using WebSockets for communicating between clients and this server. As our pub/sub broker we’ll make use of Ably, a realtime messaging broker intended for handling massive scale, which will be responsible for handling the fan-in and fan-out of data over WebSockets to end-users.
Step 1: AWS account
The first thing you’ll need to do is make sure you have an AWS account with which you can create an EC2 instance where we’ll host a server, in addition to an Aurora instance.
If you don’t have an AWS account, create a free one here.
EC2
First, navigate to the EC2 console. Here you should be able to see an option for ‘Launch instance’. If you click this, you should be navigated to the setup page for an EC2 instance.

On this setup page, fill in the following details:
- Set the Name to ‘ec2-chat’
- Application and OS Images (Amazon Machine Image), should be set to Amazon Linux, with the specific image being Amazon Linux 2 AMI (the default free option)
- The Instance should be t2.micro
- For the Key pair (login), you can either use an existing key you have (which should be listed in the dropdown) or generate a new key from the button next to the input. If creating a new key, put in a memorable name, and keep the other settings on their defaults. This should automatically save a .pem file to your device, so make a note of where it’s saved to
- For Network settings, make sure that ‘Allow HTTPS traffic from the internet’ and ‘Allow HTTP traffic from the internet’ are both enabled

Keep the remaining sections as-is, and select ‘Launch instance’ once you’re ready. If this is successful, you should see a message stating that it’s been successful.

We can now go look at our running instance by following the ‘View all instances’ button. Here you should see the ‘ec2-chat’ EC2 instance, which should eventually enter the ‘Running’ state.
Aurora setup
With the EC2 instance running, we’ll want to get Aurora going for it to interact with. To get started, head to the AWS RDS console. On this page, check the top-right corner to ensure that the region matches the region you created the EC2 instance in.
On this page, you should see a button to ‘Create database’. Click it to start the setup process.

On the Create database page, select 'Standard create'.
For this tutorial, we’ll be going with a MySQL-compatible Aurora. For Engine type, choose Aurora (MySQL Compatible).

As this demo is only intended for testing purposes, Under Templates select ‘Dev/Test’.
Under ‘Settings’, create your own cluster identifier, such as say ‘chat-db-cluster’, and then your own username and passwords which you’ll remember.
In the Instance configuration section, set the instance class to be ‘Burstable classes’, and then select the ‘db.t3.small’ version. This is again to prioritize reducing potential costs for this demo. If you were to create this at scale, you’d want to look to scale up your clusters.
Next, under Connectivity, we’ll want to allow for our previously created EC2 instance to communicate with our Aurora cluster. Tick the ‘Connect to an EC2 compute resource’ section, and select your ‘ec2-chat’ instance. This should set up your VPC for this interaction automatically.
Finally, there is a collapsed section at the bottom of the page called ‘Additional configuration’. Here we can define an initial database for the Aurora cluster. Set the ‘Initial database name’ to ‘messages’, and leave the remaining options as they are.
With these settings configured, select the ‘Create database’ button. You should be re-directed to the databases overview page, where you can see the cluster we just set up being created.
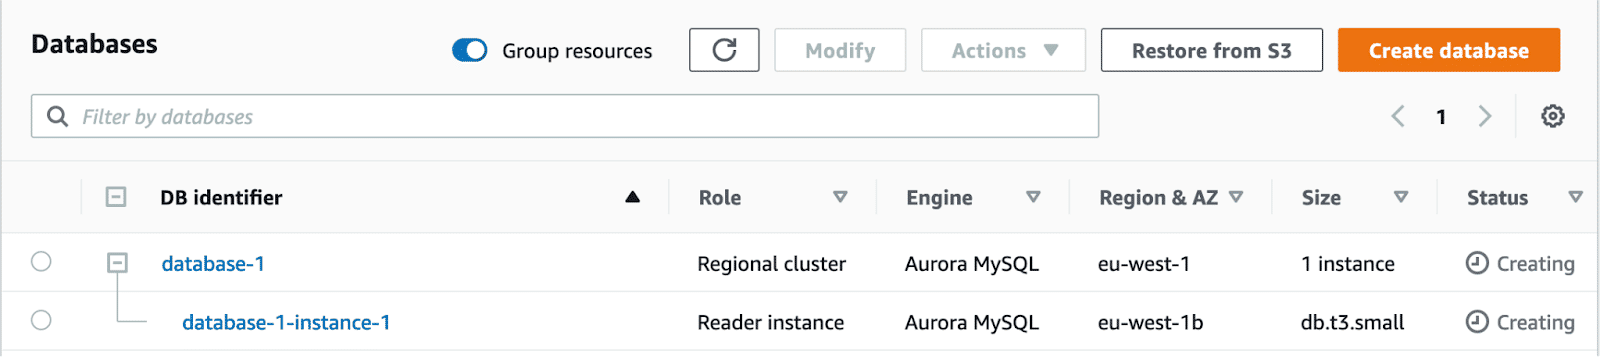
Once they’re done being created, select the top-level database cluster, and look at the ‘Endpoints’ section. Make a note of the endpoint with the ‘writer’ type, as this will be used by the EC2 instance to interact with the database.
Step 2: Adding the chat interface to the EC2 instance
With the EC2 instance and Aurora cluster running, we can now work to run our web server on the EC2 instance. To do this, we’ll need to connect to the EC2 instance.
The easiest way is to go to the EC2 instance we created in the AWS dashboard. On the ‘ec2-chat’ overview page, select the ‘Connect’ button.
From here, select ‘Connect’ again on the new page within the ‘EC2 Instance Connect’ section.
This should open up a terminal which we can interact with. As a good practice, run `sudo yum update` initially to fetch any security patches and fixes.
With that done, let’s install nvm on the instance by running the following:
curl -o- https://raw.githubusercontent.com/nvm-sh/nvm/v0.39.3/install.sh | bash
Activate nvm using the following command:
. ~/.nvm/nvm.sh
Next, let’s install version 16 of Node.JS, which is the latest version as of writing supported by Amazon Linux 2:
nvm install 16
With Node.js installed, let’s get git:
sudo yum install git -y
To make sure this worked, you can run `git — version`, which should spit out the version of git you have installed.
With git installed, we can now pull the Node.js code we’ll need to make our Aurora server.
git clone https://github.com/ably-labs/ably-aurora-chat.git
Enter the folder:
cd ably-aurora-chat
This repo contains a basic node.js express server which we’ll run on our EC2 instance. It makes use of the Ably Chat WebComponent to handle subscribing to Ably and the UI side of things.
All of the express details are contained in the `src/server.js` file. There are three main components; setting up the express server, connecting to Ably to communicate with clients, and communicating with our Aurora instance.
Express
For our Express server, we’re providing access to our chat app page via the root of our URL (`/`), originating from the `public` folder:
/* Server */
app.use(express.static('public'));
We then also provide an endpoint, `/auth`, which is used to generate Ably Tokens for our clients to use. It’s important for clients to only ever make use of Tokens, rather than an API key, so as to ensure they’re limited to only specific Channels and actions, as well as have revocable access. They’re also given a random unique ID to identify them.
// Issue token requests to clients sending a request to the /auth endpoint
app.get("/auth", async (req, res) => {
    let tokenParams = {
        capability: { },
        clientId: uuidv4()
    };
    tokenParams.capability[`${FROM_CLIENT_CHANNEL_NAME}`] = ["publish"];
    tokenParams.capability[`${TO_CLIENT_CHANNEL_NAME}`] = ["subscribe"];

    console.log("Sending signed token request:", JSON.stringify(tokenParams));

    realtime.auth.createTokenRequest(tokenParams, (err, tokenRequest) => {
        if (err) {
            res.status(500).send(`Error requesting token: ${JSON.stringify(err)}`);
        } else {
            res.setHeader("Content-Type", "application/json");
            res.send(JSON.stringify(tokenRequest));
        }
    });
});
Ably
For Ably, the server is subscribed to an Ably Channel which clients will be sending their messages to. It will then apply any transformations required on the data (in this case a basic filter), store the data to Aurora, and then pass the new message to all other clients.
const BANNED_WORDS = /(potato)|(cheese)/g;
// Use Ably to listen and send updates to users, as well as save messages to Aurora
const realtime = new Ably.Realtime({ key: API_KEY });
realtime.channels.get(FROM_CLIENT_CHANNEL_NAME).subscribe(async (msg) => {
    let filteredMsg = msg.data.replaceAll(BANNED_WORDS, (substring, offset, string) => {
        console.log(substring);
        return '*'.repeat(substring.length);
    });
    console.log(filteredMsg);
    createNewMessageInAurora(filteredMsg, FROM_CLIENT_CHANNEL_NAME);
    new Ably.Rest({ key: API_KEY, clientId: msg.clientId }).channels.get(TO_CLIENT_CHANNEL_NAME).publish(msg.name, filteredMsg);
});
Aurora
For communicating with Aurora, we initialize our connection first:
let sequelize = new Sequelize.Sequelize(
    process.env.DB_NAME,
    process.env.DB_USERNAME,
    process.env.DB_PASSWORD,
    {
        dialect: 'mysql',
        dialectModule: mysql2,
        host: process.env.DB_HOST,
        logging: console.log,
        port: Number.parseInt(process.env.DB_PORT),
    }
);
We define the Message type, which is used to hold our messages, and then sync to Aurora:
const Message = sequelize.define('Message', {
    clientId: DataTypes.STRING,
    message: DataTypes.STRING,
    room: DataTypes.STRING
});

sequelize.sync();
Finally, we have a function to send messages to Aurora, which was used in the Ably section:
async function createNewMessageInAurora(message, chatRoomName) {
    const response = await Message.create({
        clientId: message.clientId,
        message: message.data,
        room: chatRoomName
    });

    console.log(response);
};
Step 3: Running the server
To run, we first need to install the required npm modules:
npm install
Next, you’ll need to add your own config details for your Aurora instance to a .env file to be used by the server. You can copy a template .env file from `.env.example`:
cp .env.example .env
In this .env file you’ll need to add the database host, username, and password you noted earlier when setting up Aurora.
You’ll also need an Ably API key, which is used by the server to authenticate with Ably and generate Ably Tokens for clients. If you have an Ably Account already, you can get it from one of your Ably Apps. If not, you can sign up for a free Ably Account, create an app, and then get your API key from there.
Once you’ve added your variables, you’re ready to run the code:
npm run start
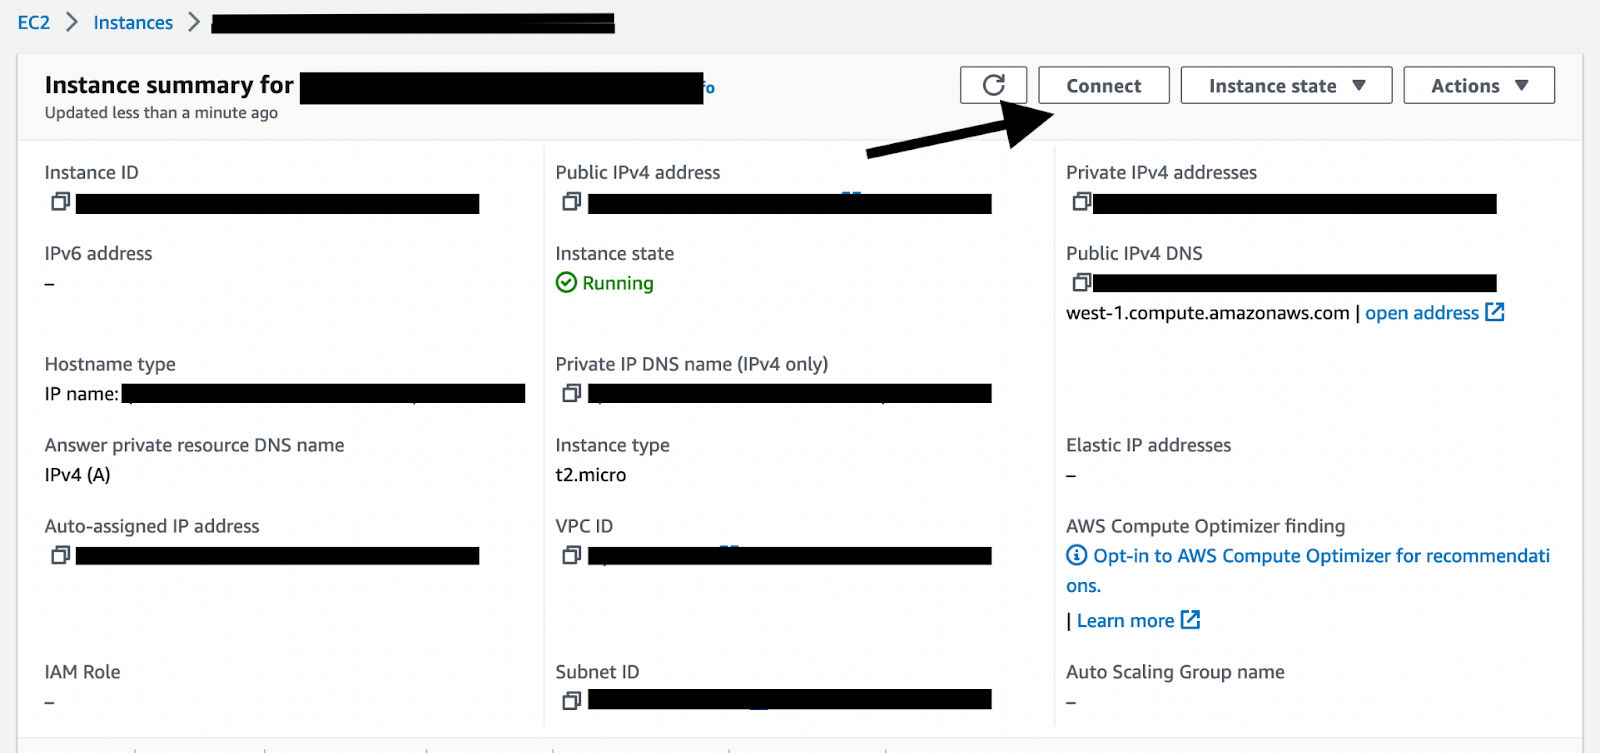
The server will be accessible from port 3000. You can find the server’s URL on the EC2 instance’s page:

Note: This is not configured for HTTPS, so make sure you don’t specify https in the URL.
If you go to the URL ‘http://YOUR_URL:YOUR_PORT’, you should see the chat app.
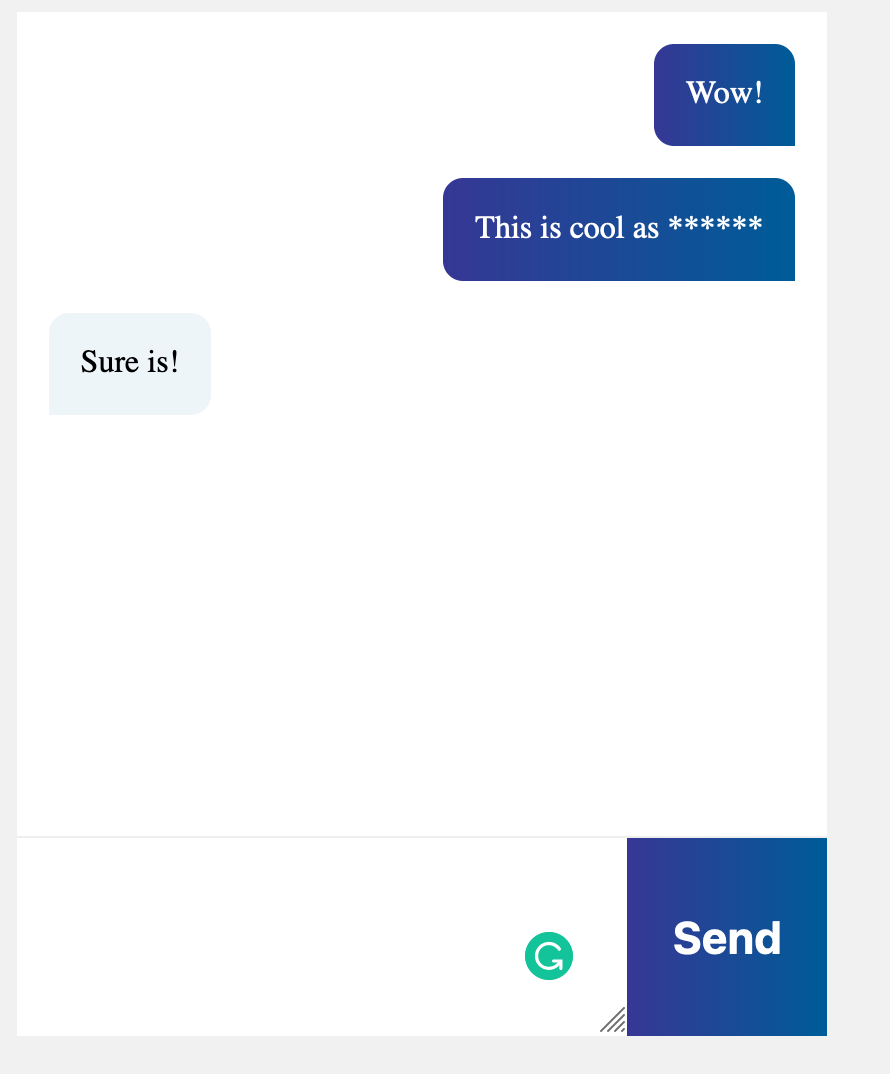
You should find that we’re able to communicate between multiple clients through different browsers. If you type in one of the banned words, it will also be starred out. All data will be persisted to our Aurora backend, where it can be queried in the future, say if we wanted to search for a specific word that’s appeared historically in messages.
Conclusion
With EC2 and Aurora, we have the perfect backend for persisting and processing data. WebSockets allow for reliable communication between clients. These in combination with Ably for handling communication with devices mean that we have a fully scalable solution for any form of problem which requires realtime interactions.
In this case, we’ve demonstrated the basics of a chat application, but there’s a lot more that can be done even just for chat. Things such as typing indicators, multiple chat rooms, and media insertion are all features that are expected in realtime chat applications, which make use of the same base model. Data can be communicated through a solution such as Ably to indicate typing, our backend EC2 instance could make use of S3 for storing images, and we can make use of multiple Ably Channels for more chat rooms.
Other realtime use-cases also make use of the same sort of structure: sports apps need to send out notifications from their backend services to frontend devices whenever a big event occurs in a game. This will again make use of a backend such as an EC2 instance with Aurora backing up necessary information, and use a platform such as Ably to handle the scale of distributing updates to everyone.