# Getting started: Push Notifications in React Native
This guide will get you started with Ably Push Notifications in a new React Native application.
You'll learn how to set up your application with Firebase Cloud Messaging (FCM), register devices with Ably, send push notifications, subscribe to channel-based push, and handle incoming notifications on both iOS and Android.
## Prerequisites
1. [Sign up](https://ably.com/signup) for an Ably account.
2. Create a [new app](https://ably.com/accounts/any/apps/new), and create your first API key in the **API Keys** tab of the dashboard.
* Your API key needs the `publish`, `subscribe` capabilities.
* Also add the `push-admin` capability if you're using the same API key to send a push notification. In production this would more likely be a server using a different API key.
3. Add a rule to a channel so you can test sending push notification via a channel. Select [**Rules**](https://ably.com/accounts/any/apps/any/app_namespaces) in the Ably dashboard, add a new rule and enable the **Push notifications** option.
4. Install [Node.js](https://nodejs.org/) 18 or higher.
5. Set up your React Native development environment following the [React Native CLI Quickstart](https://reactnative.dev/docs/set-up-your-environment).
6. For iOS: Install [Xcode](https://developer.apple.com/xcode/). Push notifications require a physical iOS device (simulators do not support push).
7. For Android: Install [Android Studio](https://developer.android.com/studio). Use a physical device or an emulator with Google Play Services installed.
### (Optional) Install Ably CLI
Use the [Ably CLI](https://github.com/ably/cli) as an additional client to quickly test Pub/Sub features and push notifications.
1. Install the Ably CLI:
#### Shell

```
npm install -g @ably/cli
```
2. Run the following to log in to your Ably account and set the default app and API key:
#### Shell

```
ably login
```
### Set up Firebase Cloud Messaging
Firebase Cloud Messaging delivers push notifications for both Android and iOS. To enable FCM:
1. Go to the [Firebase Console](https://console.firebase.google.com/) and create a new project (or use an existing one).
2. Register your Android app using your package name. Download `google-services.json` and place it in `android/app/`.
3. Download your Firebase service account JSON file from your Firebase console: **Project configuration** → **Service Accounts** → **Generate new private key**.
4. In the Ably dashboard left sidebar, navigate to your app's **Push Notifications**.
5. Scroll to the **Configure push service for devices** section and press **Configure Push**.
6. Upload your Firebase service account JSON file in **Setting up Firebase Cloud Messaging** section.
7. In the [Apple Developer portal](https://developer.apple.com), go to **Certificates, Identifiers & Profiles** → **Keys**.
8. Add a new key and check **Apple Push Notifications service (APNs)**, click **Register**.
9. Download the `.p8` file — you can only download it once. Note your **Key ID** and **Team ID**.
10. In the Firebase Console, go to **Project configuration** → **Cloud Messaging** → **Apple App Setup** → **APNS authentication key** to upload your `.p8` file.
11. Register an iOS app in your Firebase project using your bundle identifier. Download `GoogleService-Info.plist` and add it to your Xcode project's root target.
### Create a React Native project
Create a new React Native project and install the required dependencies:
#### Shell

```
npx react-native@latest init PushTutorial
cd PushTutorial
npm install ably @react-native-firebase/app @react-native-firebase/messaging @notifee/react-native
```
#### Configure Android project
Apply the Google Services plugin in `android/build.gradle`:
##### Text

```
// android/build.gradle
buildscript {
    dependencies {
        classpath('com.google.gms:google-services:4.4.2')
    }
}
```
Then apply it in `android/app/build.gradle`:
##### Text

```
// android/app/build.gradle
apply plugin: 'com.google.gms.google-services'
```
Also declare the `POST_NOTIFICATIONS` permission in `android/app/src/main/AndroidManifest.xml`:
##### Xml

```


    ...

```
#### Configure iOS project
Open `ios/PushTutorial.xcworkspace` in Xcode and add the `Push Notifications` capability: select your target, go to **Signing & Capabilities**, and click **+ Capability**.
Add `use_modular_headers!` to `ios/Podfile` after `prepare_react_native_project!`:
##### Text

```
prepare_react_native_project!
use_modular_headers!
```
This is required for Firebase Swift pods (`FirebaseCoreInternal`, `GoogleUtilities`) to be integrated as static libraries. Then install the native pods:
##### Shell

```
cd ios && pod install && cd ..
```
Then add `FirebaseApp.configure()` to `AppDelegate.swift` before React Native starts:
##### Text

```
import Firebase

func application(
  _ application: UIApplication,
  didFinishLaunchingWithOptions launchOptions: [UIApplication.LaunchOptionsKey: Any]? = nil
) -> Bool {
  FirebaseApp.configure()
  // ... rest of existing setup
}
```
Add all further code to `App.tsx`.
## Step 1: Set up Ably
Replace the contents of `App.tsx` with the following to initialize the Ably Pub/Sub client, wrap the app in `AblyProvider` and `ChannelProvider`, and subscribe to realtime messages on the channel with `useChannel`:
### React
```
import React, {useRef, useState} from 'react';
import {
Platform,
ScrollView,
StyleSheet,
Text,
TouchableOpacity,
View,
} from 'react-native';
import {SafeAreaView} from 'react-native-safe-area-context';
import * as Ably from 'ably';
import {AblyProvider, ChannelProvider, useAbly, useChannel} from 'ably/react';
import messaging from '@react-native-firebase/messaging';
import notifee, {AuthorizationStatus} from '@notifee/react-native';
const CHANNEL_NAME = 'my-first-push-channel';
// Use token authentication in production
const client = new Ably.Realtime({
key: 'your-api-key',
clientId: 'push-tutorial-client',
});
function PushScreen() {
const [status, setStatus] = useState('Ready to start');
const [log, setLog] = useState([]);
function addLog(message: string) {
setLog(prev => [...prev, message]);
}
function showStatus(message: string) {
setStatus(message);
console.log(message);
}
useChannel(CHANNEL_NAME, message => {
addLog(`Received: ${message.name} - ${JSON.stringify(message.data)}`);
});
return (
Ably Push Tutorial{status}
{log.map((entry, i) => (
{entry}
))}
);
}
export default function App() {
return (
);
}
const styles = StyleSheet.create({
safeArea: {flex: 1, backgroundColor: '#fff'},
container: {flex: 1, padding: 16},
title: {fontSize: 22, fontWeight: 'bold', textAlign: 'center', marginBottom: 12},
statusBox: {backgroundColor: '#f0f0f0', padding: 12, borderRadius: 6, marginBottom: 12},
statusText: {fontSize: 14},
logBox: {flex: 1, backgroundColor: '#fff', borderWidth: 1, borderColor: '#ddd', borderRadius: 6, padding: 8},
logEntry: {fontFamily: Platform.OS === 'ios' ? 'Courier' : 'monospace', fontSize: 12, marginBottom: 4},
});
```
Key configuration options:
- `key`: Your Ably API key.
- `clientId`: A unique identifier for this client.
`AblyProvider` makes the Ably client available to all child components via React context. `ChannelProvider` scopes child components to `my-first-push-channel`. `useChannel` subscribes to realtime messages published on the channel.
## Step 2: Set up push notifications
Push notification activation in React Native requires obtaining an FCM registration token and registering the device with Ably. Add the following inside `PushScreen`:
### React

```
// Inside PushScreen:
const client = useAbly();

// Randomly generated on each app start for simplicity — in production, persist this (e.g. using AsyncStorage) to reuse the same device registration across restarts
const [deviceId] = useState(
  `push-tutorial-${Platform.OS}-${Math.random().toString(36).slice(2, 9)}`,
);
const tokenRefreshUnsubscribeRef = useRef<(() => void) | null>(null); // To store the FCM token refresh listener unsubscribe function

async function requestPermission(): Promise {
  if (Platform.OS === 'android') {
    // Use notifee for consistent POST_NOTIFICATIONS permission behavior across Android API levels
    const settings = await notifee.requestPermission();
    return settings.authorizationStatus >= AuthorizationStatus.AUTHORIZED;
  }
  // On iOS, request permission using Firebase Messaging which will trigger the native iOS permission dialog
  const authStatus = await messaging().requestPermission();
  return (
    authStatus === messaging.AuthorizationStatus.AUTHORIZED ||
    authStatus === messaging.AuthorizationStatus.PROVISIONAL
  );
}

// Save the device registration with Ably using the FCM token
async function saveDeviceRegistration(token: string) {
  await client.push.admin.deviceRegistrations.save({
    id: deviceId,
    clientId: 'push-tutorial-client',
    platform: Platform.OS === 'ios' ? 'ios' : 'android',
    formFactor: 'phone',
    push: {
      recipient: {
        transportType: 'fcm', // FCM on both platforms — messaging().getToken() returns an FCM token even on iOS
        registrationToken: token,
      },
    },
  });
}

async function activatePush() {
  try {
    showStatus('Activating push notifications...');
    const granted = await requestPermission();
    if (!granted) {
      showStatus('Notification permission denied.');
      return;
    }

    await messaging().registerDeviceForRemoteMessages(); // Required to receive push notifications on iOS, no-op on Android
    const fcmToken = await messaging().getToken();
    await saveDeviceRegistration(fcmToken);

    tokenRefreshUnsubscribeRef.current?.();
    tokenRefreshUnsubscribeRef.current = messaging().onTokenRefresh(async newToken => {
      try {
        await saveDeviceRegistration(newToken);
      } catch (error) {
        console.error('Failed to update FCM token:', (error as Ably.ErrorInfo).message);
      }
    });

    showStatus(`Push activated. Device ID: ${deviceId}`);
    addLog(`Push activated. Device ID: ${deviceId}`);
  } catch (error) {
    showStatus(`Failed to activate push: ${(error as Ably.ErrorInfo).message}`);
  }
}

async function deactivatePush() {
  try {
    showStatus('Deactivating push notifications...');
    await client.push.admin.deviceRegistrations.remove(deviceId);
    tokenRefreshUnsubscribeRef.current?.();
    tokenRefreshUnsubscribeRef.current = null;
    showStatus('Push notifications deactivated.');
  } catch (error) {
    showStatus(`Failed to deactivate push: ${(error as Ably.ErrorInfo).message}`);
  }
}
```
`activatePush()` does the following:
1. Requests notification permission from the user.
2. Obtains the FCM registration token from Firebase.
3. Registers the device with Ably's push notification service using the token.
4. Sets up a listener for FCM token refresh events to update the registration with Ably if the token changes.
After successful activation, `deviceId` can be used to send push notifications to this device.
### Handle push notifications
The FCM SDK handles background push notifications automatically and displays them as system notifications. For foreground handling, use `@notifee/react-native` to display notifications while the app is open.
Add the following inside `PushScreen`:
#### React

```
useEffect(() => {
  // Create a default Android notification channel
  if (Platform.OS === 'android') {
    notifee.createChannel({id: 'default', name: 'Default Channel'});
  }

  // Handle foreground push messages
  const unsubscribe = messaging().onMessage(async remoteMessage => {
    const title = remoteMessage.notification?.title ?? 'Push Notification';
    const body = remoteMessage.notification?.body ?? '';
    addLog(`Push received: ${title} — ${body}`);
    await notifee.displayNotification({
      title,
      body,
      android: {channelId: 'default'},
    });
  });

  return () => {
    unsubscribe();
  };
}, []);
```
## Step 3: Subscribe to channel push notifications
To subscribe your device to a channel so it can receive channel-based push notifications, add the following functions inside `PushScreen`, after the functions from Step 2:
### React

```
async function subscribeToChannel() {
  try {
    await client.push.admin.channelSubscriptions.save({
      deviceId,
      channel: CHANNEL_NAME,
    });
    showStatus(`Subscribed to push on channel: ${CHANNEL_NAME}`);
  } catch (error) {
    showStatus(`Failed to subscribe: ${(error as Ably.ErrorInfo).message}`);
  }
}

async function unsubscribeFromChannel() {
  try {
    await client.push.admin.channelSubscriptions.remove({
      deviceId,
      channel: CHANNEL_NAME,
    });
    showStatus(`Unsubscribed from push on channel: ${CHANNEL_NAME}`);
  } catch (error) {
    showStatus(`Failed to unsubscribe: ${(error as Ably.ErrorInfo).message}`);
  }
}
```
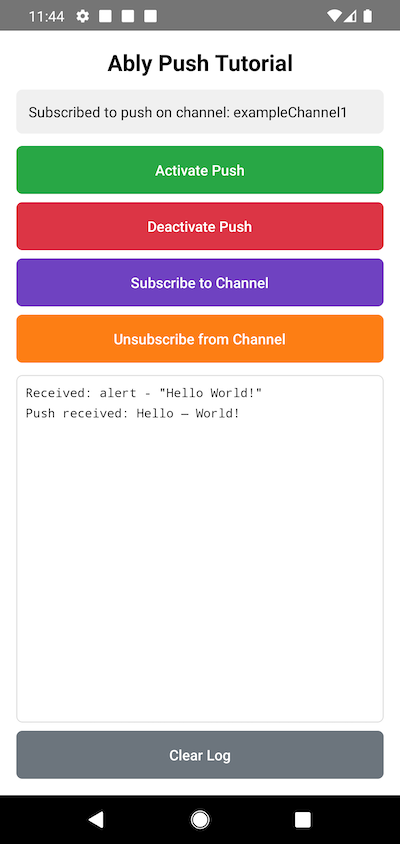
## Step 4: Build the UI
Build a UI in your app to add buttons that call all push functions. Update the `return` statement in `PushScreen`:
### React
```
return (
Ably Push Tutorial{status}Activate PushDeactivate PushSubscribe to ChannelUnsubscribe from Channel
{log.map((entry, i) => (
{entry}
))}
setLog([])}>
Clear Log
);
```
Add the button styles to the `StyleSheet.create` call:
### React

```
buttons: {gap: 8, marginBottom: 12},
btn: {padding: 14, borderRadius: 6, alignItems: 'center'},
btnText: {color: '#fff', fontWeight: '600'},
btnGreen: {backgroundColor: '#28a745'},
btnRed: {backgroundColor: '#dc3545'},
btnPurple: {backgroundColor: '#6f42c1'},
btnOrange: {backgroundColor: '#fd7e14'},
btnGray: {backgroundColor: '#6c757d', marginTop: 8},

```
Build and run your app on a physical device:
### Shell

```
# Android
npx react-native run-android

# iOS
npx react-native run-ios --device
```
You can also open each platform project in their respective IDEs and run from there.
## Step 5: Publish a push notification
In the app tap **Activate Push** and wait until the status message displays your device ID.
### Publish directly to your device
Publish a push notification directly to your client ID (or device ID using `--device-id` instead of `--client-id`) via the [Ably CLI](https://ably.com/docs/platform/tools/cli.md):
#### Shell

```
ably push publish --client-id push-tutorial-client \
  --title "Hello" \
  --body "World!" \
  --data '{"foo":"bar"}'
```
### Publish via a channel
Tap **Subscribe to Channel** in the app, then publish a push notification to the channel using the [Ably CLI](https://ably.com/docs/platform/tools/cli.md):
#### Shell

```
ably push publish --channel my-first-push-channel \
  --title "Hello" \
  --body "World!" \
  --message '{"name":"greeting","data":"Hello World!"}'
```
If you tap **Unsubscribe from Channel**, the device no longer receives push notifications for that channel. Send the same command again and verify that no notification is received.
To see the full list of options for sending push notifications with the Ably CLI, run `ably push publish --help` or see the [Ably CLI push documentation](https://ably.com/docs/cli/push.md). To send push notifications from your own server code instead of the CLI, see [Push notification publishing](https://ably.com/docs/push/publish.md).
## Next steps
* Understand [token authentication](https://ably.com/docs/auth/token.md) before going to production.
* Explore [push notification administration](https://ably.com/docs/push.md#push-admin) for managing devices and subscriptions.
* Learn about [channel rules](https://ably.com/docs/channels.md#rules) for channel-based push notifications.
* Read more about the [Push Admin API](https://ably.com/docs/api/realtime-sdk/push-admin.md).
You can also explore the [Ably JavaScript SDK](https://github.com/ably/ably-js) on GitHub, or visit the [API references](https://ably.com/docs/api/realtime-sdk.md) for additional functionality.
## Related Topics
- [Web Push](https://ably.com/docs/push/getting-started/web.md): Get started with Ably Push Notifications in JavaScript. Learn how to register a service worker, activate push on your client, handle incoming notifications, and send push messages from the browser.
- [APNs](https://ably.com/docs/push/getting-started/apns.md): Get started with Ably Push Notifications in Swift. Learn how to register for push notifications, activate push on your client, handle incoming notifications, and send push messages.
- [FCM](https://ably.com/docs/push/getting-started/fcm.md): Get started with Ably Push Notifications in Kotlin for Android. Learn how to register for push notifications with Firebase Cloud Messaging (FCM), activate push on your client, handle incoming notifications, and send push messages.
- [Flutter](https://ably.com/docs/push/getting-started/flutter.md): Get started with Ably Push Notifications in Flutter. Learn how to register for push notifications on iOS and Android, activate push on your client, handle incoming notifications, and send push messages.
## Documentation Index
To discover additional Ably documentation:
1. Fetch [llms.txt](https://ably.com/llms.txt) for the canonical list of available pages.
2. Identify relevant URLs from that index.
3. Fetch target pages as needed.
Avoid using assumed or outdated documentation paths.