# Getting started: Push Notifications in Kotlin
This guide will get you started with Ably Push Notifications in a new Android application using Kotlin.
You'll learn how to set up your application with Firebase Cloud Messaging (FCM), register devices with Ably, send push notifications, subscribe to channel-based push, and handle incoming notifications.
## Prerequisites
1. [Sign up](https://ably.com/signup) for an Ably account.
2. Create a [new app](https://ably.com/accounts/any/apps/new), and create your first API key in the **API Keys** tab of the dashboard.
3. Your API key needs the `publish` and `subscribe` capabilities. For sending push notifications from your app, you'll also need the `push-admin` capability.
4. For channel-based push, add a rule for the channel with **Push notifications enabled** checked. In the dashboard left sidebar: **Configuration** → **Rules** → **Add** or **Edit** a rule, then enable the Push notifications option. See [channel rules](https://ably.com/docs/channels.md#rules) for details.
5. Install [Android Studio](https://developer.android.com/studio).
6. Use a real Android device or an emulator with Google Play Services installed (required for FCM).
### (Optional) Install Ably CLI
Use the [Ably CLI](https://github.com/ably/cli) as an additional client to quickly test Pub/Sub features and push notifications.
1. Install the Ably CLI:
#### Shell

```
npm install -g @ably/cli
```
2. Run the following to log in to your Ably account and set the default app and API key:
#### Shell

```
ably login
```
### Set up Firebase Cloud Messaging
To enable push notifications, you need to configure FCM:
1. Go to the [Firebase Console](https://console.firebase.google.com/) and create a new project (or use an existing one).
2. Add an Android app to your Firebase project using your application's package name.
3. Download the `google-services.json` file and place it in your Android app module directory (`app/`).
4. In the Firebase Console, go to **Project Settings** → **Service accounts** and generate a new private key. Download the JSON file.
5. In the Ably dashboard, navigate to your app's **Notifications** tab.
6. Scroll to the **Push Notifications Setup** section and select **Configure Push**.
7. Follow the instructions to upload your Firebase service account JSON file.
### Create an Android project
Create a new Android project in Android Studio with an **Empty Views Activity** template using Kotlin, and set the minimum SDK to API 26 (Android 8.0) or higher.
Add the following to your **project-level** `build.gradle.kts`:
#### Kotlin

```
plugins {
    id("com.google.gms.google-services") version "4.4.2" apply false
}
```
Then add the following dependencies to your **app-level** `build.gradle.kts`:
#### Kotlin

```
plugins {
    id("com.google.gms.google-services")
}

dependencies {
    // AppCompat for AppCompatActivity and Theme.AppCompat
    implementation("androidx.appcompat:appcompat:1.7.0")

    // Ably Android SDK (includes push notification support)
    implementation("io.ably:ably-android:1.2.+")

    // Firebase Cloud Messaging
    implementation(platform("com.google.firebase:firebase-bom:33.0.0"))
    implementation("com.google.firebase:firebase-messaging-ktx")

    // Required for LocalBroadcastManager
    implementation("androidx.localbroadcastmanager:localbroadcastmanager:1.1.0")
}
```
Add the `INTERNET` and `POST_NOTIFICATIONS` permissions to your `AndroidManifest.xml`:
#### Xml

```


```
All further code can be added directly to your `MainActivity.kt`, `PushNotificationService.kt`, and `AblyHelper.kt` files.
## Step 1: Set up Ably
Create an `AblyHelper.kt` file with a singleton object to manage your Ably Realtime client across the app:
### Kotlin

```
import android.content.Context
import io.ably.lib.realtime.AblyRealtime
import io.ably.lib.types.ClientOptions

object AblyHelper {
    private var instance: AblyRealtime? = null

    fun getInstance(context: Context? = null): AblyRealtime {
        return instance ?: synchronized(this) {
            instance ?: run {
                val options = ClientOptions().apply {
                    key = "your-api-key" // Use token authentication in production
                    clientId = "push-tutorial-client"
                }
                AblyRealtime(options).also {
                    if (context != null) it.setAndroidContext(context)
                    instance = it
                }
            }
        }
    }
}
```
Initialize the Ably client early in your app's lifecycle by creating an `Application` class. Create a new file `PushTutorialApp.kt`:
### Kotlin

```
import android.app.Application

class PushTutorialApp : Application() {
    override fun onCreate() {
        super.onCreate()
        // Initialize Ably client on app startup
        AblyHelper.getInstance(this)
    }
}
```
Register your `Application` class in `AndroidManifest.xml` inside the `` element:
### Xml

```

```
## Step 2: Set up push notifications
To receive push notifications on Android, you need to integrate with FCM. Create a `PushNotificationService.kt` file that extends `FirebaseMessagingService`. This service handles new FCM tokens and incoming push messages:
### Kotlin

```
import android.app.NotificationChannel
import android.app.NotificationManager
import android.os.Build
import android.util.Log
import androidx.core.app.NotificationCompat
import com.google.firebase.messaging.FirebaseMessagingService
import com.google.firebase.messaging.RemoteMessage

class PushNotificationService : FirebaseMessagingService() {

    companion object {
        private const val TAG = "PushService"
        private const val CHANNEL_ID = "push_tutorial_channel"
    }

    override fun onNewToken(token: String) {
        super.onNewToken(token)
        Log.d(TAG, "New FCM token received")
        // Re-activate push with Ably whenever the FCM token is refreshed
        try {
            AblyHelper.getInstance().push.activate()
        } catch (e: Exception) {
            Log.e(TAG, "Error updating FCM token with Ably", e)
        }
    }

    override fun onMessageReceived(remoteMessage: RemoteMessage) {
        super.onMessageReceived(remoteMessage)
        Log.d(TAG, "Message received from: ${remoteMessage.from}")

        // Display a notification when the app is in the foreground
        remoteMessage.notification?.let { notification ->
            showNotification(
                notification.title ?: "Push Notification",
                notification.body ?: "",
                remoteMessage.data
            )
        }
    }

    private fun showNotification(title: String, body: String, data: Map) {
        val notificationManager = getSystemService(NOTIFICATION_SERVICE) as NotificationManager

        if (Build.VERSION.SDK_INT >= Build.VERSION_CODES.O) {
            val channel = NotificationChannel(
                CHANNEL_ID,
                "Push Tutorial",
                NotificationManager.IMPORTANCE_DEFAULT
            )
            notificationManager.createNotificationChannel(channel)
        }

        val notification = NotificationCompat.Builder(this, CHANNEL_ID)
            .setSmallIcon(android.R.drawable.ic_dialog_info)
            .setContentTitle(title)
            .setContentText(body)
            .setAutoCancel(true)
            .build()

        notificationManager.notify(System.currentTimeMillis().toInt(), notification)
    }
}
```
Register the service in `AndroidManifest.xml` inside the `` element:
### Xml

```


```
Now add push activation and deactivation to your `MainActivity.kt`. The Ably Android SDK activates push asynchronously and the result arrives via Android's broadcast system, so register a `BroadcastReceiver` to handle it (the following imports cover all steps in this guide):
### Kotlin

```
import android.content.BroadcastReceiver
import android.content.Context
import android.content.Intent
import android.content.IntentFilter
import android.os.Build
import android.os.Bundle
import android.util.Log
import android.widget.Button
import android.widget.ScrollView
import android.widget.TextView
import androidx.appcompat.app.AppCompatActivity
import androidx.localbroadcastmanager.content.LocalBroadcastManager
import io.ably.lib.types.AblyException
import io.ably.lib.types.ErrorInfo
import io.ably.lib.realtime.CompletionListener
import io.ably.lib.util.IntentUtils
import com.google.gson.JsonObject
import io.ably.lib.types.Message
import io.ably.lib.types.MessageExtras
import io.ably.lib.types.Param

class MainActivity : AppCompatActivity() {

    companion object {
        private const val TAG = "MainActivity"
        private const val CHANNEL_NAME = "exampleChannel1"
    }

    private val realtime by lazy { AblyHelper.getInstance() }

    private val pushActivationReceiver = object : BroadcastReceiver() {
        override fun onReceive(context: Context, intent: Intent) {
            when (intent.action) {
                "io.ably.broadcast.PUSH_ACTIVATE" -> {
                    val error = IntentUtils.getErrorInfo(intent)
                    if (error != null) {
                        Log.e(TAG, "Push activation failed: ${error.message}")
                        updateStatus("Push activation failed: ${error.message}")
                    } else {
                        try {
                            val deviceId = realtime.device().id
                            Log.d(TAG, "Push activated. Device ID: $deviceId")
                            updateStatus("Push activated. Device ID: $deviceId")
                        } catch (e: Exception) {
                            Log.e(TAG, "Push activated but failed to get device ID: ${e.message}")
                            updateStatus("Push activated")
                        }
                    }
                }
                "io.ably.broadcast.PUSH_DEACTIVATE" -> {
                    val error = IntentUtils.getErrorInfo(intent)
                    if (error != null) {
                        Log.e(TAG, "Push deactivation failed: ${error.message}")
                    } else {
                        Log.d(TAG, "Push deactivated")
                        updateStatus("Push notifications deactivated")
                    }
                }
            }
        }
    }

    private fun updateStatus(message: String) {
        runOnUiThread {
            Log.d(TAG, message)
            // Wire this to your status TextView in Step 4
        }
    }

    fun activatePushNotifications() {
        updateStatus("Activating push notifications...")
        try {
            realtime.push.activate()
        } catch (e: AblyException) {
            updateStatus("Activation error: ${e.message}")
        }
    }

    fun deactivatePushNotifications() {
        updateStatus("Deactivating push notifications...")
        try {
            realtime.push.deactivate()
        } catch (e: AblyException) {
            updateStatus("Deactivation error: ${e.message}")
        }
    }
}
```
Your app is now configured to receive push notifications once activated.
## Step 3: Subscribe and test push notifications
Push notifications delivered while your app is in the background are handled automatically by the FCM SDK and displayed as system notifications. For foreground handling, your `PushNotificationService.onMessageReceived()` method (from Step 2) displays a notification via `NotificationManager`.
To subscribe your device to a channel so it can receive channel-based push notifications, add the following methods to `MainActivity`:
### Kotlin

```
fun subscribeToChannel(channelName: String) {
    val channel = realtime.channels.get(channelName)
    channel.push.subscribeDeviceAsync(object : CompletionListener {
        override fun onSuccess() {
            Log.d(TAG, "Subscribed to push on channel: $channelName")
            updateStatus("Subscribed to push on channel: $channelName")
        }

        override fun onError(reason: ErrorInfo?) {
            Log.e(TAG, "Failed to subscribe: ${reason?.message}")
            updateStatus("Failed to subscribe: ${reason?.message}")
        }
    })
}

fun unsubscribeFromChannel(channelName: String) {
    val channel = realtime.channels.get(channelName)
    channel.push.unsubscribeDeviceAsync(object : CompletionListener {
        override fun onSuccess() {
            Log.d(TAG, "Unsubscribed from push on channel: $channelName")
            updateStatus("Unsubscribed from push on channel: $channelName")
        }

        override fun onError(reason: ErrorInfo?) {
            Log.e(TAG, "Failed to unsubscribe: ${reason?.message}")
            updateStatus("Failed to unsubscribe: ${reason?.message}")
        }
    })
}
```
Also add a realtime channel subscription to receive messages while the app is in the foreground:
### Kotlin

```
fun subscribeToRealtime(channelName: String) {
    val channel = realtime.channels.get(channelName)
    channel.subscribe { message ->
        Log.d(TAG, "Received message: ${message.name} - ${message.data}")
    }
}
```
Now use the Ably CLI to test sending a push notification to your client ID:
### Shell

```
ably push publish --client-id push-tutorial-client \
  --title "Test push" \
  --body "Hello from CLI!" \
  --data '{"foo":"bar","baz":"qux"}'
```
Or send directly to a device ID:
### Shell

```
ably push publish --device-id  \
  --title "Test push" \
  --body "Hello from device ID!"
```
To send push notifications via a channel, you first need a UI to subscribe to the channel.
## Step 4: Build the UI
Create the layout file `res/layout/activity_main.xml`:
### Xml

```


```
Now update `MainActivity.kt` to wire up the UI and register the broadcast receiver:
### Kotlin
```
class MainActivity : AppCompatActivity() {
companion object {
private const val TAG = "MainActivity"
private const val CHANNEL_NAME = "exampleChannel1"
}
private val realtime by lazy { AblyHelper.getInstance() }
private lateinit var statusTextView: TextView
private lateinit var logTextView: TextView
private lateinit var logScrollView: ScrollView
private val pushActivationReceiver = object : BroadcastReceiver() {
override fun onReceive(context: Context, intent: Intent) {
when (intent.action) {
"io.ably.broadcast.PUSH_ACTIVATE" -> {
val error = IntentUtils.getErrorInfo(intent)
if (error != null) {
updateStatus("Push activation failed: ${error.message}")
} else {
try {
updateStatus("Push activated. Device ID: ${realtime.device().id}")
} catch (e: Exception) {
updateStatus("Push activated")
}
}
}
"io.ably.broadcast.PUSH_DEACTIVATE" -> {
updateStatus("Push notifications deactivated")
}
}
}
}
override fun onCreate(savedInstanceState: Bundle?) {
super.onCreate(savedInstanceState)
setContentView(R.layout.activity_main)
statusTextView = findViewById(R.id.statusTextView)
logTextView = findViewById(R.id.logTextView)
logScrollView = findViewById(R.id.logScrollView)
// Register broadcast receiver for push activation results
val filter = IntentFilter().apply {
addAction("io.ably.broadcast.PUSH_ACTIVATE")
addAction("io.ably.broadcast.PUSH_DEACTIVATE")
}
LocalBroadcastManager.getInstance(this)
.registerReceiver(pushActivationReceiver, filter)
// Request notification permission on Android 13+
if (Build.VERSION.SDK_INT >= Build.VERSION_CODES.TIRAMISU) {
requestPermissions(arrayOf(android.Manifest.permission.POST_NOTIFICATIONS), 0)
}
// Wire up buttons
findViewById
Build and run your app on an Android device or emulator. Tap **Activate Push** and wait until the status message displays your device ID. Try sending a push using the Ably CLI commands shown in Step 3.
### Send push via channel
To test push notifications via channel, tap **Subscribe to Channel** in the app and then publish a message to "exampleChannel1" with a `push` `extras` field using Ably CLI:
#### Shell

```
ably channels publish exampleChannel1 '{"name":"example","data":"Hello from CLI!","extras":{"push":{"notification":{"title":"Ably CLI","body":"Hello from CLI!"},"data":{"foo":"bar"}}}}'
```
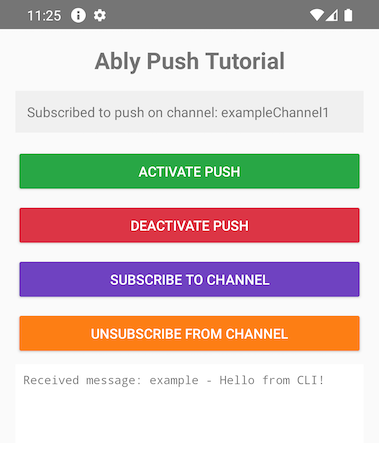
If you tap **Unsubscribe from Channel**, you will no longer receive push notifications for that channel. Send the same command again and verify that no notification is received.
You can also send push notifications right from your app. The next step will show you how.
## Step 5: Send push with code
Just as you can send push notifications through the Ably CLI or dashboard, you can also send them directly from your app using `deviceId` (or `clientId`), or channel publishing methods. For channel publishing, you don't need the admin capabilities for your API key.
Add the following methods to `MainActivity`:
### Kotlin

```
fun sendPushToDevice() {
    val deviceId = realtime.device().id
    val recipient = arrayOf(Param("deviceId", deviceId))
    val payload = JsonObject().apply {
        add("notification", JsonObject().apply {
            addProperty("title", "Push Tutorial")
            addProperty("body", "Hello from device ID!")
        })
        add("data", JsonObject().apply {
            addProperty("foo", "bar")
            addProperty("baz", "qux")
        })
    }

    realtime.push.admin.publishAsync(recipient, payload, object : CompletionListener {
        override fun onSuccess() {
            updateStatus("Push sent to device ID: $deviceId")
        }
        override fun onError(reason: ErrorInfo?) {
            updateStatus("Failed to send push to device: ${reason?.message}")
        }
    })
}

fun sendPushToClient() {
    val clientId = realtime.auth.clientId
    val recipient = arrayOf(Param("clientId", clientId))
    val payload = JsonObject().apply {
        add("notification", JsonObject().apply {
            addProperty("title", "Push Tutorial")
            addProperty("body", "Hello from client ID!")
        })
        add("data", JsonObject().apply {
            addProperty("foo", "bar")
            addProperty("baz", "qux")
        })
    }

    realtime.push.admin.publishAsync(recipient, payload, object : CompletionListener {
        override fun onSuccess() {
            updateStatus("Push sent to client ID: $clientId")
        }
        override fun onError(reason: ErrorInfo?) {
            updateStatus("Failed to send push to client: ${reason?.message}")
        }
    })
}
```
Sending to a channel is just publishing a message on a channel with a `push` `extras` field:
### Kotlin

```
fun sendPushToChannel(channelName: String) {
    val extras = JsonObject().apply {
        add("push", JsonObject().apply {
            add("notification", JsonObject().apply {
                addProperty("title", "Channel Push")
                addProperty("body", "Sent push to $channelName")
            })
            add("data", JsonObject().apply {
                addProperty("foo", "bar")
                addProperty("baz", "qux")
            })
        })
    }

    val message = Message("example", "Hello from channel!")
    message.extras = MessageExtras(extras)

    realtime.channels.get(channelName).publish(message, object : CompletionListener {
        override fun onSuccess() {
            updateStatus("Push sent to channel: $channelName")
        }
        override fun onError(reason: ErrorInfo?) {
            updateStatus("Failed to send push to channel: ${reason?.message}")
        }
    })
}
```
Add three more buttons to `activity_main.xml` (before the `ScrollView`):
### Xml

```


```
Wire up the new buttons in `MainActivity.onCreate()`:
### Kotlin
```
findViewById
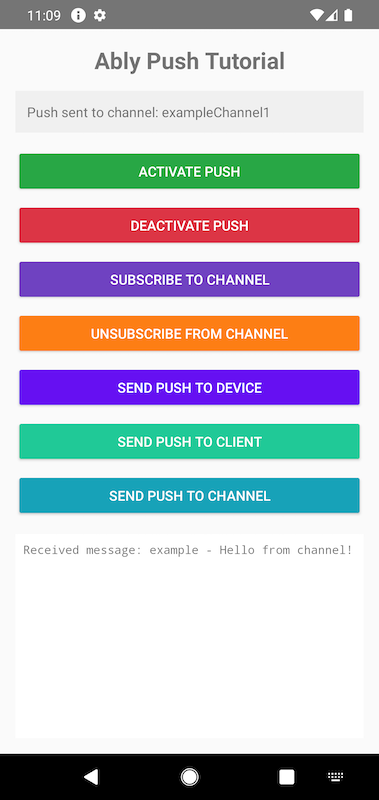
Build and run your app again. Use the new buttons to send push notifications directly to your device ID, client ID, or the subscribed channel:
## Next steps
* Understand [token authentication](https://ably.com/docs/auth/token.md) before going to production.
* Explore [push notification administration](https://ably.com/docs/push.md#push-admin) for managing devices and subscriptions.
* Learn about [channel rules](https://ably.com/docs/channels.md#rules) for channel-based push notifications.
* Read more about the [Push Admin API](https://ably.com/docs/api/realtime-sdk/push-admin.md).
You can also explore the [Ably SDK for Android](https://github.com/ably/ably-java) on GitHub, or visit the [API references](https://ably.com/docs/api/realtime-sdk.md) for additional functionality.
## Related Topics
- [Overview](https://ably.com/docs/getting-started.md): Getting started with Ably Pub/Sub in your language or framework of choice. Learn how to publish, subscribe, track presence, fetch message history, and manage realtime connections.
- [JavaScript](https://ably.com/docs/getting-started/javascript.md): Get started with Pub/Sub in vanilla JavaScript using Ably. Learn how to publish, subscribe, track presence, fetch message history, and manage realtime connections.
- [Node.js](https://ably.com/docs/getting-started/node.md): Get started with Pub/Sub in JavaScript using Ably. Learn how to publish, subscribe, track presence, fetch message history, and manage realtime connections.
- [React](https://ably.com/docs/getting-started/react.md): A getting started guide for Ably Pub/Sub React that steps through some of the key features using React and Vite.
- [React Native](https://ably.com/docs/getting-started/react-native.md): A getting started guide for Ably Pub/Sub React Native that steps through some of the key features using React Native with Expo.
- [Kotlin](https://ably.com/docs/getting-started/kotlin.md): Get started with Pub/Sub in Kotlin using Ably. Learn how to publish, subscribe, track presence, fetch message history, and manage realtime connections.
- [Swift](https://ably.com/docs/getting-started/swift.md): Get started with Pub/Sub in Swift using Ably. Learn how to publish, subscribe, track presence, fetch message history, and manage realtime connections.
- [Flutter](https://ably.com/docs/getting-started/flutter.md): A getting started guide for Ably Pub/Sub Flutter that steps through some of the key features using Flutter.
- [Java](https://ably.com/docs/getting-started/java.md): A getting started guide for Ably Pub/Sub Java that steps through some of the key features using Java.
- [Go](https://ably.com/docs/getting-started/go.md): Get started with Pub/Sub in Go using Ably. Learn how to publish, subscribe, track presence, fetch message history, and manage realtime connections.
- [Python](https://ably.com/docs/getting-started/python.md): A getting started guide for Ably Pub/Sub Python that steps through some of the key features using Python.
- [Ruby](https://ably.com/docs/getting-started/ruby.md): A getting started guide for Ably Pub/Sub Ruby that steps through some of the key features using Ruby.
- [C# .NET](https://ably.com/docs/getting-started/dotnet.md): A getting started guide for Ably Pub/Sub C# .NET that steps through some of the key features using C# and .NET.
- [Objective C](https://ably.com/docs/getting-started/objective-c.md): A getting started guide for Ably Pub/Sub Objective-C that steps through some of the key features using Objective-C.
- [PHP](https://ably.com/docs/getting-started/php.md): A getting started guide for Ably Pub/Sub PHP that steps through some of the key features using PHP.
- [Laravel](https://ably.com/docs/getting-started/laravel.md): A getting started guide for Ably Pub/Sub Laravel 12 that steps through some of the key features using Laravel.
- [Web Push](https://ably.com/docs/push/getting-started/web.md): Get started with Ably Push Notifications in JavaScript. Learn how to register a service worker, activate push on your client, handle incoming notifications, and send push messages from the browser.
- [APNs](https://ably.com/docs/push/getting-started/apns.md): Get started with Ably Push Notifications in Swift. Learn how to register for push notifications, activate push on your client, handle incoming notifications, and send push messages.
## Documentation Index
To discover additional Ably documentation:
1. Fetch [llms.txt](https://ably.com/llms.txt) for the canonical list of available pages.
2. Identify relevant URLs from that index.
3. Fetch target pages as needed.
Avoid using assumed or outdated documentation paths.