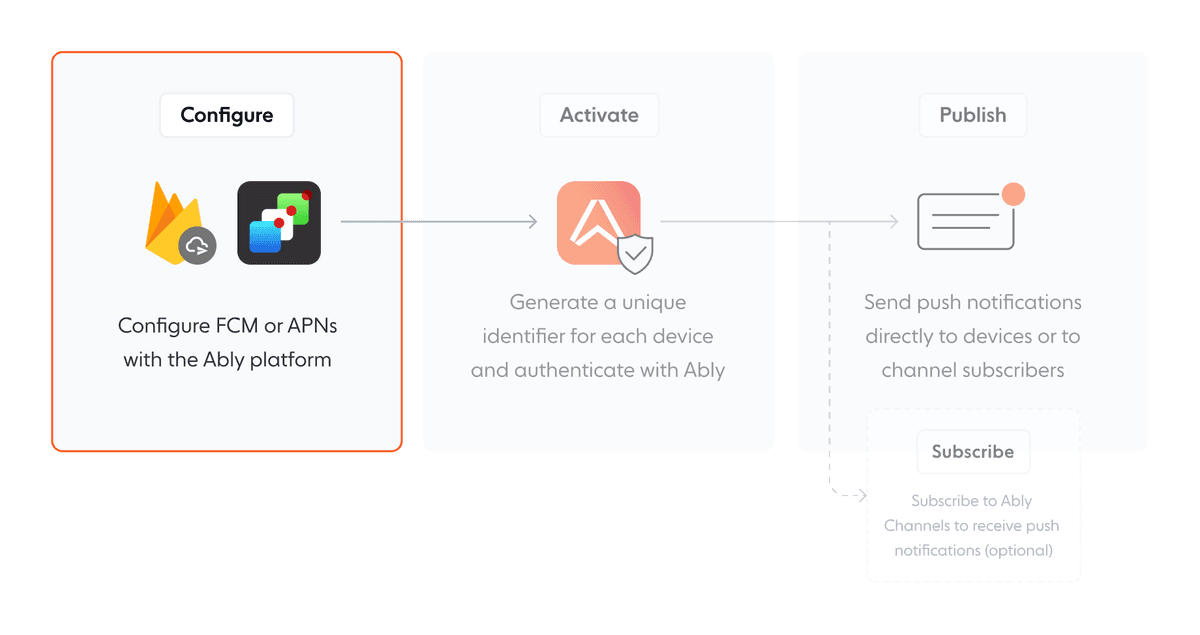
# Configure and activate devices
To send push notifications with Ably, you must first configure the device using its platform-specific notification service ([FCM](https://firebase.google.com/docs/cloud-messaging) or [APNs](https://developer.apple.com/notifications/)) and integrate it with Ably's infrastructure. You can then activate the push notifications service, either directly or via a server.
## Configure devices
Configuration is the first step in setting up push notifications with Ably. This step requires setting up the necessary infrastructure on the device's operating system or platform, as well as on the Ably platform.
### Configure FCM for Android devices
* Go to the [Firebase Console](https://firebase.google.com/).
* Click **add project** and follow the steps to **create and manage service account keys**.
* Download your service account **JSON file**.
* In your Ably [dashboard](https://ably.com/accounts), navigate to the **Notifications** tab under your app settings.
* Go to **push notifications setup**, click **configure push**.
* Add your service account **JSON file** to the **setting up Firebase cloud messaging** section.
### Configure APNs for iOS devices
To enable push notifications for iOS devices, you need to configure your app to communicate with Apple Push Notification Service (APNs). You can do this in two ways:
1. Use [token-based](#token) authentication (recommended) with a **.p8 file**.
2. Use [certificate-based](#cert) authentication with a **.p12** or **.cer** file.
#### Token-based authentication (recommended)
Use token-based authentication for new or updated apps. Apple recommends this approach and is [actively deprecating certificate-based authentication](https://developer.apple.com/documentation/usernotifications/establishing-a-token-based-connection-to-apns).
Token-based authentication is recommended for the following reasons:
| Aspect | Certificate (.p12) | Token (.p8) |
| ------ | ------------------ | ----------- |
| Expiration | Expires annually, requires renewal | Never expires, unless manually revoked |
| Scope | One certificate per app | One key works for all apps in your team |
| Management | Manual renewal, export from Keychain | Simpler, easier CI/CD automation |
* **Download the .p8 file**:
* Go to the [Apple Developer Program](https://developer.apple.com/documentation/usernotifications/establishing-a-token-based-connection-to-apns) and sign in.
* Follow the steps top create a new **APNs authentication key** and download the **.p8 file**.
* **Obtain your credentials**:
* Locate the **Key ID** associated with the authentication key.
* Find your **Team ID** or equivalent organization identifier.
* Identify the **Topic header**, typically your app's bundle or project identifier.
* **Configure authentication**:
* Upload the **.p8 file** to your server or push notification platform.
* Use the **Key ID** and **Team ID** to generate an authentication token.
* Set the appropriate **Topic header** in your notification requests. Then, click **save**.
#### Certificate-based authentication
* Go to the [Apple Developer Program](https://developer.apple.com/programs/).
* Use the Apple developer portal to create a **push notification** service certificate for your app.
* Export the certificate as a **.p12 file**.
* Next, you can either import the **.p12 cert** or create a **PEM file** and copy it into your Ably dashboard:
* **Import the .p12 file**:
* In your Ably [dashboard](https://ably.com/accounts), navigate to the **Notifications** tab under your app settings.
* Go to **push notifications setup**, click **configure push** and scroll to the **setting up Apple push notification service** section.
* Select the **.p12 file** you exported and enter the password you created during the export process.
* Click **save**. You should receive confirmation that the certificate has been successfully imported.
* To further confirm the import, refresh the page and check if the **PEM cert** and **private key** text boxes are now populated with the imported key details.
* **Create a PEM file from the .p12 file**:
* Using [OpenSSL](https://www.openssl.org/), convert the recently exported **.p12 file** (`io.ably.test.p12`) to a **PEM file** with the following command: `$ openssl pkcs12 -in ./io.ably.test.p12 -out ./io.ably.test.pem -nodes -clcerts`.
* Open the **PEM file** in your text editor.
* Copy everything between and including `-----BEGIN CERTIFICATE-----` and `-----END CERTIFICATE-----`, and paste it into the **PEM cert** text box of the Apple push notification service section of your Ably notifications app [dashboard](https://ably.com/accounts).
* Similarly, copy everything between and including `-----BEGIN PRIVATE KEY-----` and `-----END PRIVATE KEY-----`, and paste it into the **PEM private key** text box of the same section. Then, click **save**.
### Install and set up your Ably SDK
Use the following code to install and set up your Ably SDK:
```java
// Add the Ably SDK into your build.gradle dependencies and ensure there's a reference to Maven in the repositories section:

dependencies {
  implementation 'io.ably:ably-android:1.2.0'
}

repositories {
  mavenCentral()
}
```

```kotlin
// Add the Ably SDK into your build.gradle.kts dependencies and ensure there's a reference to Maven in the repositories section:

dependencies {
    implementation("io.ably:ably-android:1.2.0")
}

repositories {
    mavenCentral()
}
```

```swift
// Add the Ably SDK to your Podfile:

pod 'Ably'

// Install the SDK with:

pod install

// Import the SDK into your files with:

import Ably
```

```objc
// Add the Ably SDK to your Podfile:

pod 'Ably'

// Install the SDK with:

pod install

// Import the SDK into your files with:

#import "Ably.h"
```

```csharp
// For Android, install .NET SDK from the package manager console:

PM> Install-Package ably.io.push.android

// For Android, install the .NET package into your project directory using the .NET CLI:

dotnet add package ably.io.push.ios

// For iOS, install .NET SDK from the package manager console:

PM> Install-Package ably.io.push.ios

// For iOS, install the .NET package into your project directory using the .NET CLI:

dotnet add package ably.io.push.ios

// Then, add the SDK to your .cs file:

using IO.Ably;
```

```flutter
// Update your @pubspec.yaml with the package and version:

dependencies:
  # ...
  ably_flutter: [version]
  # ...

// Import the package into your Dart file:

import 'package:ably_flutter/ably_flutter.dart' as ably;
```
## Activate devices
To receive push notifications using Ably, each device must first register with it's platform-specific push notification service (FCM or APNs). Ably's SDK facilitates this registration process and provides a unified API to manage it across different platforms.
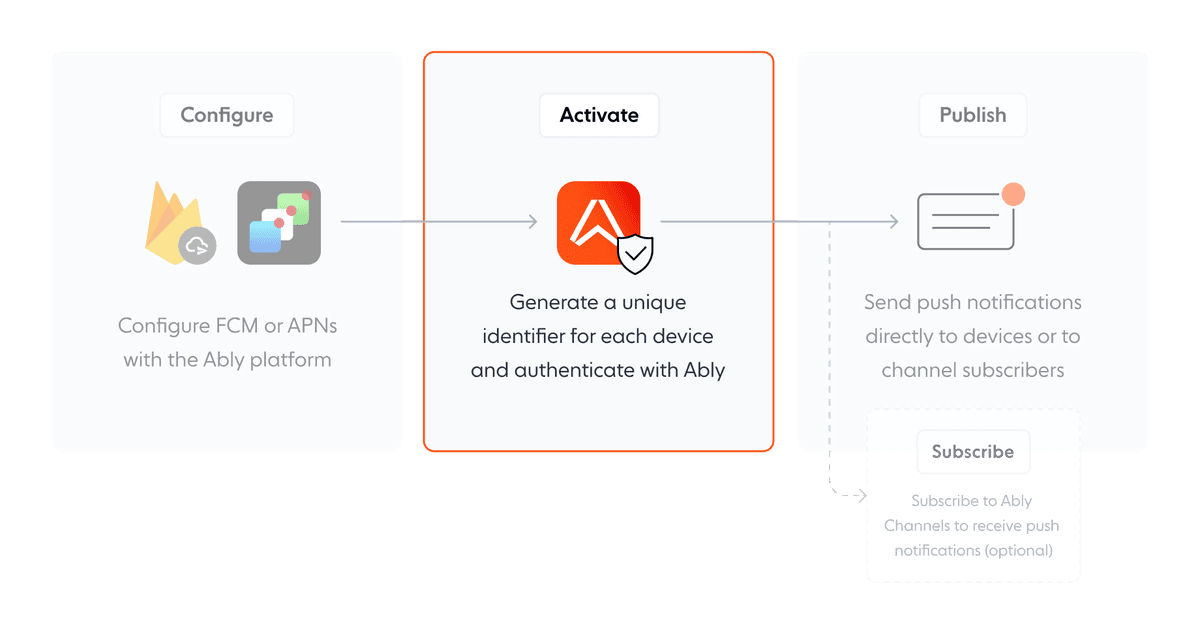
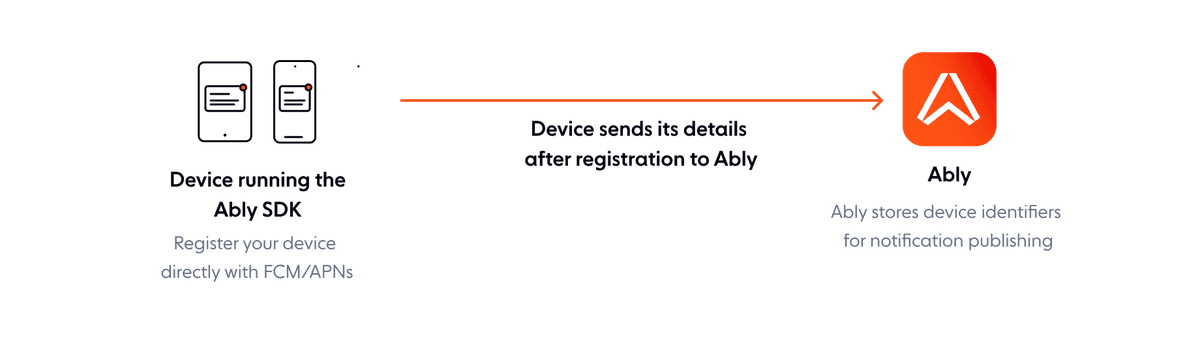
### Activate directly
Activating a device for push notifications is typically done directly on the device itself. Use the [`push.activate()`](https://ably.com/docs/api/realtime-sdk/push#activate) method to activate push notifications from a device. The following steps describe the direct activation process:
1. Authenticate the Ably client.
2. Generate a unique identifier for the device and saves it locally.
3. Activate push notifications for the device with the underlying OS, obtaining a unique identifier like a registration token for FCM or a device token for APNs.
4. Register the device with Ably, providing its unique identifier (`deviceId`), platform details, and push recipient information.
5. Store the device's identity token from Ably's response locally for authentication in subsequent updates.
Note that once activated, the device remains registered even after the application is closed until the [`push.deactivate()`](https://ably.com/docs/api/realtime-sdk/push#deactivate) method is called. Calling activate again has no effect if the device is already activated.
The following diagram demonstrates the direct activation process:
The following example initializes an instance of the Ably Realtime service and then activates the push notifications feature _for that instance_:
```realtime_kotlin
val ably = getAblyRealtime()
ably.setAndroidContext(context)
ably.push.activate()
```

```realtime_java
AblyRealtime ably = getAblyRealtime();
ably.setAndroidContext(context);
ably.push.activate();
```

```realtime_swift
let ably = self.getAblyRealtime()
ably.push.activate()
```

```realtime_objc
ARTRealtime *ably = [self getAblyRealtime];
[ably.push activate];
```

```realtime_csharp
ActivatePush = new Command(() => Ably.Push.Activate());
```

```realtime_flutter
AblyRealtime ably = getAblyRealtime();
ably.push.activate();
```
#### Test your push notification activation
* Use the Ably [dashboard](https://ably.com/accounts) or [API](https://ably.com/docs/api/realtime-sdk/push-admin) to send a test push notification to a registered device.
* Ensure your application correctly receives and handles the push notification.
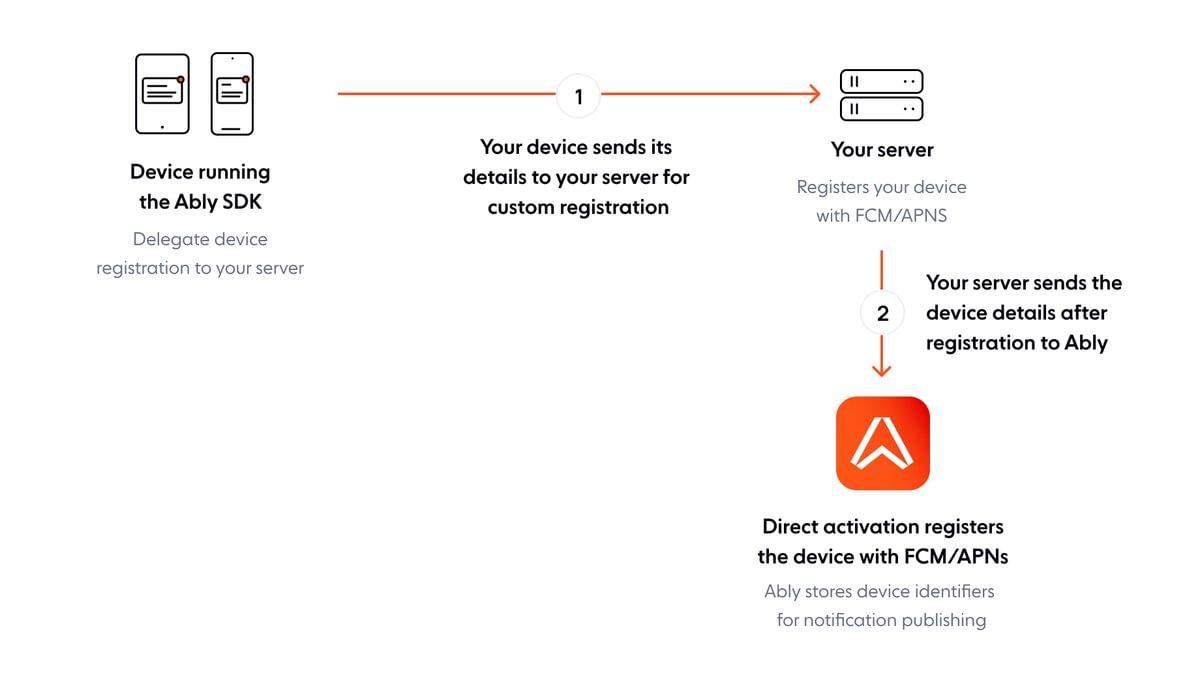
### Activate via server
In specific scenarios, especially where strict control over device capabilities is essential, managing the activation of devices for push notifications through the server is useful. This approach separates the registration with the device's platform-specific push notification service, which still happens on the device. Meanwhile, your server manages the device registration with Ably. This setup provides a centralized and efficient process for controlling devices.
The following steps explain the server assisted activation process:
1. The device initiates the activation process by registering with its platform service to obtain a unique device identifier, such as a registration token for FCM or device token for APNs.
2. Instead of registering itself with Ably, the device sends its platform-specific identifier to your server. Your server then uses this identifier to register the device with Ably using Ably's Push Admin API.
3. The server stores and manages the device tokens. It is responsible for updating these tokens in Ably's system whenever they change, which can be triggered by the device sending a new token to the server following the platform service's renewal.
The following diagram demonstrates the process for activating devices from a server:
#### Activate Android devices via server
Your application must interact with the Ably SDK to configure server-side registration for push notifications, utilizing the [`LocalBroadcastManager`](https://developer.android.com/reference/android/support/v4/content/LocalBroadcastManager) for communication.
Ensure that the `useCustomRegisterer` parameter is set to `true` when calling [`push.activate()`](https://ably.com/docs/api/realtime-sdk/push#activate) or [`push.deactivate()`](https://ably.com/docs/api/realtime-sdk/push#deactivate).
```kotlin
ably.push.activate(context, true)
ably.push.deactivate(context, true)
```
```java
ably.push.activate(context, true);
ably.push.deactivate(context, true);
```
Upon activation or deactivation, the Ably SDK broadcasts signals indicating whether to register or deregister the device from your server. It uses `io.ably.broadcast.PUSH_REGISTER_DEVICE` for registration and `io.ably.broadcast.PUSH_DEREGISTER_DEVICE` for de-registration. To handle these broadcasts, implement a listener in your app's `AndroidManifest.xml` and respond by sending back `PUSH_DEVICE_REGISTERED` or `PUSH_DEVICE_DEREGISTERED` as appropriate.
The following examples set up the server-side activation:
```xml


```
```kotlin
class MyAblyBroadcastReceiver : BroadcastReceiver() {
    override fun onReceive(context: Context, intent: Intent) {
        val ably = getAblyRealtime()
        val action = intent.action

        when (action) {
            "io.ably.broadcast.PUSH_REGISTER_DEVICE" -> {
                val device = ably.device(context)
                val isNew = intent.getBooleanExtra("isNew", false)

                val response = Intent("io.ably.broadcast.PUSH_DEVICE_REGISTERED")

                try {
                    val deviceIdentityToken: String = registerThroughYourServer(device,
                    isNew)

                    response.putExtra("deviceIdentityToken", deviceIdentityToken)
                } catch (e: AblyException) {
                    IntentUtils.addErrorInfo(intent, e.errorInfo)
                }

                LocalBroadcastManager.getInstance(context.applicationContext).sendBroadcast(response)
            }
            "io.ably.broadcast.PUSH_DEREGISTER_DEVICE" -> {
                val device = ably.device(context)

                try {
                    deregisterThroughYourServer(device.id)
                } catch (e: AblyException) {
                    IntentUtils.addErrorInfo(intent, e.errorInfo)
                }

                LocalBroadcastManager.getInstance(context.applicationContext).sendBroadcast(intent)
            }
        }
    }
}
```
```xml


```
```java
public class MyAblyBroadcastReceiver extends BroadcastReceiver {
    @Override
    public void onReceive(Context context, Intent intent) {
        AblyRealtime ably = getAblyRealtime();
        String action = intent.getAction();

        if ("io.ably.broadcast.PUSH_REGISTER_DEVICE".equals(action)) {
            Intent response = new Intent("io.ably.broadcast.PUSH_DEVICE_REGISTERED");
            boolean isNew = intent.getBooleanExtra("isNew", false);

            LocalDevice device;

            try {
                device = ably.device();
            } catch (AblyException e) {
                IntentUtils.addErrorInfo(response, e.errorInfo);
                return;
            }

            try {
                String deviceIdentityToken = registerThroughYourServer(device, isNew);
                response.putExtra("deviceIdentityToken", deviceIdentityToken);
            } catch (AblyException e) {
                IntentUtils.addErrorInfo(response, e.errorInfo);
            }

            LocalBroadcastManager.getInstance(context.getApplicationContext()).sendBroadcast(response);
        } else if ("io.ably.broadcast.PUSH_DEREGISTER_DEVICE".equals(action)) {
            Intent response = new Intent("io.ably.broadcast.PUSH_DEVICE_DEREGISTERED");
            LocalDevice device;

            try {
                device = ably.device();
            } catch (AblyException e) {
                IntentUtils.addErrorInfo(response, e.errorInfo);
                return;
            }

            try {
                deregisterThroughYourServer(device.id);
            } catch (AblyException e) {
                IntentUtils.addErrorInfo(response, e.errorInfo);
            }

            LocalBroadcastManager.getInstance(context.getApplicationContext()).sendBroadcast(response);
        }
    }
}
```
#### Activate iOS device via server
When setting up server-side registration for push notifications on iOS, your application must interact with the Ably SDK to handle device registration and de-registration securely and effectively. Implement the following optional methods from `ARTPushRegistererDelegate` in your `UIApplicationDelegate` to customize the registration process:
```swift
func ablyPushCustomRegister(_ error: ARTErrorInfo?, deviceDetails: ARTDeviceDetails, callback: @escaping (ARTDeviceIdentityTokenDetails?, ARTErrorInfo?) -> Void) {
    if let e = error {
        // Log or handle the error as needed
        callback(nil, e)
        return
    }

    // Your server-side logic to register the device
    self.registerThroughYourServer(deviceDetails: deviceDetails, callback: callback)
}

func ablypushCustomDeregister(_ error: ARTErrorInfo?, deviceId: String, callback: @escaping (ARTErrorInfo?) -> Void) {
    if let e = error {
        // Log or handle the error as needed
        callback(nil, e)
        return
    }

    // Your server-side logic to deregister the device
    self.unregisterThroughYourServer(deviceId: deviceId, callback: callback)
}
```

```objc
- (void)ablyPushCustomRegister:(ARTErrorInfo *)error
                deviceDetails:(ARTDeviceDetails *)deviceDetails
                callback:(void (^)(ARTDeviceIdentityTokenDetails * _Nullable, ARTErrorInfo * _Nullable))callback {
    if (error) {
        // Log or handle the error as needed
        callback(nil, error);
        return;
    }

    // Your server-side logic to register the device
    [self registerThroughYourServer:deviceDetails callback:callback];
}

- (void)ablyPushCustomDeregister:(ARTErrorInfo *)error
                deviceId:(ARTDeviceId *)deviceId
                callback:(void (^)(ARTErrorInfo * _Nullable))callback {
    if (error) {
        // Log or handle the error as needed
        callback(nil, error);
        return;
    }

    // Your server-side logic to deregister the device
    [self unregisterThroughYourServer:deviceId callback:callback];
}
```
#### Activate Android and iOS devices via server using .NET
Initialize the specific mobile device. You can achieve this by using either `AppleMobileDevice.Initialize` or `AndroidMobileDevice.Initialize`. To initialize, you need to pass a valid `Ably.ClientOptions`, which will be used to initialize the Ably realtime or REST client, and an instance of `PushCallbacks`, which you can use to receive notifications when the device is activated, deactivated, or when sync registration fails.
The `Initialize` method will create an instance of `RealtimeClient` or `RestClient`, which can be used to activate push notifications for the device by calling `client.Push.Activate()`. Activation is not guaranteed to happen immediately. The developer will be notified through the `ActivatedCallback`, which was passed to the `Initialize` method when setting up push notifications.
```csharp
public override bool FinishedLaunching(UIApplication app, NSDictionary options)
{
    Xamarin.Forms.Forms.Init();
    InitialiseAbly();
    //...

    return base.FinishedLaunching(app, options);
}

private void InitialiseAbly()
{
    var clientId = ""; // Set or generate a clientId. Use the clientId to send push notifications to a device.
    var callbacks = new PushCallbacks
    {
        ActivatedCallback = error => { /* handle notification */ },
        DeactivatedCallback = error => { /* handle notification */ },
        SyncRegistrationFailedCallback = error => { /* handle notification */ },
    };

    // IOS
    _realtime = AppleMobileDevice.Initialise(GetAblyOptions(clientId), callbacks);
    // ANDROID
    _realtime = AndroidMobileDevice.Initialise(GetAblyOptions(clientId), callbacks);

    _realtime.Connect();
}

private ClientOptions GetAblyOptions(string clientId)
{
    var options = new ClientOptions
    {
        Key = "your-api-key",
        ClientId = string.IsNullOrWhiteSpace(clientId) ? Guid.NewGuid().ToString("D") : clientId,
    };

    _realtime = new AblyRealtime(options);
    // If you are going to use the AblyRealtime client in the app feel free to call Connect here
    // If not then skip it and add `AutoConnect = false,` to the ClientOptions.
    _realtime.Connect();

    return options;
}
```
#### Test your push notification activation
* Use the Ably [dashboard](https://ably.com/accounts) or [API](https://ably.com/docs/docs/api/realtime-sdk/push-admin) to send a test push notification to a registered device.
* Ensure your application correctly receives and handles the push notification.
#### Manual device registration with cross-platform push services
In some scenarios, you may want to use FCM for iOS devices instead of APNs, or manually register devices with custom platform configurations. This is useful when using Firebase's unified messaging system across both Android and iOS platforms.
To manually register a device using FCM with iOS:
1. Use the Firebase iOS SDK to obtain an FCM registration token.
2. Create a `DeviceDetails` object with the appropriate platform and transport configuration.
3. Register the device using the Push Admin API.
```swift
// Get FCM token from Firebase iOS SDK first
// Then create DeviceDetails object manually

let deviceDetails = ARTDeviceDetails(id: ULID().ulidString)
deviceDetails.secret = generateSecret()
deviceDetails.platform = "ios" // or "android"
deviceDetails.formFactor = "phone" // or "tablet", "tv", "watch", "desktop", "car"
deviceDetails.clientId = "clientA"
deviceDetails.metadata = NSMutableDictionary()
deviceDetails.push.recipient = [
    "transportType": "fcm", // Use FCM instead of APNs
    "registrationToken": "your-fcm-registration-token"
]

// Register the device using Push Admin API
rest.push.admin.deviceRegistrations.save(deviceDetails) { error in
    if let error = error {
        print("Registration failed: \(error)")
    } else {
        print("Device registered successfully")
    }
}
```

```objc
// Get FCM token from Firebase iOS SDK first
// Then create DeviceDetails object manually

ARTDeviceDetails *deviceDetails = [[ARTDeviceDetails alloc] initWithId:[[NSUUID UUID] UUIDString]];
deviceDetails.secret = [self generateSecret];
deviceDetails.platform = @"ios"; // or @"android"
deviceDetails.formFactor = @"phone"; // or @"tablet", @"tv", @"watch", @"desktop", @"car"
deviceDetails.clientId = @"clientA";
deviceDetails.metadata = [[NSMutableDictionary alloc] init];
deviceDetails.push.recipient = @{
    @"transportType": @"fcm", // Use FCM instead of APNs
    @"registrationToken": @"your-fcm-registration-token"
};

// Register the device using Push Admin API
[rest.push.admin.deviceRegistrations save:deviceDetails callback:^(ARTErrorInfo *error) {
    if (error) {
        NSLog(@"Registration failed: %@", error);
    } else {
        NSLog(@"Device registered successfully");
    }
}];
```
This approach allows:
- Using FCM for both Android and iOS devices for unified push messaging.
- Overriding the default platform-specific push service assignments.
- Maintaining full control over device registration parameters.
- Integration with Firebase's analytics and other services across platforms.
#### Test your push notification activation
* Use the Ably [dashboard](https://ably.com/accounts) or [API](https://ably.com/docs/docs/api/realtime-sdk/push-admin) to send a test push notification to a registered device.
* Ensure your application correctly receives and handles the push notification.
### Device activation lifecycle
When the [`push.activate()`](https://ably.com/docs/api/realtime-sdk/push#activate) and [`push.deactivate()`](https://ably.com/docs/api/realtime-sdk/push#deactivate) methods are called, the device registers with FCM or APNs. In addition, whenever there is an update to the push token (registration token for FCM or device token for APNs), the Ably SDK attempts to update this token on Ably's servers.
| Event | Method |
|-------|--------|
| Handle push activation | `io.ably.broadcast.PUSH_ACTIVATE` in a broadcast intent |
| Handle push deactivation | `io.ably.broadcast.PUSH_DEACTIVATE` in a broadcast intent |
| Handle push registration failure | `io.ably.broadcast.PUSH_UPDATE_FAILED` in a broadcast intent |
| Event | Method |
|-------|--------|
| Handle push activation | `func didActivateAblyPush(_ error: ARTErrorInfo?)` |
| Handle push deactivation | `func didDeactivateAblyPush(_ error: ARTErrorInfo?)` |
| Handle push registration failure | `func didAblyPushRegistrationFail(_ error: ARTErrorInfo?)` |
| Event | Method |
|-------|--------|
| Handle push activation | `(void)didActivateAblyPush:(nullable ARTErrorInfo *)error;` |
| Handle push deactivation | `(void)didDeactivateAblyPush:(nullable ARTErrorInfo *)error;` |
| Handle push registration failure | `(void)didAblyPushRegistrationFail:(nullable ARTErrorInfo *)error;` |
| Event | Method |
|-------|--------|
| Handle push activation | `private void HandlePushActivation(ARTErrorInfo error)` |
| Handle push deactivation | `private void HandlePushDeactivation(ARTErrorInfo error)` |
| Handle push registration failure | `private void HandlePushRegistrationFailure(ARTErrorInfo error)` |