# Getting started: Pub/Sub with Flutter
This guide will get you started with Ably Pub/Sub in a new Flutter application.
You'll establish a realtime connection to Ably and learn to publish and subscribe to messages. You'll also implement presence to track other online clients, and learn how to retrieve message history.
## Prerequisites
1. [Sign up](https://ably.com/sign-up) for a free Ably account.
2. Create a [new app](https://ably.com/accounts/any/apps/new), and create your first API key in the **API Keys** tab of the dashboard.
3. Your API key will need the `publish`, `subscribe`, `presence` and `history` [capabilities](https://ably.com/docs/auth/capabilities.md).
### Create a Flutter project
Create a new Flutter project and navigate to the project folder:
```shell
flutter create ably_pubsub_flutter
cd ably_pubsub_flutter
```
### Install Ably Pub/Sub Flutter SDK
Add the Ably Flutter SDK to your `pubspec.yaml` file:
```flutter
dependencies:
  flutter:
    sdk: flutter
  ably_flutter: ^1.2.35
```
Then run:
```shell
flutter pub get
```
### Set up Ably Realtime Client
Create a new file `lib/ably_service.dart` to manage your Ably connection:
```flutter
// lib/ably_service.dart
import 'package:ably_flutter/ably_flutter.dart' as ably;

class AblyService {
  static final AblyService _instance = AblyService._internal();
  late ably.Realtime _realtime;

  factory AblyService() {
    return _instance;
  }

  AblyService._internal();

  Future init() async {
    final clientOptions = ably.ClientOptions(
      key: 'your-api-key',
      clientId: 'my-first-client',
    );

    _realtime = ably.Realtime(options: clientOptions);
  }

  ably.Realtime get realtime => _realtime;

  Future close() async {
    await _realtime.close();
  }
}
```
Replace the contents of your `lib/main.dart` to initialize the Ably service:
```flutter
// lib/main.dart
import 'package:flutter/material.dart';
import 'ably_service.dart';

void main() async {
  WidgetsFlutterBinding.ensureInitialized();
  await AblyService().init();
  runApp(const MyApp());
}

class MyApp extends StatelessWidget {
  const MyApp({super.key});

  @override
  Widget build(BuildContext context) {
    return MaterialApp(
      title: 'Ably Pub/Sub Flutter',
      theme: ThemeData(
        primarySwatch: Colors.blue,
      ),
      home: const MyHomePage(),
    );
  }
}

class MyHomePage extends StatelessWidget {
  const MyHomePage({super.key});

  @override
  Widget build(BuildContext context) {
    return Scaffold(
      appBar: AppBar(
        title: const Text('Ably Pub/Sub Flutter'),
        backgroundColor: Colors.blue,
      ),
      body: const Padding(
        padding: EdgeInsets.all(16.0),
        child: Center(
          child: Card(
            child: Padding(
              padding: EdgeInsets.all(16.0),
              child: Column(
                mainAxisSize: MainAxisSize.min,
                children: [
                  Text(
                    'Ably Pub/Sub Flutter',
                    style: TextStyle(
                      fontSize: 24,
                      fontWeight: FontWeight.bold,
                      color: Colors.blue,
                    ),
                  ),
                ],
              ),
            ),
          ),
        ),
      ),
    );
  }
}
```
### (Optional) Install Ably CLI
Use the [Ably CLI](https://github.com/ably/cli) as an additional client to quickly test Pub/Sub features. It can simulate other clients by publishing messages, subscribing to channels, and managing presence states.
1. Install the Ably CLI:
```shell
npm install -g @ably/cli
```
2. Run the following to log in to your Ably account and set the default app and API key:
```shell
ably login
```
## Step 1: Connect to Ably
Clients establish a connection with Ably when they instantiate an SDK instance. This enables them to send and receive messages in realtime across channels.
In the [Set up Ably Realtime Client](#prerequisites-setup-ably-client) section, you added code to create an Ably Realtime client. This code creates a new Realtime client instance, establishing a connection to Ably when your application starts. At the minimum you need to provide an authentication mechanism. While using an API key is fine for the purposes of this guide, you should use [token authentication](https://ably.com/docs/auth/token.md) in production environments. A [`clientId`](https://ably.com/docs/auth/identified-clients.md) ensures the client is identified, which is required to use certain features, such as presence.
To monitor the Ably connection state within your application, create a widget that displays the current connection state. Create a new file `lib/widgets/connection_state.dart`:
```flutter
// lib/widgets/connection_state.dart
import 'package:flutter/material.dart';
import 'package:ably_flutter/ably_flutter.dart' as ably;
import '../ably_service.dart';

class AblyConnectionState extends StatefulWidget {
  const AblyConnectionState({super.key});

  @override
  State createState() => _ConnectionStateState();
}

class _ConnectionStateState extends State {
  late ably.Connection _connection;
  ably.ConnectionState _connectionState = ably.ConnectionState.initialized;

  @override
  void initState() {
    super.initState();
    _connection = AblyService().realtime.connection;
    _connectionState = _connection.state;

    // Listen for connection state changes
    _connection.on().listen((ably.ConnectionStateChange stateChange) {
      setState(() {
        _connectionState = stateChange.current;
      });
    });
  }

  @override
  Widget build(BuildContext context) {
    return Padding(
      padding: const EdgeInsets.only(top: 8.0),
      child: Text(
        'Connection: ${_connectionState.name}!',
        style: const TextStyle(fontSize: 16, fontWeight: FontWeight.w500),
        textAlign: TextAlign.center,
      ),
    );
  }
}
```
Update your `lib/main.dart` to include the `ConnectionState` widget:
```flutter
// lib/main.dart
// Add the following import
import 'widgets/connection_state.dart';

// Inside MyHomePage widget, find the children array and add `AblyConnectionState()` widget.
children: [
  Text(
    'Ably Pub/Sub Flutter',
    style: TextStyle(
      fontSize: 24,
      fontWeight: FontWeight.bold,
      color: Colors.blue,
    ),
  ),
  // Add AblyConnectionState here
  AblyConnectionState(),
],
```
Now start your application by running:
```shell
flutter run
```
You should see the connection state displayed in your UI (e.g., `Connection: connected!`). You can also inspect connection events in the [dev console](https://ably.com/accounts/any/apps/any/console) of your app.
## Step 2: Subscribe to a channel and publish a message
Messages contain the data that a client is communicating, such as a short 'hello' from a colleague, or a financial update being broadcast to subscribers from a server. Ably uses channels to separate messages into different topics, so that clients only ever receive messages on the channels they are subscribed to.
### Subscribe to a channel
Create a new file `lib/widgets/messages.dart` to handle message display and publishing:
```flutter
// lib/widgets/messages.dart
import 'package:flutter/material.dart';
import 'package:ably_flutter/ably_flutter.dart' as ably;
import '../ably_service.dart';

class Messages extends StatefulWidget {
  const Messages({super.key});

  @override
  State createState() => _MessagesState();
}

class _MessagesState extends State {
  late ably.RealtimeChannel _channel;
  final List _messages = [];
  final TextEditingController _textController = TextEditingController();

  @override
  void initState() {
    super.initState();
    _channel = AblyService().realtime.channels.get('my-first-channel');

    // Subscribe to messages
    _channel.subscribe().listen((ably.Message message) {
      setState(() {
        _messages.add(message);
      });
    });
  }

  Future _publishMessage() async {
    if (_textController.text.trim().isEmpty) return;

    try {
      await _channel.publish(
        name: 'my-first-messages',
        data: _textController.text.trim(),
      );
      _textController.clear();
    } catch (error) {
      debugPrint('Error publishing message: $error');
    }
  }

  @override
  Widget build(BuildContext context) {
    return Column(
      children: [
        Expanded(
          child: ListView.builder(
            itemCount: _messages.length,
            itemBuilder: (context, index) {
              final message = _messages[index];
              final isMine = message.clientId == 'my-first-client';

              return Container(
                margin: const EdgeInsets.symmetric(
                  vertical: 4.0,
                  horizontal: 8.0,
                ),
                padding: const EdgeInsets.all(12.0),
                decoration: BoxDecoration(
                  color: isMine ? Colors.green.shade100 : Colors.blue.shade50,
                  borderRadius: BorderRadius.circular(8.0),
                ),
                child: Text(
                  message.data.toString(),
                  style: const TextStyle(color: Colors.black87),
                ),
              );
            },
          ),
        ),
        Container(
          padding: const EdgeInsets.all(8.0),
          decoration: const BoxDecoration(
            border: Border(top: BorderSide(color: Colors.grey)),
          ),
          child: Row(
            children: [
              Expanded(
                child: TextField(
                  controller: _textController,
                  decoration: const InputDecoration(
                    hintText: 'Type your message...',
                    border: OutlineInputBorder(),
                  ),
                  onSubmitted: (_) => _publishMessage(),
                ),
              ),
              const SizedBox(width: 8.0),
              ElevatedButton(
                onPressed: _publishMessage,
                child: const Text('Publish'),
              ),
            ],
          ),
        ),
      ],
    );
  }

  @override
  void dispose() {
    _textController.dispose();
    super.dispose();
  }
}
```
Update your `lib/main.dart` to include the `Messages` widget:
```flutter
// lib/main.dart
// Add the following import
import 'widgets/messages.dart';

void main() async {
  WidgetsFlutterBinding.ensureInitialized();
  await AblyService().init();
  runApp(const MyApp());
}

// Replace MyHomePage with the following:
class MyHomePage extends StatelessWidget {
  const MyHomePage({super.key});

  @override
  Widget build(BuildContext context) {
    return Scaffold(
      appBar: AppBar(
        title: const Text('Ably Pub/Sub Flutter'),
        backgroundColor: Colors.blue,
      ),
      body: Padding(
        padding: const EdgeInsets.all(16.0),
        child: Column(
          children: [
            Card(
              child: Padding(
                padding: const EdgeInsets.all(16.0),
                child: Column(
                  children: [
                    const Text(
                      'Ably Pub/Sub Flutter',
                      style: TextStyle(
                        fontSize: 24,
                        fontWeight: FontWeight.bold,
                        color: Colors.blue,
                      ),
                    ),
                    const AblyConnectionState(),
                  ],
                ),
              ),
            ),
            const SizedBox(height: 16.0),
            const Expanded(
              child: Card(
                child: Messages(),
              ),
            ),
          ],
        ),
      ),
    );
  }
}
```
### Publish a message
Your application now supports publishing realtime messages! Type a message and press "Publish" to see it appear in your UI. With the app open on a device or emulator, open a new terminal on your computer and publish a message to the channel with the Ably CLI:
```shell
ably channels publish my-first-channel 'Hello from CLI!'
```
Messages from the CLI will appear in your UI in a different color to the ones you sent from the app.
## Step 3: Join the presence set
Presence enables clients to be aware of one another if they are present on the same channel. You can then show clients who else is online, provide a custom status update for each, and notify the channel when someone goes offline.
Create a new file `lib/widgets/presence_status.dart` to handle presence functionality:
```flutter
// lib/widgets/presence_status.dart

import 'package:flutter/material.dart';
import 'package:ably_flutter/ably_flutter.dart' as ably;
import '../ably_service.dart';

class PresenceStatus extends StatefulWidget {
  const PresenceStatus({super.key});

  @override
  State createState() => _PresenceStatusState();
}

class _PresenceStatusState extends State {
  late ably.RealtimeChannel _channel;
  final List _presenceData = [];

  @override
  void initState() {
    super.initState();
    _channel = AblyService().realtime.channels.get('my-first-channel');

    // Enter presence set
    _channel.presence.enter({'status': "I'm here!"});

    // Subscribe to presence updates
    _channel.presence.subscribe().listen((
      ably.PresenceMessage presenceMessage,
    ) {
      setState(() {
        _updatePresenceData(presenceMessage);
      });
    });

    // Get current presence members
    _loadPresenceMembers();
  }

  Future _loadPresenceMembers() async {
    try {
      final members = await _channel.presence.get();
      setState(() {
        _presenceData.clear();
        _presenceData.addAll(members);
      });
    } catch (error) {
      debugPrint('Error loading presence members: $error');
    }
  }

  void _updatePresenceData(ably.PresenceMessage presenceMessage) {
    switch (presenceMessage.action) {
      case ably.PresenceAction.enter:
      case ably.PresenceAction.present:
      case ably.PresenceAction.update:
        _presenceData.removeWhere(
          (member) => member.clientId == presenceMessage.clientId,
        );
        _presenceData.add(presenceMessage);
        break;
      case ably.PresenceAction.leave:
      case ably.PresenceAction.absent:
        _presenceData.removeWhere(
          (member) => member.clientId == presenceMessage.clientId,
        );
        break;
      case null:
        // Handle null case
        break;
    }
  }

  @override
  Widget build(BuildContext context) {
    return Container(
      padding: const EdgeInsets.all(16.0),
      child: Column(
        crossAxisAlignment: CrossAxisAlignment.start,
        children: [
          Container(
            padding: const EdgeInsets.only(bottom: 8.0),
            decoration: const BoxDecoration(
              border: Border(bottom: BorderSide(color: Colors.grey)),
            ),
            child: Text(
              'Present: ${_presenceData.length}',
              style: const TextStyle(
                fontSize: 18,
                fontWeight: FontWeight.bold,
                color: Colors.green,
              ),
              textAlign: TextAlign.center,
            ),
          ),
          const SizedBox(height: 16.0),
          Expanded(
            child: ListView.builder(
              itemCount: _presenceData.length,
              itemBuilder: (context, index) {
                final member = _presenceData[index];
                final status = member.data is Map
                    ? (member.data as Map)['status']
                    : null;

                return Padding(
                  padding: const EdgeInsets.only(bottom: 8.0),
                  child: Row(
                    children: [
                      Container(
                        width: 8.0,
                        height: 8.0,
                        decoration: const BoxDecoration(
                          color: Colors.green,
                          shape: BoxShape.circle,
                        ),
                      ),
                      const SizedBox(width: 8.0),
                      Expanded(
                        child: Text(
                          '${member.clientId}${status != null ? ' ($status)' : ''}',
                          style: const TextStyle(color: Colors.black87),
                        ),
                      ),
                    ],
                  ),
                );
              },
            ),
          ),
        ],
      ),
    );
  }
}
```
Update your `lib/main.dart` to include the `PresenceStatus` widget:
```flutter
// lib/main.dart

// Import the PresenceStatus widget
import 'widgets/presence_status.dart';

// Replace the line `const Expanded(child: Card(child: Messages())),` with the following:
Expanded(
  child: Row(
    crossAxisAlignment: CrossAxisAlignment.start,
    children: [
      Expanded(
        flex: 2,
        child: Card(
          child: Container(
            decoration: const BoxDecoration(
              border: Border(right: BorderSide(color: Colors.blue)),
            ),
            child: const PresenceStatus(),
          ),
        ),
      ),
      const SizedBox(width: 16.0),
      const Expanded(
        flex: 3,
        child: Card(
          child: Messages(),
        ),
      ),
    ],
  ),
),
```
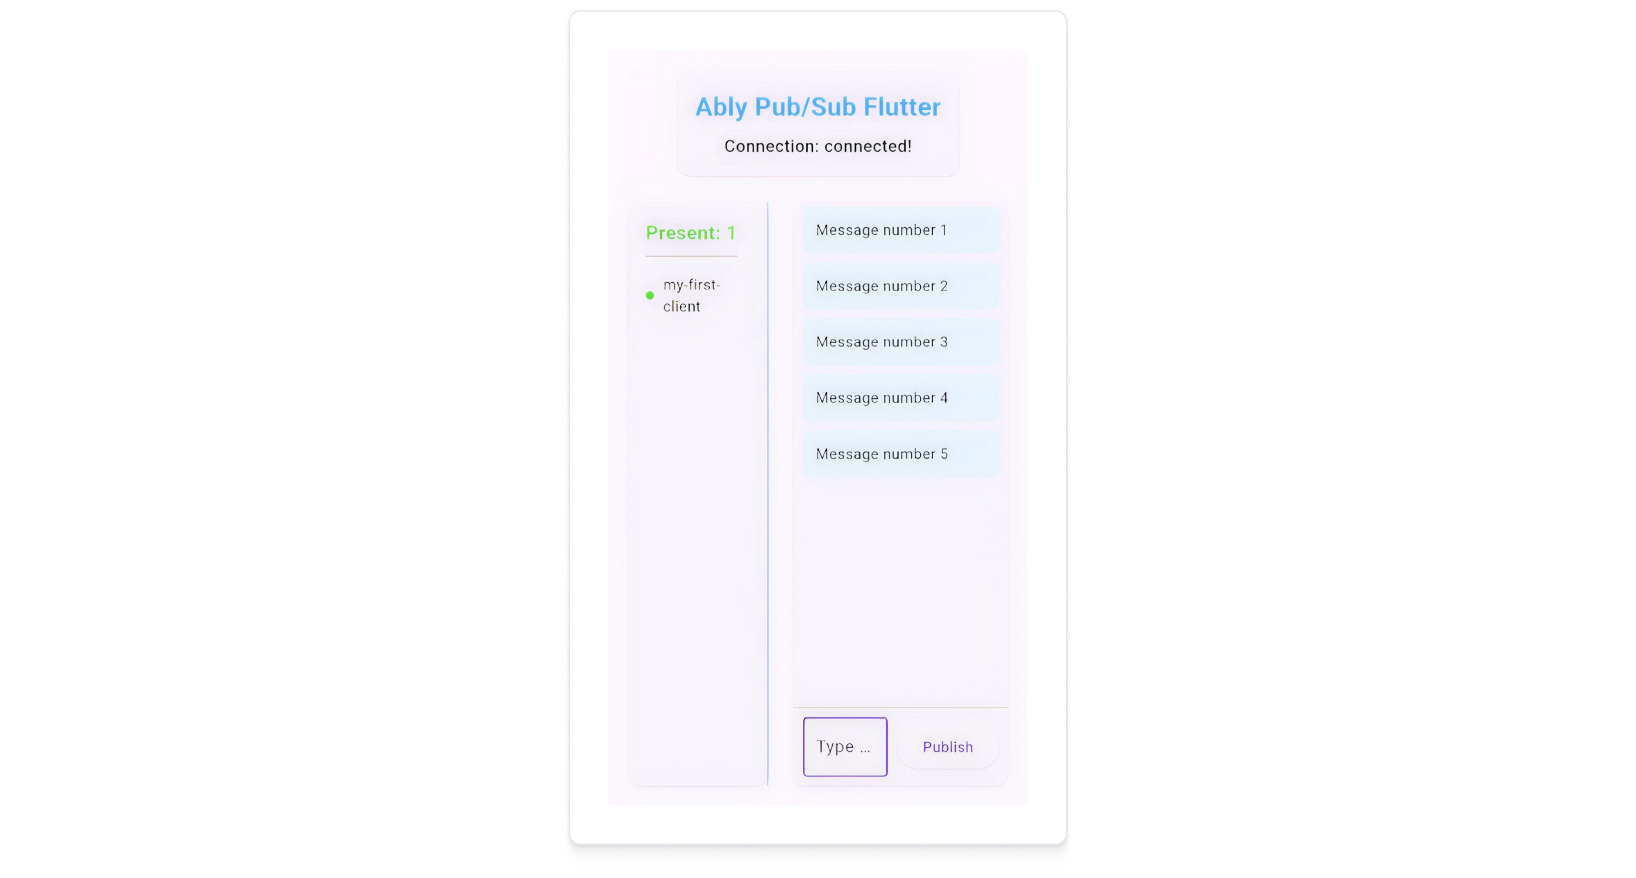
The application will now display a list of clients currently present on the channel. Your current client ID should appear in the list of online users.
You can have another client join the presence set using the Ably CLI:
```shell
ably channels presence enter my-first-channel --data '{"status":"From CLI"}'
```
## Step 4: Retrieve message history
You can retrieve previously sent messages using the history feature. Ably stores all messages for 2 minutes by default in the event a client experiences network connectivity issues. You can [extend the storage period](https://ably.com/docs/storage-history/storage.md) of messages if required.
Update your `lib/widgets/messages.dart` file by finding the function `_publishMessage` and above this add the new function `_loadMessageHistory`:
```flutter
Future _loadMessageHistory() async {
  try {
    // Retrieve the last 5 messages from history
    final history = await _channel.history(
      ably.RealtimeHistoryParams(limit: 5),
    );

    // History responses are returned in reverse chronological order (newest first)
    // Reverse the array to show the latest messages at the bottom in the UI
    final messagesFromHistory = history.items.reversed.toList();

    setState(() {
      _messages.clear();
      _messages.addAll(messagesFromHistory);
    });
  } catch (error) {
    debugPrint('Error loading message history: $error');
  }
}
```
Find the line `// Subscribe to messages` and above this add the following:
```flutter
// Load message history first
_loadMessageHistory();
```
Test this feature with the following steps:
1. Publish several messages using your application UI, or send messages from another client using the Ably CLI:
```shell
ably channels publish --count 5 my-first-channel "Message number {{.Count}}"
```
2. Hot reload the app or restart it. This will cause the `Messages` widget to reinitialize and call the `_loadMessageHistory()` method.
3. You should see the last 5 messages displayed in your UI, ordered from oldest to newest at the bottom:
```json
Message number 1
Message number 2
Message number 3
Message number 4
Message number 5
```
## Next steps
Continue to explore the documentation with Flutter as the selected language:
* Understand [token authentication](https://ably.com/docs/auth/token.md) before going to production.
* Understand how to effectively [manage connections](https://ably.com/docs/connect.md#close?lang=flutter).
* Explore more [advanced](https://ably.com/docs/pub-sub/advanced.md) Pub/Sub concepts.
You can also explore the [Ably CLI](https://www.npmjs.com/package/@ably/cli) further, or visit the Pub/Sub [API references](https://ably.com/docs/api/realtime-sdk.md).