# Getting started: Chat with React Native
This guide will get you started with Ably Chat on a new React Native application.
You'll learn how to create chat rooms, send and edit messages, and implement realtime features like typing indicators and presence. You'll also cover message history, reactions, and proper connection management.
## Prerequisites
### Ably
1. [Sign up](https://ably.com/signup) for an Ably account.
2. Create a [new app](https://ably.com/accounts/any/apps/new), and get your first API key. You can use the root API key that is provided by default, within the **API Keys** tab to get started.
### Create a new project
1. Create a new React Native project using the React Native CLI. For detailed instructions, refer to the [React Native documentation](https://reactnative.dev/docs/environment-setup).
```shell
npx rn-new@latest my-chat-react-native-app --nativewind
cd my-chat-react-native-app
```
2. Install the Ably Chat SDK and its dependencies:
```shell
npm install @ably/chat ably
```
3. For iOS, install the native dependencies:
```shell
cd ios && pod install && cd ..
```
### (Optional) Install Ably CLI
Use the [Ably CLI](https://github.com/ably/cli) as an additional client to quickly test chat features. It can simulate other users by sending messages, entering presence, and acting as another user typing a message.
1. Install the Ably CLI:
```shell
npm install -g @ably/cli
```
2. Run the following to log in to your Ably account and set the default app and API key:
```shell
ably login
```
## Step 1: Setting up the Ably and Chat client providers
The Ably Pub/Sub SDK and the Ably Chat SDK expose React hooks and context providers to make it easier to use them in your React Native components. The [`AblyProvider`](https://ably.com/docs/getting-started/react-hooks.md#ably-provider) and [`ChatClientProvider`](https://sdk.ably.com/builds/ably/ably-chat-js/main/typedoc/functions/chat-react.ChatClientProvider.html) should be used at the top level of your application, typically in `App.tsx`. These are required when working with the [`useChatConnection`](https://sdk.ably.com/builds/ably/ably-chat-js/main/typedoc/functions/chat-react.useChatConnection.html) hook and [`ChatRoomProvider`](https://sdk.ably.com/builds/ably/ably-chat-js/main/typedoc/functions/chat-react.ChatRoomProvider.html) exposed by Ably Chat.
In production, you should use [token authentication](https://ably.com/docs/auth/token.md) to avoid exposing your API keys publicly, the [`clientId`](https://ably.com/docs/auth/identified-clients.md) is used to identify the client.
Replace the contents of your `App.tsx` file with the following code to set up the providers:
```react
// App.tsx
import React from 'react';
import * as Ably from 'ably';
import { ChatClient, LogLevel } from '@ably/chat';
import { ChatClientProvider } from '@ably/chat/react';
import { AblyProvider } from 'ably/react';
import './global.css';

// Create your Ably Realtime client and ChatClient instances:
const realtimeClient = new Ably.Realtime({
  key: your-api-key,
  clientId: 'my-first-client',
});

const chatClient = new ChatClient(realtimeClient, {
  logLevel: LogLevel.Info,
});

export default function App() {
  return (


  );
}
```
## Step 2: Connect to Ably
Clients establish a connection with Ably when they instantiate an SDK. This enables them to send and receive messages in realtime across channels. This hook must be nested within a `ChatClientProvider`.
Create a new file `ChatApp.tsx` and add the following functions with the imports needed for the chat functionality:
```react
// ChatApp.tsx
import React, {useCallback, useEffect, useState} from 'react';
import {
SafeAreaView,
ScrollView,
Text,
TextInput,
TouchableOpacity,
View,
StyleSheet,
KeyboardAvoidingView,
Platform,
Alert,
Modal
} from 'react-native';
import {
ChatRoomProvider,
useChatConnection,
useMessages,
usePresence,
usePresenceListener,
useRoom,
useRoomReactions,
useTyping,
} from '@ably/chat/react';
import {
ChatMessageEvent,
Message,
ChatMessageEventType,
RoomReaction,
} from '@ably/chat';
// This component will display the current connection status
function ConnectionStatus() {
const {currentStatus} = useChatConnection();
return (
Ably Chat ConnectionConnection: {currentStatus}!
);
}
function ChatApp() {
return (
{/* RoomStatus will be called here */}
{/* ChatBox component will be called here */}
);
}
export default ChatApp;
```
In the `App.tsx` file, add the import for this new component:
```react
import ChatApp from './ChatApp';
```
Update `tailwind.config.js` content to include your `ChatApp` following:
```react
content: ['./App.{js,ts,tsx}', './ChatApp.{js,ts,tsx}', './components/**/*.{js,ts,tsx}'],
```
Now in your `return()` within the `` add your new `ChatApp` component:
```react
  return (


  );
```
Run your application by starting the development server and choose the method of running (Android, iPhone, Simulator):
```shell
npm run start
```
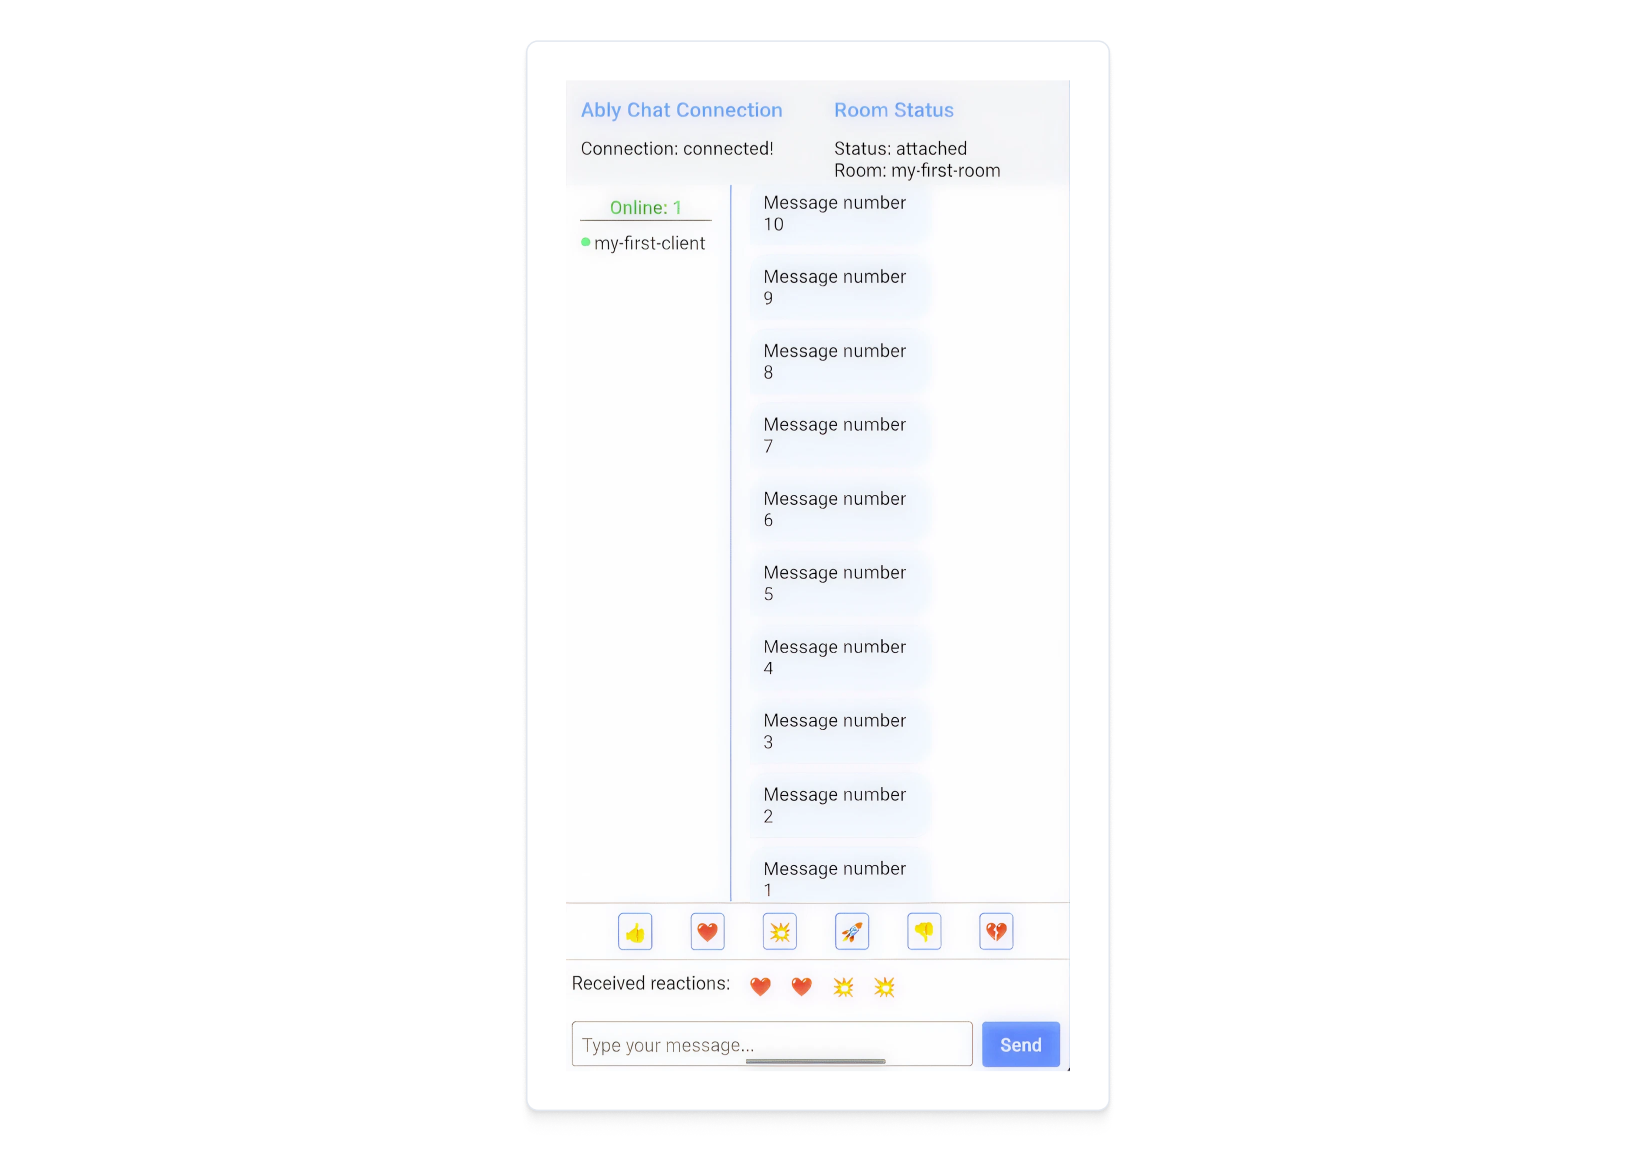
The application should now be running on either your device or simulator. You should see the connection status displayed with "Connection: connected!".
## Step 3: Create a room
Now that you have a connection to Ably, you can create a room. Use rooms to separate and organize clients and messages into different topics, or 'chat rooms'. Rooms are the entry object into Chat, providing access to all of its features, such as messages, presence and reactions.
Ably Chat exposes the [`ChatRoomProvider`](https://sdk.ably.com/builds/ably/ably-chat-js/main/typedoc/functions/chat-react.ChatRoomProvider.html)
to help you create and manage rooms. It must be nested under the `ChatClientProvider` described above.
This provider also gives you access to the room via the [`useRoom()`](https://sdk.ably.com/builds/ably/ably-chat-js/main/typedoc/functions/chat-react.useRoom.html) hook,
which you can be used to interact with the room and monitor its status.
In your project, open `ChatApp.tsx`, and add a new component called `RoomStatus`:
```react
// ChatApp.tsx
// ...existing code...

function RoomStatus() {
  const [currentRoomStatus, setCurrentRoomStatus] = useState('');
  const {roomName} = useRoom({
    onStatusChange: (status) => {
      setCurrentRoomStatus(status.current);
    },
  });

  return (

      Room Status

        Status: {currentRoomStatus}
        {'\n'}
        Room: {roomName}


  );
}
```
Update your `ChatApp()` component first by wrapping the contents of the return with a `ChatRoomProvider`, then find the line `/* RoomStatus will be called here */` and replace it with ``.
```react
function ChatApp() {
  return (


                {/* Added RoomStatus component */}


                {/* ChatBox component will be called here */}


  );
}
// ...existing code...
```
The above code creates a room with the name `my-first-room` and sets up a listener to monitor the room status. It also displays the room name and current status in the UI.
## Step 4: Send a message
Messages are how your clients interact with one another and Ably Chat exposes a [`useMessages()`](https://sdk.ably.com/builds/ably/ably-chat-js/main/typedoc/functions/chat-react.useMessages.html) hook to interact with the [messages](https://ably.com/docs/chat/rooms/messages.md) feature of the Chat SDK. After the room provider is set up, you can use the [`useMessages()`](https://sdk.ably.com/builds/ably/ably-chat-js/main/typedoc/functions/chat-react.useMessages.html) hook to send and receive messages in the room.
In `ChatApp.tsx`, add a `ChatBox` component which will allow users to send and receive messages:
```react
// ChatApp.tsx
// ...existing code...

function ChatBox() {
  const [inputValue, setInputValue] = useState('');
  const [messages, setMessages] = useState([]);

  const {sendMessage} = useMessages({
    listener: (event: ChatMessageEvent) => {
      const message = event.message;
      switch (event.type) {
        case ChatMessageEventType.Created: {
          setMessages((prevMessages) => {
            // Check if the incoming message is correctly ordered
            if (prevMessages.length > 0 && prevMessages[prevMessages.length - 1].serial > message.serial) {
              // If the message arrived out of order - you should find the correct insertion point based on serial
              // This is omitted for brevity, but production code should maintain serial order
            }
            return [...prevMessages, message];
          });
          break;
        }
        default: {
          console.error('Unhandled event', event);
        }
      }
    },
  });

  const handleSend = () => {
    if (!inputValue.trim()) return;
    sendMessage({text: inputValue.trim()}).catch((err) =>
      console.error('Error sending message', err),
    );
    setInputValue('');
  };

  return (


        {messages.map((msg: Message) => {
          const isMine = msg.clientId === 'my-first-client';
          return (

              {msg.text}

          );
        })}


          Send


  );
}
```
Add `ChatBox` component to your `ChatApp` component:
```react
// Update ChatApp to include ChatBox
function ChatApp() {
  return (


                {/* Added ChatBox component */}


  );
}
```
The UI will automatically render the new component, and you will be able to send messages to the room.
Type a message in the input box and click the send button. You'll see the message appear in the chat box.
You can also use the Ably CLI to send a message to the room from another environment:
```shell
  ably rooms messages send my-first-room 'Hello from CLI!'
```
You'll see the message in your app's chat box UI. If you have sent a message via CLI, it should appear in a different color to the one you sent from the app.
## Step 5: Edit a message
If your client makes a typo, or needs to update their original message then they can edit it. To do this, you can extend the functionality of the `ChatBox` component to allow updating of messages. The `useMessages()` hook exposes the [`updateMessage()`](https://sdk.ably.com/builds/ably/ably-chat-js/main/typedoc/interfaces/chat-js.Messages.html#update) method of the Chat SDK [messages](https://ably.com/docs/chat/rooms/messages.md) feature.
Expose the `updateMessage()` method from the `useMessages()` hook and then add a method to the `ChatBox` component to handle the edit action like so:
```react
// ChatApp.tsx - Update ChatBox component
function ChatBox() {
  // ...existing code...
  const [editModalVisible, setEditModalVisible] = useState(false);
  const [editingMessage, setEditingMessage] = useState(null);
  const [editText, setEditText] = useState('');

  const onUpdateMessage = useCallback(
    (message: Message) => {
      setEditingMessage(message);
      setEditText(message.text);
      setEditModalVisible(true);
    },
    [],
  );

  const handleUpdate = useCallback(async () => {
    if (!editingMessage || !editText.trim()) {
      console.log('Early return - missing data');
      return;
    }

    updateMessage(editingMessage.serial, {text: editText.trim()}, {description: "Message update by user"})
      .then((updatedMsg: Message) => {
        console.log('Message updated:', updatedMsg);
        setEditModalVisible(false);
        setEditingMessage(null);
        setEditText('');
      })
      .catch((error) => {
        console.warn('Failed to update message', error);
        // Still close the modal even if update fails
        setEditModalVisible(false);
        setEditingMessage(null);
        setEditText('');
      });

      console.log('Update function completed');
  }, [editingMessage, editText, updateMessage]);

  const handleChange = (newValue: string) => {
    setInputValue(newValue);
  };
```
Update the rendering of messages in `ChatBox` to enable the update action in the UI:
```react
  return (


          {/* Add PresenceStatus component here */}


          {messages.map((msg: Message) => {
            const isMine = msg.clientId === 'my-first-client';
            return (
               onUpdateMessage(msg)}>

                  {msg.text}


            );
          })}


        {/* Row 1: Typing indicator */}
        {/* Add typing indicator functionality here */}

        {/* Row 2: Reactions */}
        {/* Add Reactions component here */}

        {/* Row 3: Text input & send button */}


            Send


       setEditModalVisible(false)}>


            Edit Message


               setEditModalVisible(false)}>
                Cancel

               {
                  console.log('Update button pressed');
                  handleUpdate();
                }}>
                Update


  );
```
Update the listener provided to the `useMessages()` hook to handle the `ChatMessageEventType.Updated` event:
```react
// ChatApp.tsx - Replace the useMessages hook with the following:
const {sendMessage, updateMessage} = useMessages({
  listener: (event: ChatMessageEvent) => {
    const message = event.message;
    switch (event.type) {
      case ChatMessageEventType.Created: {
        // Add the new message to the list
        setMessages((prevMessages) => [...prevMessages, event.message]);
        break;
      }
      case ChatMessageEventType.Updated: {
        setMessages((prevMessages) => {
          // Find the index of the message to update
          const index = prevMessages.findIndex((other) => other.serial === message.serial);

          // If the message is not found, return the previous messages
          if (index === -1) {
            return prevMessages;
          }

          // Apply the update to the original message
          const newMessage = prevMessages[index].with(event);

          // Create a new array with the updated message and return it
          const updatedArray = prevMessages.slice();
          updatedArray[index] = newMessage;
          return updatedArray;
        });
        break;
      }
      default: {
        console.error('Unhandled event', event);
      }
    }
  }
});
```
Now, when you click on a previously sent message in the UI, it will prompt you to enter new text. After entering the required change and submitting, it will send the updated message to the room, where the listener will receive it and update the UI accordingly.
## Step 6: Message history and continuity
Ably Chat enables you to retrieve previously sent messages in a room. This is useful for providing conversational context when a user first joins a room, or when they subsequently rejoin it later on. The `useMessages()` hook exposes the [`historyBeforeSubscribe()`](https://sdk.ably.com/builds/ably/ably-chat-js/main/typedoc/interfaces/chat-js.Messages.html#historyBeforeSubscribe) method to enable this functionality. This method returns a paginated response, which can be queried further to retrieve the next set of messages.
To do this, you need to expose `historyBeforeSubscribe()` on the hook, and extend the `ChatBox` component to include a method to retrieve the last 10 messages when the component mounts.
In your `ChatApp.tsx` file, add the following `useEffect` to your `ChatBox` component:
```react
// ChatApp.tsx - Add to ChatBox component
function ChatBox() {
  // ...existing code...

  const {sendMessage, updateMessage, historyBeforeSubscribe} = useMessages({
    // ...existing code...
  });

  useEffect(() => {
    async function loadHistory() {
      try {
        if (!historyBeforeSubscribe) return;
        const history = await historyBeforeSubscribe({limit: 10});
        setMessages(history.items);
      } catch (error) {
        console.error('Error loading message history:', error);
      }
    }
    loadHistory();
  }, [historyBeforeSubscribe]);

  // ...existing code...
}
```
The above code will retrieve the last 10 messages when the component mounts, and set them in the state.
Try the following to test this feature:
1. Use the Ably CLI to simulate sending some messages to the room from another client such as `ably rooms messages send --count 10 my-first-room 'Message number {{.Count}}'`
2. Refresh the app, this will cause the `ChatBox` component to mount again and call the `historyBeforeSubscribe()` method.
3. You'll see the last 10 messages appear in the chat box.
## Step 7: Show who is typing a message
Typing indicators enable you to display messages to clients when someone is currently typing. An event is emitted when someone starts typing, when they press a keystroke, and then another event is emitted after a configurable amount of time has passed without a key press.
The Chat SDK exposes the [`useTyping()`](https://sdk.ably.com/builds/ably/ably-chat-js/main/typedoc/functions/chat-react.useTyping.html) hook to enable this feature. The `currentlyTyping` array from the hook tells you which clients are currently typing, allowing you to render them in the UI. The hook also exposes `keystroke()` and `stop()` methods to start and stop typing.
In your `ChatApp.tsx` file, update the existing `ChatBox` component. It should include the typing indicator hook, a function to handle text input and a modification to the existing `handleSend` method so typing stops on message send:
```react
// ChatApp.tsx - Update ChatBox component
function ChatBox() {
  {/* ...existing code... */}

  const {currentlyTyping, keystroke, stop} = useTyping();

  const handleSend = () => {
    {/* ...existing code... */}
    stop().catch((err) => console.error('Error stopping typing', err));
  };

  const handleChange = (newValue: string) => {
    setInputValue(newValue);
    if (newValue.trim().length > 0) {
      keystroke().catch((err) =>
        console.error('Error starting typing', err),
      );
    } else {
      stop().catch((err) => console.error('Error stopping typing', err));
    }
  };
}
```
To render the typing indicator, update the `` part of `ChatBox` rendering section like so:
```react
  return (


      {/* ...Existing code... */}


        {/* Row 1: Typing indicator */}
        {/* Add typing indicator functionality here */}
        {currentlyTyping.size > 0 && (


              {Array.from(currentlyTyping).join(', ')}
              {' '}
              {currentlyTyping.size > 1 ? 'are' : 'is'} typing...


        )}
      {/* ...Existing code... */}

  );
```
When you start typing in the input box, your client will be indicated as typing, and if you clear all text, the indicator will stop. Other connected clients can also be displayed in the list if they're typing, you can use the Ably CLI to simulate typing from another client by running the following command:
```shell
  ably rooms typing keystroke my-first-room
```
## Step 8: Display who is present in the room
Display the online status of clients using the presence feature. This enables clients to be aware of one another if they are present in the same room. You can then show clients who else is online, provide a custom status update for each, and notify the room when someone enters it, or leaves it, such as by going offline.
The Chat SDK exposes both the [`usePresence()`](https://sdk.ably.com/builds/ably/ably-chat-js/main/typedoc/functions/chat-react.usePresence.html) and [`usePresenceListener()`](https://sdk.ably.com/builds/ably/ably-chat-js/main/typedoc/functions/chat-react.usePresenceListener.html) hooks to interact with the presence feature. The `usePresence()` hook allows you to enter the room and update your presence status, while the `usePresenceListener()` hook allows you to subscribe to presence updates for the room.
The `usePresenceListener()` hook also returns an object with the `presenceData` array, which contains the current presence data for the room.
In your `ChatApp.tsx` file, create a new component called `PresenceStatus` like so:
```react
// ChatApp.tsx
function PresenceStatus() {
  usePresence();
  const {presenceData} = usePresenceListener();

  return (


        Online: {presenceData.length}


        {presenceData.map((member, idx) => (


            {member.clientId}

        ))}


  );
}
```
Add the `PresenceStatus` component to the `ChatBox` component:
```react
// Update ChatBox to include presence
function ChatBox() {
  return (


          {/* Adding PresenceStatus component */}


        {/* ...existing code... */}
  );
}
```
You'll now see your current client ID in the list of present users.
You can also use the Ably CLI to enter the room from another client by running the following command:
```shell
  ably rooms presence enter my-first-room
```
## Step 9: Send a reaction
Clients can send a reaction to a room to show their sentiment for what is happening, such as a point being scored in a sports game.
Ably Chat provides a [`useRoomReactions()`](https://sdk.ably.com/builds/ably/ably-chat-js/main/typedoc/functions/chat-react.useRoomReactions.html) hook to send and receive reactions in a room. These are short-lived (ephemeral) and are not stored in the room history.
In your `ChatApp.tsx` file, add a new component called `ReactionComponent`, like so:
```react
// ChatApp.tsx
function ReactionComponent() {
  const reactions = ['👍', '❤️', '💥', '🚀', '👎', '💔'];
  const [roomReactions, setRoomReactions] = useState([]);
  const {sendRoomReaction} = useRoomReactions({
    listener: (reactionEvent) => {
      setRoomReactions((prev) => [...prev, reactionEvent.reaction]);
    },
  });

  return (

      {/* Reactions buttons */}

        {reactions.map((reaction) => (

              sendRoomReaction({name: reaction}).catch((err) =>
                console.error('Error sending reaction', err),
              )
            }
            className="text-xl p-1 border border-blue-500 rounded">
            {reaction}

        ))}


      {/* Received reactions */}

        Received reactions:

          {roomReactions.map((r, idx) => (

              {r.name}

          ))}


  );
}
```
Add the `ReactionComponent` component to the `ChatBox` component:
```react
// Update ChatBox to include reactions
function ChatBox() {
  return (


        {/* ...Existing code... */}


        {/* ...Existing code... */}
        {/* Row 2: Reactions */}

      {/* ...Existing code... */


  );
}
```
The above code should display a list of reactions that can be sent to the room. When you click on a reaction, it will send it to the room and display it in the UI.
You can also send a reaction to the room via the Ably CLI by running the following command:
```shell
  ably rooms reactions send my-first-room 👍
```
## Step 10: Disconnection and release
The disconnection and release section remains largely the same for React Native:
### Automatic detachment on unmount
When a React Native component using the `ChatRoomProvider` unmounts, the room will automatically detach and clean up all associated resources.
### Closing the realtime connection
To close the realtime connection in React Native:
```react
// In your ChatProviders.tsx or where you manage the realtime client
const handleDisconnect = () => {
  realtimeClient.connection.close();
};
```
## Next steps
Continue to explore the documentation with React Native as the selected language:
* Understand [token authentication](https://ably.com/docs/auth/token.md) before going to production.
* Read more about using [rooms](https://ably.com/docs/chat/rooms.md) and sending [messages](https://ably.com/docs/chat/rooms/messages.md).
* Find out more regarding [presence](https://ably.com/docs/chat/rooms/presence.md).
* Read into pulling messages from [history](https://ably.com/docs/chat/rooms/history.md) and providing context to new joiners.
Explore the [Ably CLI](https://www.npmjs.com/package/@ably/cli) further, or check out the [Chat JS API references](https://sdk.ably.com/builds/ably/ably-chat-js/main/typedoc/modules/chat-js.html) for additional functionality.