Receive and display SMS in your browser to create engaging live experiences

Allow me to set a scene - You’re a speaker at a conference in a large venue. During your talk you’d like to poll your audience to find out whether they use a Mac, Windows or Linux. You’ve got an interactive chart in your slides which will update as the audience votes on your web app. But there’s a hitch, you — as the speaker, have access to a private WiFi, but your attendees don’t have that. Perhaps there were too many of them and they knocked over the venue WiFi, or maybe the venue just didn’t provide a connection for the attendees, either way, you need a different way to collect votes. SMS to the rescue!
SMS voting is a fun way to engage your audience with minimum effort on their side. Text a keyword to a number and they’re done! A low barrier to entry and no need for you to create forms or apps to collate the data.
Online platforms offer the ability for developers to buy phone numbers which your audience can send SMS to and APIs to allow you to manage the responses. For this demo you're going to use the Vonage Communications APIs and a Vonage phone number to programmatically receive the SMS.
Then you will create a serverless function which will forward the SMS received by the Vonage API to Ably’s Pub/Sub messaging service which will allow us to display it easily in the web.
Whether this is your experience or you’d just like to learn how to display SMS in the browser, this is the post for you.
What are you going to build?
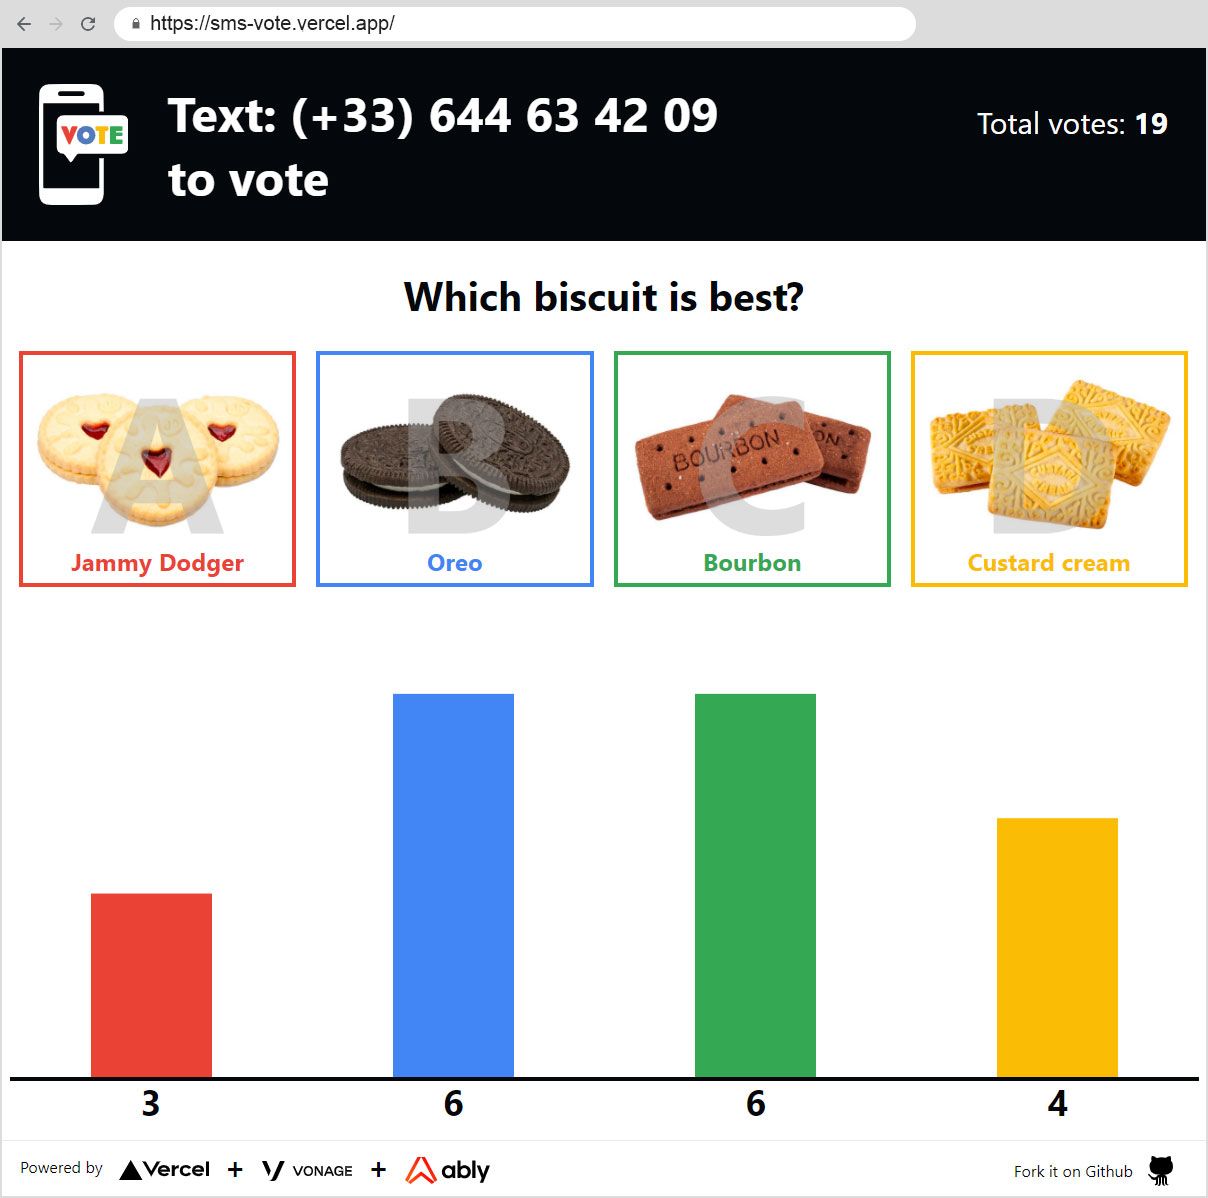
We’ll build a simple web app that asks a single question and provides a phone number for our users to send an SMS to. The app will then display the results of the texts as they come in on a bar chart. You can see a demo of the working app here:
https://sms-vote.vercel.app/
This app is build upon the basic Ably + Vonage starter app described in this tutorial over on the Vonage Blog. It is built in Next.js and hosted with Vercel. This post will walk you through how to:
- Create a brand new Next.js application
- Create an Ably account and get an API key
- Create a Next.js Vercel Serverless API
- Buy a phone number using Vonage
- Configure Vonage to forward SMS data as a web hook
- Use React Functional components and React Hooks with Ably
- Host your app on Vercel
Next.js is a React framework by Vercel. It is used to build static web applications with
server side rendering, serverless functions and seamless hosting. It’s a framework that takes the React knowledge you already have, and puts some extra structure and conventions in place. You can also check our tutorial on how to build a realtime chat app with Next.js and Vercel
Ably is a reliable, realtime, pub/sub messaging platform with a suite of integrated services and functionality to deliver complete realtime experiences directly to end-users.
Vercel is a hosting platform, built specifically to host Next.js apps, and Serverless Functions with them.
React is a JavaScript library for building user
interfaces with encapsulated components that manage their own state.
Vonage is an SMS gateway provider.
What will you need?
In order to build this app, you will need:
- An Ably account for sending messages: Create an account with Ably for free.
- A Vercel Account for hosting on production: Create an account with Vercel for free.
- A Vonage Account for creating a phone number: Create an account with Vonage for free.
- Node 12 (LTS) or greater: Install Node.
Local dev pre-requirements — Ably API Key
You’ll need an API key from Ably to authenticate with the Ably Service. To get
an API key, once you have created an Ably account:
- Visit your app dashboard and click on “Create New App”.
- Give the new app a name
- Copy the Private API key once the app has been created. Keep it safe, this is how you will authenticate with the Ably service.
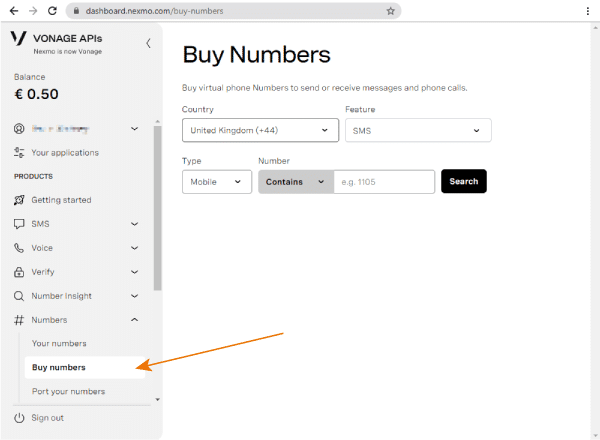
Local dev pre-requirements — Vonage Phone Number
You’ll need a Vonage phone number for your audience to send an SMS to. Once you have created an account with Vonage, you can create a phone number by logging into their Communications APIs dashboard. There you will be able to purchase a virtual phone number (costs of numbers vary by country, and costs of sending to those numbers varies by provider).
Go to: “Numbers” > “Buy Numbers”. Search for a number that works for you and add some credits to pay for the number.
Create a Basic Starter App with Next.js
We’re going to use the tool provided by Next.js to create a basic starter app. In your terminal type:
npx create-next-app voting-app
This will bootstrap a Next.js app for you (which might take a minute or so).
Then change directory to the voting-app you just created and run the app
cd voting-app
npm run dev
The dev server will spin up and you’ll see a minimal starter app in your browser, you can build our app on top of this starter.
Realtime messaging with Ably
The app you'll build uses Ably for pub/sub messaging between the users. Pub/Sub stands for Publish and Subscribe, and it is a popular pattern used for realtime data delivery. The app will be able to receive messages over an Ably Channel. As people vote, their responses will be published to a channel. The client that uses the app will be subscribed to this channel. You'll build a UI to display votes as they are received on the channel.

In order to use Ably, you'll need to add the API key that you created earlier into the app as an environment variable.
In the root of the directory create a new file called .env and inside it assign your API key as follows:
touch .env
echo "ABLY_API_KEY=your-ably-api-key:goes-here" >> .env
Authentication with the Ably service
Vercel Next.js apps don’t run traditional “server side code”, however, you can add JavaScript files to /pages/api/* and the Vercel deployment engine will
treat each one as an API endpoint and manage them for you, as serverless functions.
For local development, the Next.js tools run these functions in a Node server, so they work as you would expect in your local dev environment. You will add a Vercel serverless function to the starter code that you created earlier to authenticate the app with Ably, and make it possible to start receiving messages over the Ably service.
You’ll need to install the Ably npm package in your new app. In the terminal run:
npm install ably
Writing the App
Now you’re all set up to start building the functionality and the UI of the voting app. If you’d rather get the code directly you can do so at the repo of
the app: https://github.com/ably-labs/vonage-vercel-voting or, this post will go over building it now.
Writing the Serverless function to connect to Ably
First up you're going to authenticate with the Ably Service by creating a serverless function. Create a file called ./pages/api/createTokenRequest.js into which add the following code:
import Ably from "ably/promises";

export default async function handler(req, res) {
    const client = new Ably.Realtime(process.env.ABLY_API_KEY);
    const tokenRequestData = await client.auth.createTokenRequest({ clientId: 'ably-nextjs-demo' });

    res.status(200).json(tokenRequestData);
};
This serverless function uses the Ably SDK to create a tokenRequest with your API key. This token will be used later - it allows you to keep your "real" API key safe while using it in the Next.js app. By default, this API is configured to be available on http://localhost:3000/api/createTokenRequest We're going to provide this URL to the Ably SDK in our client to authenticate with Ably.
The Realtime SMS voting app Architecture
The topology of the voting app will look like this:
├─ .env
├─ .gitignore
├─ package-lock.json
├─ package.json
├─ README.md
│
├─── components
│     ├─ QuestionComponent.jsx
│     ├─ QuestionComponent.module.css
│     ├─ ResultsComponent.jsx
│     ├─ ResultsComponent.module.css
│     ├─ AblyReactEffect.js
│     └─ parseSms.js
│
├─── pages
│    ├─ index.js
│    │
│    └─── api
│          ├─ acceptWebhook.js
│          └─ createTokenRequest.js
│
└─── public
/pages/index.jsis the home page/api/acceptWebhook.jsis our SMS receiving API for Vonage to call/api/createTokenRequest.jsis our Ably token authentication API/components/QuestionComponent.jsxis the UI for the question to be asked/components/QuestionComponent.module.csscontains the styles for the QuestionComponent/components/ResultsComponent.jsxis the UI to display the results/components/ResultsComponent.module.csscontains the styles for the ResultsComponent/components/AblyReactEffect.jsis the Ably React Hook./components/parseSms.jsis the SMS unpacker.
Building the Components
Pages in Next.js are React components, so the pages/index.js home page is the React component that contains the page layout.
This is the default page generated by create-next-app, you'll add your own components to this - a QuestionsComponent and a ResultsComponent:
import Head from 'next/head';
import styles from '../styles/Home.module.css';
import dynamic from 'next/dynamic';
import QuestionsComponent from "../components/QuestionComponent";

const ResultsComponent = dynamic(() => import('../components/ResultsComponent'), { ssr: false });

export default function Home() {

    const question = getQuestion();

    return (
        <div className={styles.container}>
            <Head>
                <title>Create Next App</title>
                <link rel="icon" href="/favicon.ico" />
            </Head>
            <main className={styles.main}>
                <header className={styles.header}>
                    <img src="/images/smsvote.svg" alt="sms vote" className={styles.logo} />
                    <h1 className={styles.title}>Text: (+33) 644 63 42 09<br />to vote</h1>
                </header>
                <QuestionsComponent question={question} />
                <ResultsComponent question={question} />
            </main>

            <footer className={styles.footer}>
                <a href="https://vercel.com?utm_source=create-next-app&utm_medium=default-template&utm_campaign=create-next-app" target="_blank" rel="noopener noreferrer">
                    Powered by{' '}
                    <img src="/vercel.svg" alt="Vercel Logo" className={styles.logo} />
                </a>
            </footer>
        </div>
    )
}

// hard-code this question here for now.

function getQuestion() {
    return {
        text: "Which biscuit is best?",
        options: [
            { key: "A", text: "Jammy Dodger", votes: 0, src: "images/jamiedodger.jpg" },
            { key: "B", text: "Oreo", votes: 0, src: "images/oreo.jpg" },
            { key: "C", text: "Bourbon", votes: 0, src: "images/bourbon.jpg" },
            { key: "D", text: "Custard cream", votes: 0, src: "images/custardcream.jpg" }
        ]
    };
}
You’ll notice that our ResultsComponent doesn’t look like a regular import — we’re including it like this:
const ResultsComponent = dynamic(() => import('../components/ResultsComponent'), { ssr: false });
before using it like any other react component:
<ResultsComponent question={question} />
This unusual include style is because the ResultsComponent can only be run inside the user's browser. It connects using WebSockets and isn't suitable for Server Side Rendering with Vercel. By default, Next.js attempts to render everything on the server side, so by including the component using a dynamic() call, you can tell Next.js not to render this during the build process, where it would throw errors because it can't connect to the APIs that it needs to function.
Presenting a question with QuestionComponent
You might have noticed in the index.js page, you used the QuestionComponent and passed the hard-coded question as React props.
The QuestionComponent is responsible for taking that question, and rendering its answer options to the screen. This is a stateless React component, only concerned with layout.
import styles from './QuestionComponent.module.css';

const QuestionComponent = ({ question }) => {
    const itemsForDisplay = question.options;
    const displayItems = itemsForDisplay.map(opt =>
        <li key={ opt.key } className={styles.answer}>
            <span className={styles.text}>{opt.text}</span>
            <img className={styles.image} src={ opt.src } alt={ opt.text } />
            <span className={styles.letter}>{ opt.key }</span>
        </li>
    );

    return (
        <>
            <h1 className={styles.question}>{ question.text }</h1>
            <ul className={styles.answers}>{displayItems}</ul>
        </>
    );
}

export default QuestionComponent;
This block of code iterates over question.options - the answers that you want your users to vote on - and builds a list to display. You can of course change this to ask any question you’d like.
Receiving SMS using Vonage and Vercel
Vonage allows you to configure mobile phone numbers in their API dashboard that will trigger your own APIs when messages are received.
To do this, you need to add a Vercel Serverless function to the Next.js app. This serverless function will get called by Vonage each time an SMS is received. You will add code to the function to unpack this SMS message, and send it to the app using an Ably Channel.
This process is similar to the setup for the createTokenRequest you built earlier. Create a file called ./pages/api/acceptWebhook.js into which, add the
following code:
import Ably from "ably/promises";

export default async function handler(req, res) {

    // Unpack the SMS details from the request query string
    const incomingData = getSmsDetails(req, res);

    // If the request was invalid, return status 400.
    if (!incomingData.success) {
        res.status(400).end();
        return;
    }

    // Create an Ably client, get our `sms-notifications` channel
    const client = new Ably.Realtime(process.env.ABLY_API_KEY);
    const channel = client.channels.get("sms-notifications");

    // Publish our SMS contents as an Ably message for the browser
    await channel.publish({ name: "smsEvent", data: incomingData });

    // Return the received data as a 200 OK for debugging.
    res.send(incomingData);
    res.status(200).end();
};

function getSmsDetails(req, res) {

    const params = req.query;

    if (!params.to || !params.msisdn) {
        console.log('This is not a valid inbound SMS message!');
        return { success: false };
    }

    return {
        success: true,
        messageId: params.messageId,
        from: params.msisdn,
        text: params.text,
        type: params.type,
        timestamp: params['message-timestamp']
    };
}
You'll return to this function at the end of the build, once our app is deployed to Vercel and the function has a public URL that you can share with Vonage, but now it is time to continue editing the app.
Reacting to SMS messages with the ResultsComponent
The SMS voting app logic is contained inside the ResultsComponent.jsx component.
Start off by referencing the imports you'll need at the top of the file:
import React, { useEffect, useState } from 'react';
import { useChannel, readLastAblyMessage, leadingClientSends } from "./AblyReactEffect";
import { parseSms } from "./parseSms";
import styles from './ResultsComponent.module.css';
Then define the function that will be exported as a React Functional component. You're going to use the react props — a single question, and create a default initialScores object to keep track of our user votes.
const ResultsComponent = ({ question }) => {
    const initialScores = {};
    question.options.map(x => x.key).forEach(
        i => initialScores[i] = 0
    );
}
This will loop over each option a user can vote on, and create a set of zero scores for each option. For our hard-coded question, these two lines will create an object that looks like: { A: 0, B: 0, C: 0, D: 0 }
Next, set up the state properties that you'll use in the component:
const [votes, setVotes] = useState(initialScores);
and you'll use our first custom React Hook called readLastAblyMessage.
const [statusChannel] = readLastAblyMessage("sms-notifications-votes", async (lastMessage) => { setVotes(lastMessage.data) });
readLastAblyMessage does exactly what it sounds like - when the component mounts, it will read the last Ably message sent to the channel sms-notifications-votes. You're calling setVotes() with this message to make sure new clients joining the app keep in sync with their peers.
Now you'll make use of the useChannel hook that you imported earlier. useChannel is a react-hook style API for subscribing to messages from an Ably Channel. You provide it with a channel name and a callback to be invoked whenever a message is received.
const [channel, ably] = useChannel("sms-notifications", async (message) => {
    // First parse and normalise the SMS using the code in parseSms.js
    // This code converts our dates into a human readable format
    // and makes sure our strings are all trimmed.

    const sms = parseSms(message);
    const value = sms.text.toUpperCase();

    // Read the upper cased value from the SMS - expected to be A-D
    // Then clone the votes object, and increment whichever option
    // the user voted for, before calling setVotes again
    // to update the votes stored in the state.

    const updatedVotes = { ...votes };
    updatedVotes[value]++;
    setVotes(updatedVotes);

    // Publish the updated votes to the `voteSummary` channel
    // so any new joiners can load this state when they first load
    // the application.

    statusChannel.publish({ name: "voteSummary", data: updatedVotes });
});
Now, you're going to format the data model for the screen, so you can display the questions, along with the votes.
    const totalVotes = getTotalVotes(votes);
    const itemsForDisplay = decorateOptionsWithVotes(question.options, votes);

        const displayItems = itemsForDisplay.map(opt =>
      <li key={ opt.key } className={styles.vote} title={opt.text}>
        <span className={styles.number}>{ opt.votes }</span>
        <span className={styles.bar} style={{height:opt.votePercentage}}
        ></span>
      </li>
    );
You’re summing the total number of votes in the state for display, as well as calling a function called decorateOptionsWithVotes. This takes the possible answers and adds the number of votes and the total percentage of votes each has received to make the displayItems easier to calculate.
Finally you create a component and return it:
return (
    <>
        <ul className={styles.votes}>{displayItems}</ul>
        <div className={styles.total}>Total votes: <b>{totalVotes}</b></div>
    </>
);
Followed by defining the helper functions that you called earlier:
function getTotalVotes(votes) {
    return Object.values(votes).reduce((a, b) => a + b);
}

function decorateOptionsWithVotes(options, votes) {
    const totalVotes = getTotalVotes(votes);
    const optionsWithVotes = [...options];

    optionsWithVotes.forEach(option => {
        const voteCount = votes[option.key];
        const percent = totalVotes === 0 ? 0 : (voteCount / totalVotes) * 100
        option.votes = voteCount;
        option.votePercentage = Math.floor(percent) + "%";
    });

    return optionsWithVotes;
}

export default ResultsComponent;
Right at the bottom of the file, the function is exported as ResultsComponent so that it can be referenced in the Next.js page created at the start.
Extra note - Using Ably in React Components
When you're using Ably and React Functional Components it is important that you instance the Ably SDK only once otherwise you could risk making multiple connections and needlessly hitting account limits. Avoid instancing the SDK when the component is rendered. Read more about using Ably with React Functional components in the building a realtime chat app with Next.js tutorial.
Instancing the Ably library outside the scope of the component means it is only created once and will keep your limit usage down:
    import Ably from "ably/promises";
    import { useEffect } from 'react'

    const ably = new Ably.Realtime.Promise({ authUrl: '/api/createTokenRequest' });
Then you will export two React Hooks in AblyReactEffect.js, the first of which returns both the current Ably Channel and the Ably SDK for the calling code to use to send messages:
export function useChannel(channelName, callbackOnMessage) {
    const channel = ably.channels.get(channelName);

    const onMount = () => {
        channel.subscribe(msg => { callbackOnMessage(msg); });
    }

    const onUnmount = () => {
        channel.unsubscribe();
    }

    const useEffectHook = () => {
        onMount();
        return () => { onUnmount(); };
    };

    useEffect(useEffectHook);

    return [channel, ably];
}
The second hook is called readLastAblyMessage:
    export function readLastAblyMessage(channelName, callbackOnMessage) {
    const [synced, setSynced] = useState(false);

    const [statusChannel, ably] = useChannel(
        channelName,
        async (message) => {
            if (!synced) {
                setSynced(true);
                await callbackOnMessage(message);
            }
        },
        true
    );

    return [statusChannel, ably];
}
This hook actually uses useChannel under the hood, and invokes its callback only for the first message received on the channel. You use this in conjunction
with an Ably settings that means that the last message on a channel is stored and returned for one year.
This means you can use a secondary channel to synchronise state when new clients join your app.
Styling your App
Next.js has compiler enforced conventions that dictate where you keep your CSS and how to import it. For this app, you will create a CSS file with the same name as the .jsx file, with the extensions .module.css (to keep management of the components simple). Once created, import it into the component:
import styles from './ResultsComponent.module.css';
Create a class on a JSX element using the className syntax you may recognise from React. Assign the class name that you want as a property on the styles object.
className={styles.yourClassName}
The accompanying css would look like this:
.yourClassName {
    styles: gohere;
}
This app is built with CSS Grid to create the app layout, you are of course welcome to use the CSS provided with this project or to write your own or use a framework.
Hosting on Vercel
Vercel provides both a development server and a build pipeline for Next.js apps.
_The easiest way to deploy Next.js to production is to use the Vercel platform
from the creators of Next.js. Vercel is an all-in-one platform with Global CDN
supporting static & Jamstack deployment and Serverless Functions. — _The
Next.js documentation
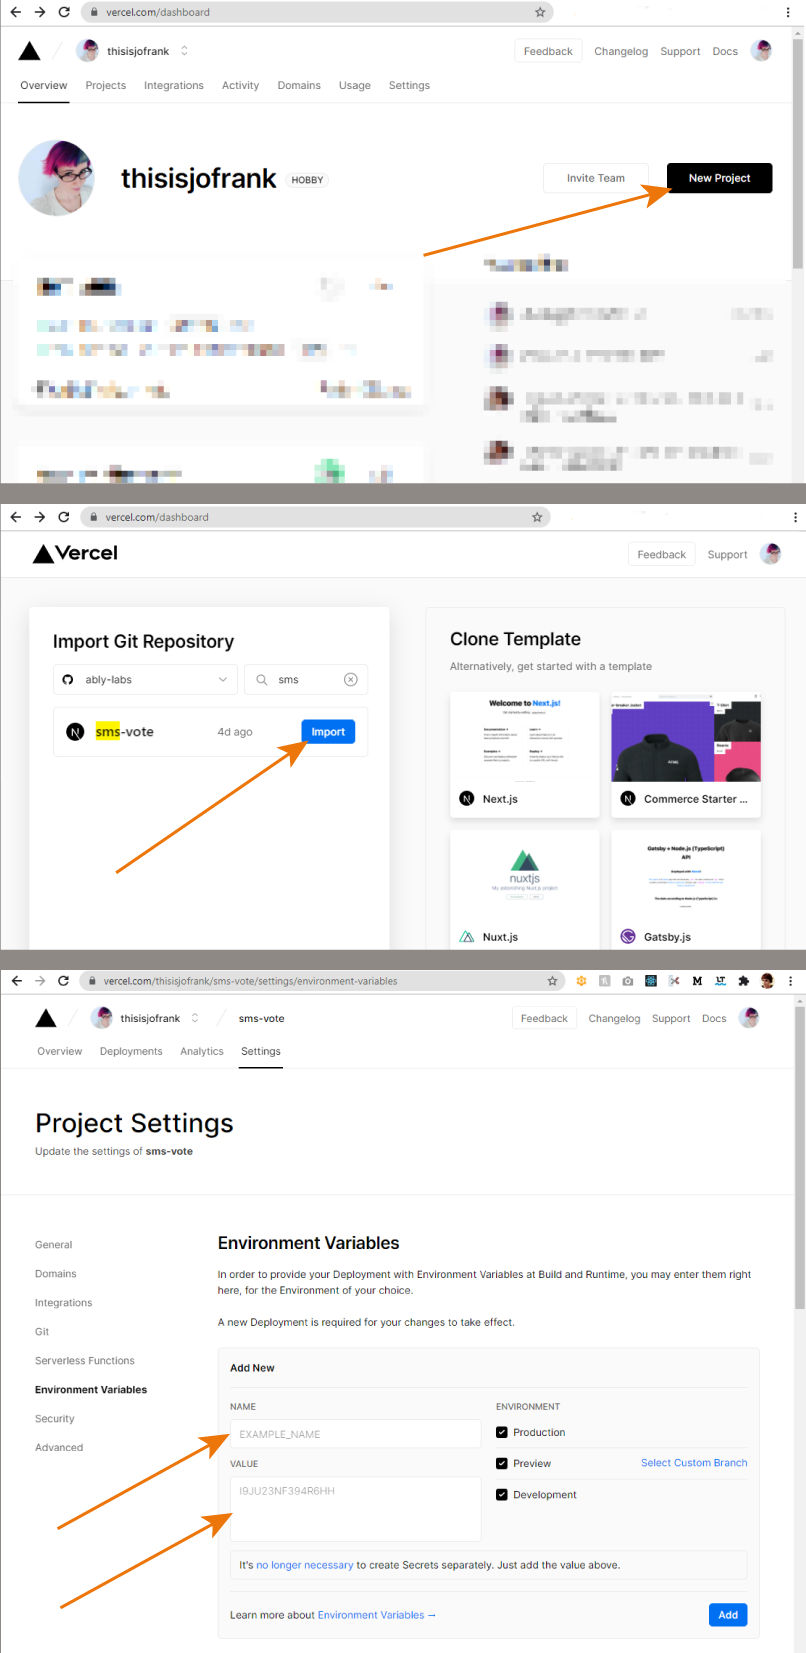
In order to deploy your new sms voting app to Vercel you’ll need a github account and a repository for your app:
- Create a Vercel account
- Create a new Vercel app and import your app from your GitHub repository. (This will require you to authorise Vercel to use your GitHub account)
- Add your
ABLY_API_KEYas an environment variable - Watch your app deploy
- Visit the newly created URL in your browser!
Setting up your Vonage SMS number to send to your app
In order to receive text messages in our app, you'll need to configure an SMS Inbound Webhook URL.
You can do this in your Vonage account by going to: Numbers > Your Numbers > Clicking the pen icon. You’ll be greeted with a modal dialog box, and you need to put the URL of the acceptWebhook API that you set up into the form.
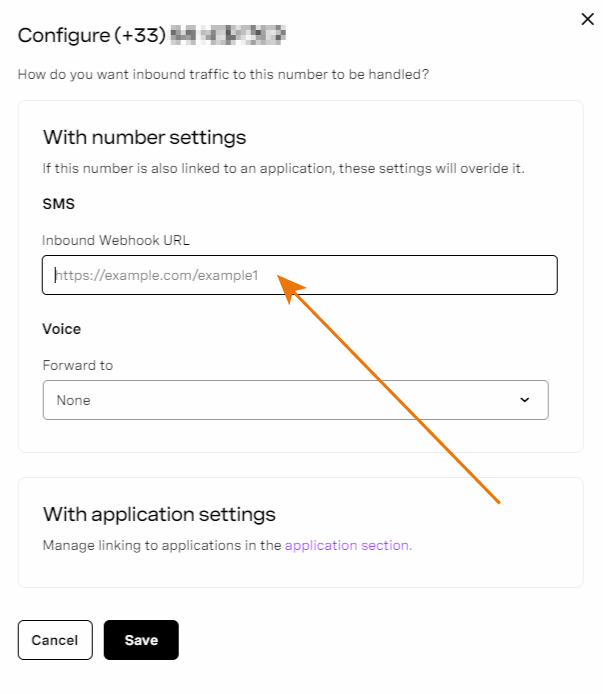
For example, if your Vercel app is called your-vercel-app, the webhook URL would be https://[your-vercel-app].vercel.app/api/acceptWebhook
Make it yours
This demo is open source, fork it and make it your own. Don’t forget to show us what you build by sharing it with us @ablyrealtime on twitter.
If you’re looking for ways to extend this project you could consider:
- Supporting multiple questions.
- Supporting text in the answers, instead of just a single character.
- Adding a database to store votes for longer term.
- Adding in an option to vote in a browser.
- Sending a response text to the voters to thank them or let them know if their answer was correct.
Let us Know
If this tutorial was helpful, or you’re using Next.js and Ably in your project, we’d love to hear about it. Drop us a message on Twitter or email us at [email protected].
Further reading
Want more from Ably? We suggest the following: