You use realtime communication every day. It is the simultaneous exchange of information between a sender and a receiver with almost zero latency. Internet, landlines, mobile/cell phones, instant messaging (IM), internet relay chat, videoconferencing, teleconferencing, and robotic telepresence are all examples of realtime communication systems.
In this tutorial, you’ll learn how to build a web based realtime chat app using Laravel, Ably and Vue.js. You’ll use Vue.js to build the frontend/UI and Laravel as a backend to interact with Ably Realtime APIs to facilitate realtime communication. By building this type of application, you’ll learn about the core concepts for building realtime apps using the Laravel-Ably integration.
Please note that you can use any frontend framework (react, angular, next.js etc.) to build the Laravel chat app and there is no dependency on any specific framework.
The source code for the project is available in this GitHub repo.
Architecture of the realtime chat app
Before getting started, you should familiarize yourself with the tech stack that you’ll be using in this tutorial to build your chat application.
Laravel
Laravel is a PHP-based web application framework with expressive, elegant syntax. The web development community loves Laravel because it provides an amazing developer experience and supports advanced concepts, like queues, dependency injection, unit testing, and integration testing. Laravel is a great choice for building realtime apps, and it already comes with support for Ably to "broadcast" your server-side Laravel events over a WebSocket connection.
Ably
Ably is a pub/sub messaging platform that powers synchronized digital experiences in realtime for millions of simultaneously connected devices around the world. Ably offers WebSockets, stream resume, history, presence, and managed third-party integrations to make it simple to build, extend, and deliver digital realtime experiences at scale. Ably makes use of different transports to make sure data is delivered in realtime.
Vue.js
Vue is a frontend javaScript framework for building user interfaces. It builds on top of standard HTML, CSS, and JavaScript and provides a declarative and component-based programming model that helps you efficiently develop user interfaces, be they simple or complex.
Laravel broadcasting
Laravel broadcasting is a feature provided by Laravel as a way for a client (frontend) to publish and receive information in realtime via channels. A channel is a logical communication medium that helps to publish and subscribe to information over a WebSocket connection. There are 3 types of channels.
1. Public channels
- The client doesn't need to be authenticated (logged in) to use public channels.
- The client can only subscribe to the data on this channel. To publish data, it needs to be done via the laravel-server (backend) i.e.
client1 => laravel => ably => client 2, client 3, client 4...
2. Private channels
- The client needs to be authenticated to use private channels.
- The client is directly able to publish and subscribe to data through Ably using client-events. i.e.
client1 => ably => client 2, client 3, client 4... - The client can also publish data through laravel-backend, as done for public channels.
3. Presence channels
- These are similar to private channels, offering all of the features of private channels, as well as a way to register client presence on the channel.
In this blog we will only look at public channels. So, the architecture of the realtime chat app will look like this:
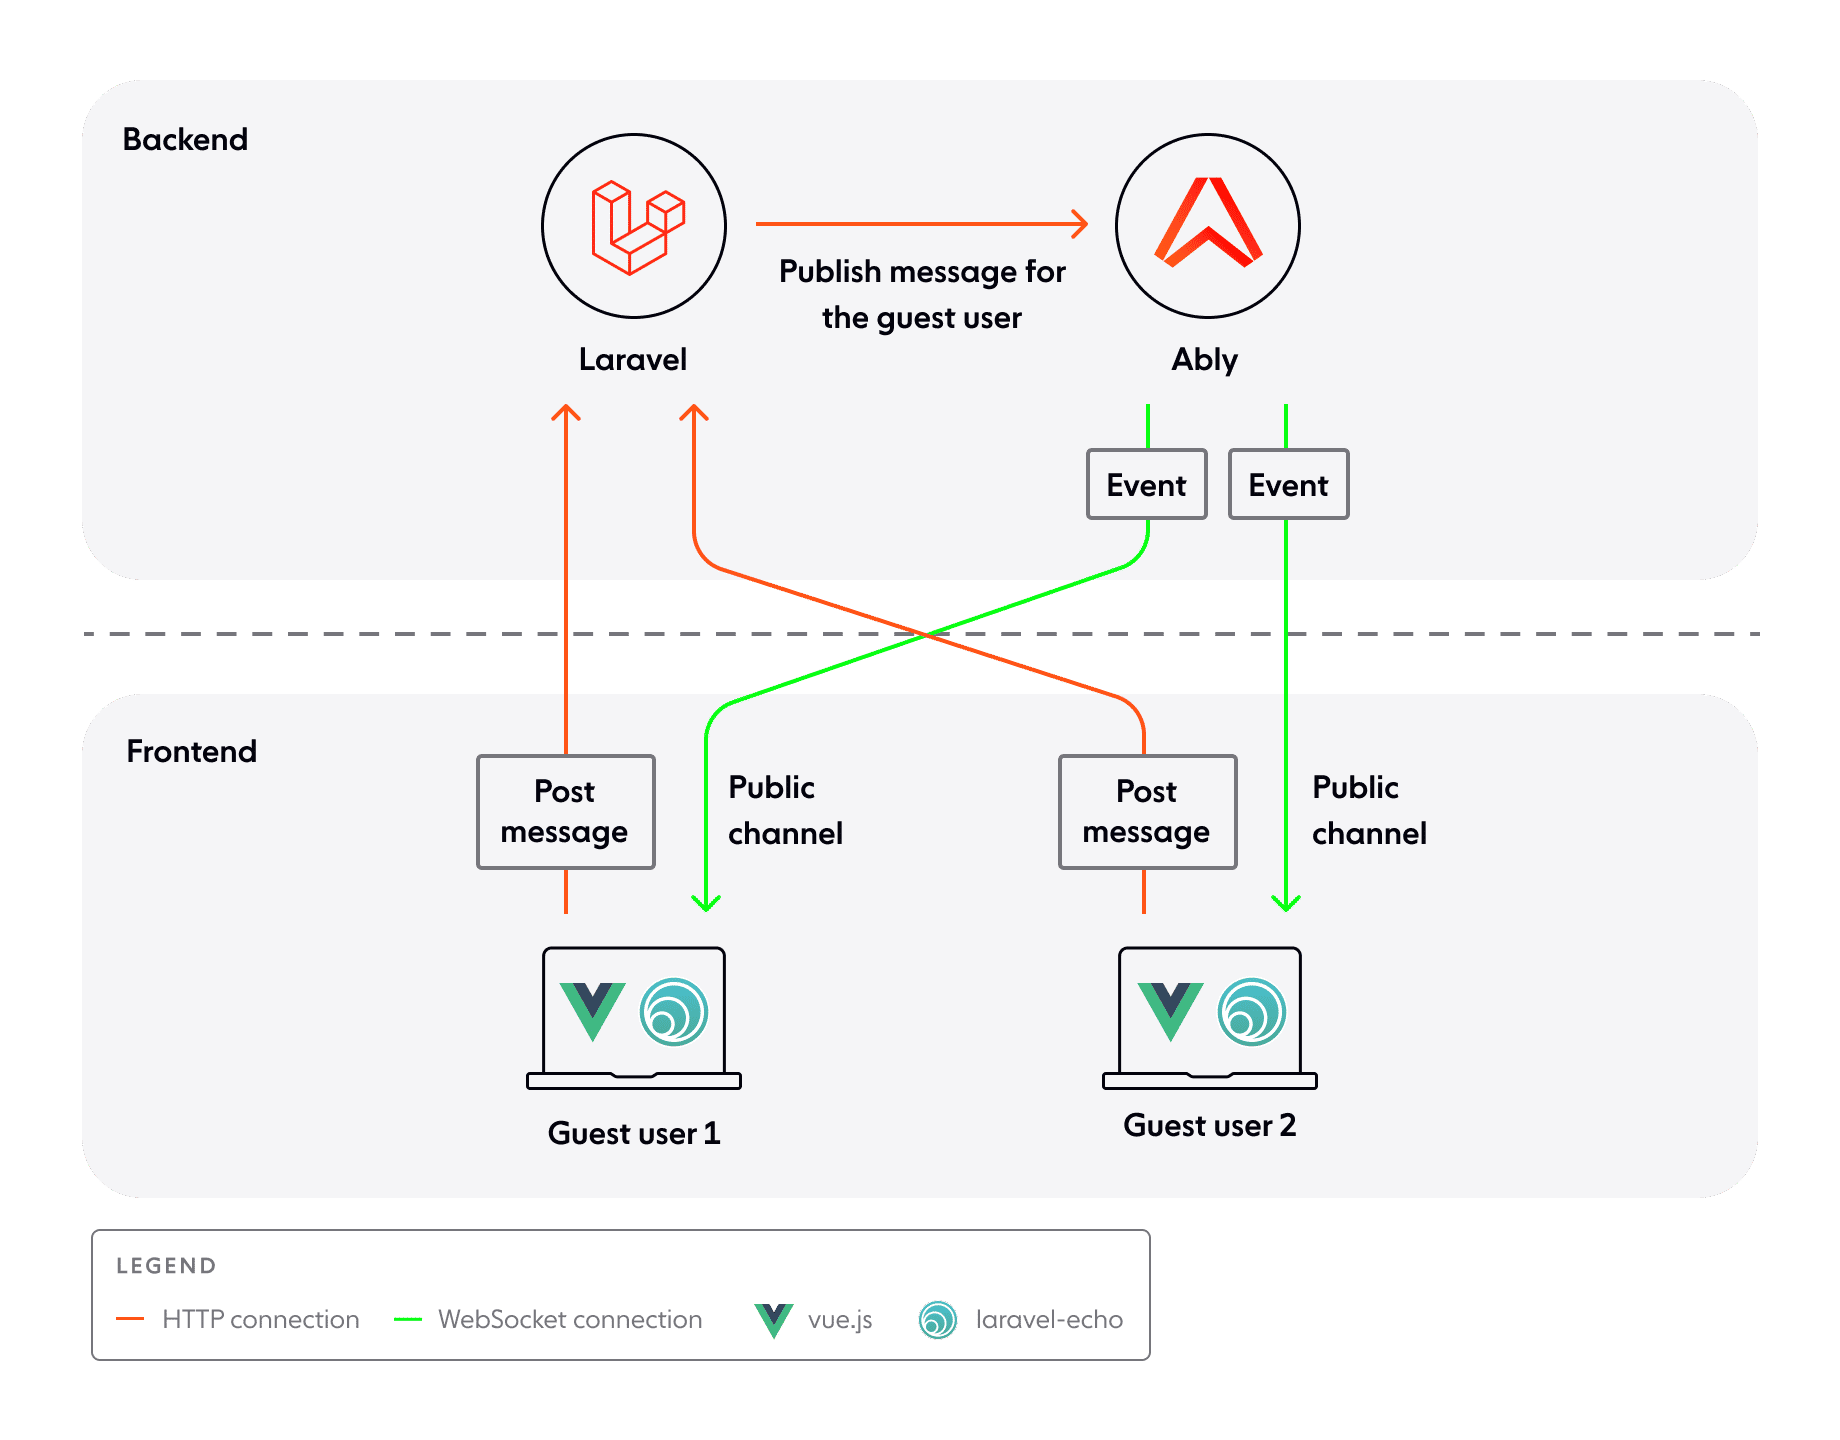
The chat app uses laravel + ably-broadcaster and Ably at server side (backend) and vue.js + ably-laravel-echo at client side (frontend).
Laravel-server is used for authenticating/authorizing clients and broadcasting information to ably on behalf of clients over a given channel. In the current example, since public channels don’t need any sort of authentication, it will only be used to broadcast information.
Clients (guest-users) use HTTP connection to post a message with a channel-name to Laravel-server. Laravel-server publishes the same message to Ably (on the same channel) using a named event. Ably is responsible for sending this information to clients (subscribed to the same channel) using the provided event over a WebSocket connection. Guest users consume this event on the client-side using the Laravel Echo library.
Publishing a message on a channel is done using an event. Events are the primary method of packaging a message on the channel.
In simpler terms, when a message is published on a channel with an eventName, it will be received by a subscriber matching the same channelName and eventName.
Setting up the environment
Here is what we will need to get started.
Prerequisites
Setting up the basic project structure
Execute the following command in the terminal to create a Laravel project.
composer create-project laravel/laravel ably-laravel-chat-appRun the following commands to get the auto-generated app running.
cd ably-laravel-chat-app
composer install
npm install
php artisan key:generate
php artisan serve // run in a separate terminal
npm run watch // run in a separate terminal
Finally, open localhost:8000 in your browser, and you’ll see your Laravel project running.
Setting up your Ably account
To start, you need to create an Ably account if you don’t have one. Next, you need to grab the API key from the Ably dashboard:
- Visit your app dashboard and click Create New App with name Chat-App.
- Once the app has been created, go to the API Keys tab. Copy the first key with the name Root. Keep the key safe. The key shouldn't be exposed to the client code.

That’s it. Your Ably account is ready to support realtime messaging.
Setting up Ably broadcaster on Laravel
Start by installing the official Ably Broadcaster for Laravel using composer:
composer require ably/laravel-broadcaster
Next, follow the Setup section to configure the Ably broadcaster.
Create PublicMessageEvent Class
To send events from Laravel to Ably, create an event file by running the following command in your terminal:
php artisan make:event PublicMessageEvent
This command will create a PublicMessageEvent.php file in the app/Events directory. Replace the content of the files with following:
<?php

namespace App\Events;

use Illuminate\Broadcasting\Channel;
use Illuminate\Broadcasting\InteractsWithSockets;
use Illuminate\Contracts\Broadcasting\ShouldBroadcast;
use Illuminate\Foundation\Events\Dispatchable;
use Illuminate\Queue\SerializesModels;

class PublicMessageEvent implements ShouldBroadcast
{
    public $channelName;
    public $message;

    use Dispatchable, InteractsWithSockets, SerializesModels;

    /**
     * Create a new event instance.
     *
     * @return void
     */
    public function __construct($channelName, $message)
    {
        $this->channelName = $channelName;
        $this->message = $message;
    }

    /**
     * Get the channels the event should broadcast on.
     * https://laravel.com/docs/broadcasting#model-broadcasting-channel-conventions
     *
     * @return \Illuminate\Broadcasting\Channel|array
     */
    public function broadcastOn()
    {
        return [new Channel($this->channelName)];
    }
}
The code above specifies:
- The PublicMessageEvent class that implements the ShouldBroadcast interface.
- By default the class name is used as an event name. This means eventName will be PublicMessageEvent. You can change eventName using broadcastAs.
- The broadcastOn method that is responsible for returning the channel/list of channels on which the event should broadcasted.
Broadcasting using PublicMessageEvent class
To handle API requests from frontend, open the routes/api.php file and add following route.
Route::post('/public-event', function (Request $request) {
    $channelName = $request->post('channelName');
    $message = $request->post('message');
    broadcast(new PublicMessageEvent( $channelName, $message ));
})->middleware('throttle:60,1'); // 60 requests/minute are allowed.
The code above specifies:
- A new API route to handle POST request from client. This API route will be available at localhost:8000/api/public-event.
- When called, the message is broadcasted to ably on the given channel with eventName as PublicMessageEvent.
- Throttle to 60 requests per minute for each IP address. It will return an error for requests exceeding the given limit. This is mainly to avoid spamming on public channels.
To check if the code is working correctly so far:
- Restart the server using
php artisan serve. - Attach to channel
public:communityfor new messages using the Ably Dev Console. - Try sending a POST request to the localhost:8000/api/public-event endpoint using curl, Postman or any other tool with channelName and message as POST method body.
curl --location --request POST 'localhost:8000/api/public-event' \
--header 'Content-Type: application/json' \
--data-raw '{
    "channelName":"public:community",
    "message":"Hi there"
}'
- Check for this message in the Ably Dev Console under the attached channel tab.
Next, we will look at setting up frontend to send and receive messages.
Setting up Laravel Frontend
Following packages need to be installed for proper communication with Laravel and Ably.
- Laravel Echo: This JavaScript library allows clients/users to subscribe to channels and listen to the events sent from ably.
- Axios: This package helps to make HTTP requests from client to laravel-server.
npm install @ably/laravel-echo [email protected] axiosInitialize Laravel-Echo
In the resources/js/bootstrap.js file, add the following snippet as per the Echo Setup Section.
import Echo from '@ably/laravel-echo';

window.Ably = require('ably');

// Create new echo client instance using ably-js client driver.
window.Echo = new Echo({
    broadcaster: 'ably',
});

// Register a callback for listing to connection state change
window.Echo.connector.ably.connection.on((stateChange) => {
    console.log("LOGGER:: Connection event :: ", stateChange);
    if (stateChange.current === 'disconnected' && stateChange.reason?.code === 40142) { // key/token status expired
        console.log("LOGGER:: Connection token expired https://help.ably.io/error/40142");
    }
});
Building the frontend UI
Please take a look at app.js, ChatComponent.vue and MessageComponent.vue from the existing repository under resources/js/ for building the UI for your chat app.
Sending messages
In the ChatComponent.vue file, you can see the broadcastMessageOnPublicChannel method is used for broadcasting data on a given public channel using axios.
broadcastMessageOnPublicChannel() {
    const message = this.message?.trim();
    if(!message)
        return;
    const publicChannelName = this.getActiveChannel().name;
    const broadcastUrl = window.location.origin + "/api/public-event";
    axios.post(broadcastUrl, { channelName : publicChannelName, message });
    this.message = null;
}
The code above specifies:
- publicChannelName is generally prefixed with
public:. - When broadcastMessageOnPublicChannel is called, it sends a message from the client to laravel-server at endpoint /api/public-event using axios.
- Axios sends a HTTP POST request with channelName and message as a request body.
Receiving messages
In the ChatComponent.vue file, the listen method describes handler for PublicMessageEvent.
Echo.channel(channelName)
.subscribed(() => // Do stuff when channel is attached )
.listenToAll(() => // Do stuff when any event is received )
.listen('PublicMessageEvent', (data) => {
    const channel = this.getChannelByName(channelName, 'public');
    this.updateBroadcastNotificationOnUI(channel, data)
})
The code above specifies:
- Public channel is created using Echo.Channel(channelName).
- Actual publicChannelName is accessed using Echo.Channel(channelName).name and is prefixed with
public:. i.e. If channelName is provided as community, internally it uses channel name as public:community while communicating with ably. - The method
listenToAllregisters a handler which gets called for any event received. - The method
listenregisters a handler for a specific PublicMessageEvent and updates the received message on the UI once called.
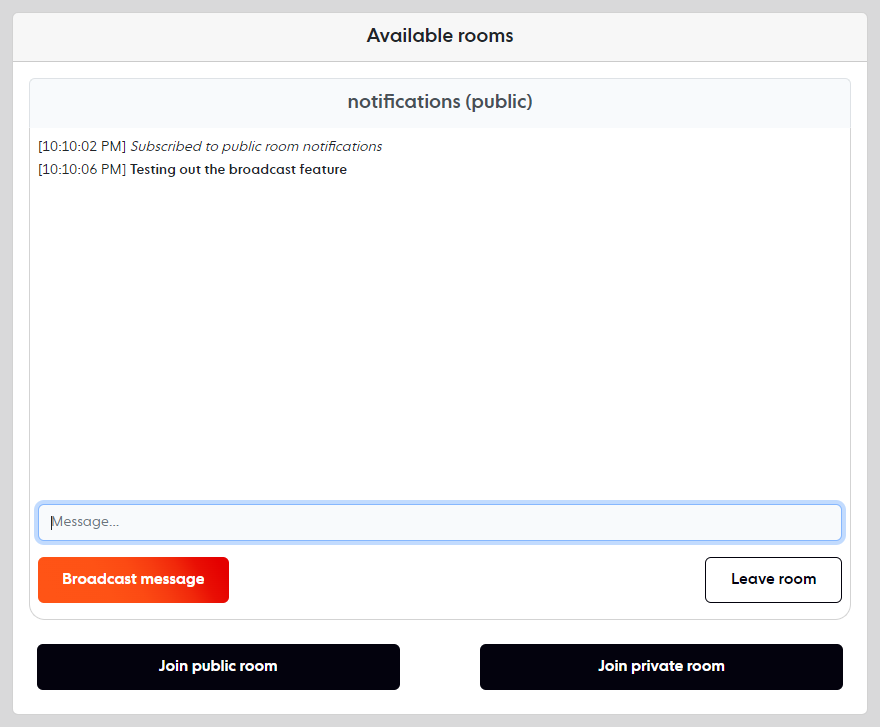
Testing the chat app
To test your chat app, open the localhost:3000 in at least two browser tabs. Join the public room in each tab and broadcast messages to each other. For more information, refer to Guest Mode under the Usage Section.
Conclusion
That’s it! In this tutorial, you learned how to create a realtime chat app using Laravel and Ably for guest users. In a future blog, we will cover how to add chat functionality for authenticated (logged in) users. Depending on your requirements, you can also discover how to add more features to your chat app in the Ably chat reference guide.
We would love to hear about how you plan to use Ably in your applications. Join our Discord server and post your ideas for builds in the showcase channel to share, we’re currently giving out Ably tees to members who participate!
Further reading
- Visualize your commits in realtime with Ably and GitHub webhooks
- Ably + React Hooks NPM package now out
- Building a realtime chat app with Next.js and Vercel
- WebSockets and Node.js - testing WS and SockJS by building a web app
- Build your own live chat web component with Ably and AWS
- Building a realtime SMS voting app