Ably’s React Hooks deliver an efficient and idiomatic way to integrate Ably’s realtime functionality into your React-based application
React is one of the most popular JavaScript libraries in the world, and is known for its performance, scalability, and flexibility. Whether it’s single-page apps, high fidelity frontends, or even in some cases static sites, there's a high chance React is being used to build them.
Today, we are pleased to announce that we have now baked in support for React Hooks within our Ably JavaScript SDK. Ably’s React Hooks provide developers with an efficient and idiomatic way to integrate Ably realtime functionality into their React applications. Not only do they make it easier to integrate with the Ably platform, but they also enhance code quality, maintainability, and performance.
About Ably
Ably is the scalable and five nines reliable middleware, used by developers at over 500 companies worldwide, to quickly build realtime applications - from collaborative experiences and live chat, to data broadcast and notifications. Supported by its globally distributed infrastructure, Ably offers 25 SDKs for various programming languages and platforms. And partner integrations with technologies including Datadog, Kafka, and Vercel, that accelerate the delivery of realtime experiences.
Ably React Hooks
Hooks have been widely adopted by the React community and have become a standard approach to building components in React applications. They make it easier to organize logic in components and create small, reusable parts without using classes. React Hooks are basic JavaScript functions that help separate reusable parts in functional components. Platform providers, such as Ably, can build custom React Hooks, to ease integration - giving developers the head-space to focus on their application instead.
Our React Hooks offering:
- Easily handle realtime at scale: Ably’s React Hooks help manage things like state and effects, making sure the code stays organized and easy to maintain.
- Full suite of React Hook features: Everything you need to send and receive messages, listen and react to changes, and consume presence events so you know which users/clients are connected.
- Easy to use: Simple and intuitive SDK component that can be used with any web application, easing integration with Ably and your React-based app.
- High performing: Powered by our market-proven, realtime infrastructure that’s built for reliability at scale, backed by five nines SLAs and messaging guarantees.
- Realtime experiences unlocked: Unlock end-to-end realtime messaging throughout your app using our suite of products. While Spaces powers the features you need to enable synchronous collaboration for teams and manage their participant state, Pub/Sub channels allows you to flexibly broadcast and sync app state changes between members, your backend, and any other pieces in your system design.
Ably’s suite of React Hooks features
Ably’s React Hooks are included in the latest version of the Ably JavaScript SDK. They provide a robust pattern for using the Ably client. They allow you to get a callback when messages are received by your component, they re-render and re-subscribe if the channel you're subscribing to is modified, and they make presence events trivial to consume so that your React app can be aware of other connected clients. The full set of features includes:
- The AblyProvider component is used to set up the Ably client for your application.
- The useChannel hook subscribes to a channel and receives messages from it.
- The usePresence hook subscribes to presence events on a channel, notifying when users join or leave the channel.
- The useConnectionStateListener hook attaches a listener to be notified of connection state changes in the Ably client.
- The useChannelStateListener hook attaches a listener to be notified of channel state changes.
- The useAbly hook grants access to the Ably client instance provided by the AblyProvider context.
Hooks like useChannel and usePresence provide information about connection and channel errors.
Multiple Ably clients can be used on the same page by keeping them in separate AblyProvider components.
Building a simple React app with Ably
Let's explore Ably's new React components by building a simple React app that can send and receive realtime messages and display users' presence status. If you want to jump ahead and grab the code, you can head over to the Github repository.
Before you get started, you’ll need to make sure you have an Ably account which you can get for free! We’ll wait here while you grab your account.
Great! Let’s start building by using Vite, a popular frontend build tool, to scaffold an initial React application. Run the following command from your terminal:
$ npm create vite@latestVite will ask you a few questions about your project including the project name, an application framework (select React), and which framework variant you want to use (select Typescript).

Once you’ve made all of the selections Vite will get to work scaffolding the project.
Once the scaffolding completes, navigate into the project directory and install the project dependencies using npm. Next, run the project:
$ npm install
$ npm run dev
The project Vite scaffolds for you is a fully running site. Check it out by loading the site URL in your browser:

Now that the initial website is in place we can move on to adding some realtime features using Ably.
Ably Client Authentication
In order to use Ably’s realtime platform, we need to authenticate an Ably client. Ably supports a number of different methods of client authentication, but for our application, we’ll use Token authentication.
Token authentication uses a trusted device with an API key to issue time-limited tokens to untrusted clients. Tokens have a limited set of access rights, known as capabilities, and can have a specific identity using a clientId. Tokens are the recommended authentication method to use client-side as it provides more fine-grained access control and limits the risk of credentials being exposed.
For our application, our trusted device will be an API endpoint that we’ll create using the Vite `vite-plugin-api` plugin. This plugin allows us to create routes in our React application that serve as API endpoints. In our case, that route will generate and return a temporary authentication token to the client.
Start by installing express, the vite-plugin-api package, and the Ably Javascript SDK:
npm install express vite-plugin-api ablyNext, configure you Vite config (`vite.config.ts`) to load the api plugin:
import { defineConfig } from 'vite'
import react from '@vitejs/plugin-react'
import { pluginAPI } from 'vite-plugin-api'

// https://vitejs.dev/config/
export default defineConfig({
  plugins: [
    react(),
    pluginAPI({})
  ],
})
Create a place to store your Ably API key by adding a `.env.local` to your project. In that file define the variable `VITE_ABLY_API_KEY` and set its value to your Ably API key, which you can find by logging into your Ably dashboard.
VITE_ABLY_API_KEY=[YOUR_ABLY_API_KEY]Next, add a new `/api/token` directory to the `src` directory of your project and in that directory add a new Typescript file `index.ts`. This will be our API endpoint. Add the code shown below to generate and return an authorization token:
import Ably from "ably/promises";

export const GET = async (req:any, res:any) => {
  const client = new Ably.Rest(import.meta.env.VITE_ABLY_API_KEY);
  const tokenRequestData:Ably.Types.TokenRequest = await  client.auth.createTokenRequest({ clientId: 'me' });

  return res.json(tokenRequestData);
}
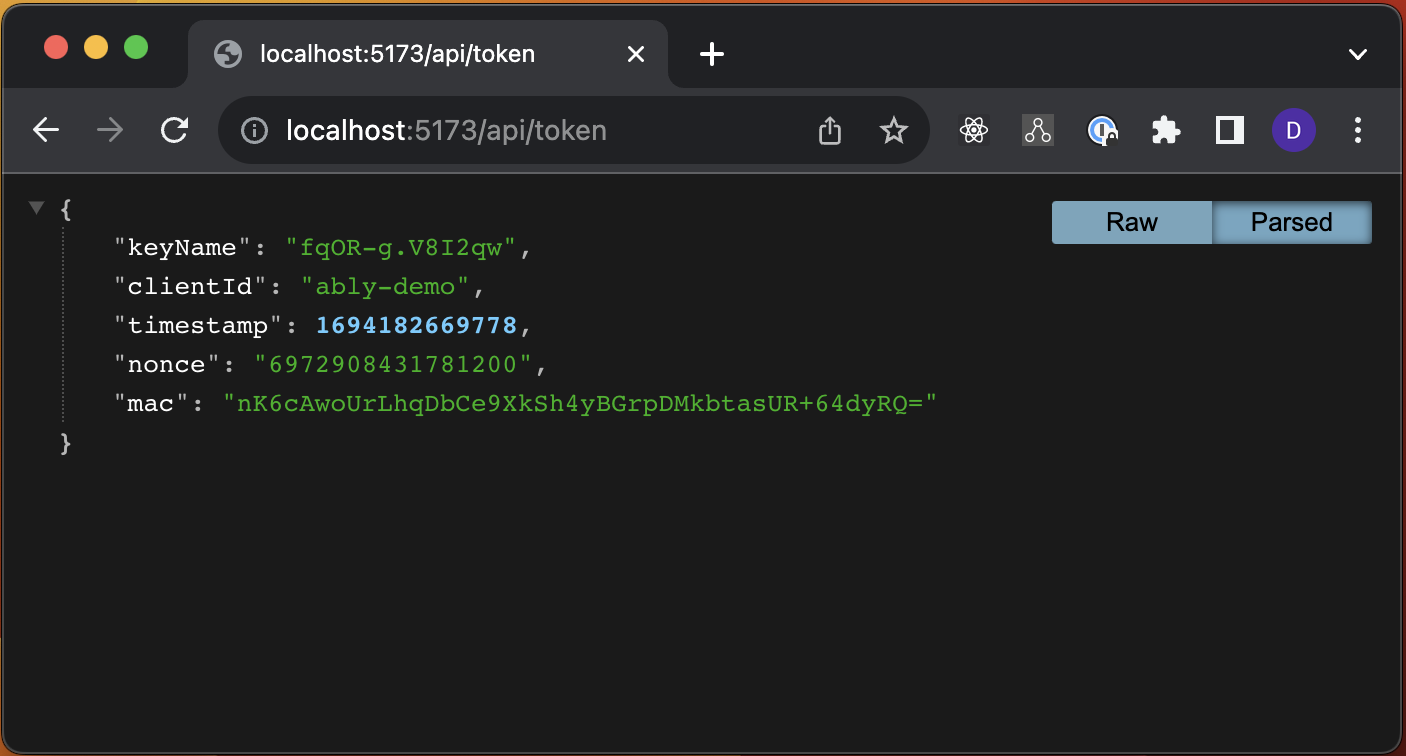
Let’s test the API endpoint. Make sure your website is still running (rerun `npm run dev` if needed) and load the website URL in a browser. Navigate to the `/api/token` path. You should see a JSON object returned that includes the authorization token:
Awesome! Now that we have a way to generate tokens we can move on to adding realtime features to our React app.
Using Ably in a React app
To use Ably in our React app we first have to create an instance of the Ably client. We’ll do this by adding the <AblyProvider> component to our application. The <AblyProvider> is used to set up the Ably client for your application and should be placed in the component tree such that it wraps every other component that needs to access Ably.
In `App.tsx`, import ably and the ably React extensions:
import * as Ably from 'ably';
import { AblyProvider } from 'ably/react'
Next create a new instance of an Ably client, configuring it with an `authUrl` property that points to the token endpoint we created earlier. Pass the instance of the client to the <AblyProvider> component:
import * as Ably from 'ably';
import { AblyProvider, useChannel } from 'ably/react'

function App() {

  const client = new Ably.Realtime.Promise({ authUrl: '/api/token' });

  return (
    <AblyProvider client= { client } >
    </AblyProvider>
  )
}
export default App;
Once we have an Ably client we'll next add the ability to send and receive realtime messages.
Pub/Sub Channels
Ably's Pub/Sub Channels allow you to send and receive realtime messages using the Ably platform. Let's start by listening for incoming messages.
To do that create a child component that encapsulates the usage of Ably. The child component is needed because we need to control which components are rendered when changed.
If the App component reloads it will cause the Ably client (and any WebSocket connections it has created) to get destroyed, so to avoid that we use a child component to hold real-time functionality. The child component can safely rerender when it needs to without the Ably client being impacted.
First import the `useChannel` React hook which gives us access to an Ably Channel:
import * as Ably from 'ably';
import { AblyProvider, useChannel } from 'ably/react'
Next, create a new component named `Messages`:
function Messages() {
  return (<div></div>)
}
Add that component to the App component:
return (
  <AblyProvider client={ client } >
    <Messages />
  </AblyProvider>
)
To receive messages we’ll use the `useChannel` hook we imported earlier, storing the returned channel as a variable to use later. Messages are received using a callback function:
function Messages() {
  const { channel } = useChannel("ably-demo", (message: Ably.Types.Message) => {
    console.log(message)
  });
  return (<div></div>)
}
To send messages we’ll use the instance of the channel received from the `useChannel` hook. Channel has a `publish` function which we can call from a button click:
return (
  <div>
    <button onClick={(event:React.MouseEvent<HTMLButtonElement>) => { channel.publish('world', 'hello world!')}}>Publish</button>
  </div>
)
Return to the browser and if needed refresh your page. You should now see the Publish button. Click the button and then open the browser debugger. You should see message objects logged to the console.

Woohoo! That's how easy it is to send and receive realtime messages in your React app.
Presence
The last feature we’ll explore is Ably Presence. Presence enables clients to be aware of other clients that are currently “present” on a channel. Each member present on a channel has a unique self-assigned client identifier and system-assigned connection identifier, along with an optional payload that can be used to describe the member’s status or attributes.
Start by two new objects, the first being the `usePresence` React hook and the second being the `useState` React hook:
import * as Ably from 'ably';
import { AblyProvider, useChannel, usePresence } from 'ably/react'
import { useState } from 'react'
Next, create another new component called Presence:
function Presence() {
  return (<div></div>)
}
Add that new component to the App:
return (
  <AblyProvider client={ client } >
    <Messages />
    <Presence />
  </AblyProvider>
)
To have Ably begin to track our client we’ll use the `usePresence` hook. This hook enables you to subscribe to presence events on a channel, notifying you when a user enters or leaves the presence set or updates their member data. In our application, we want to subscribe to presence events for the `ably-demo` channel and we’re passing the string `current status` to Ably as this client's initial status:
function Presence() {
  const { presenceData, updateStatus } = usePresence<string>("ably-demo", 'current status');
  return (<div></div>)
}
The usePresence hook returns an array of presence messages where each message is a regular Ably JavaScript SDK presenceMessage instance. Using the map function we can convert the presence data to list items to render:
function Presence() {
  const { presenceData, updateStatus } = usePresence<string>("ably-demo", 'current status');
  const peers = presenceData.map((msg, index) => <li key={msg.id}>{msg.clientId}: {msg.data}</li>);

return (
  <div>
    <ul>{peers}</ul>
  </div>
  )
}
It also returns a `updateStatus` function which can be used to update the presence data for the current client:
return (
  <div>
    <button onClick={(event:React.MouseEvent<HTMLButtonElement>) => { updateStatus('new status') }}>Update Presence</button>
  <ul>{peers}</ul>
</div>
)
Finally, to leave the presence set of a channel we've previously joined we'll conditionally render the Pre sence component. We'll add a new state property that stores a boolean value indicating if the client status is "online" or and a button to toggle the state value.
Using that state value we'll conditionally render the <Presence> component. If the component is rendered it will automatically enter presence tracking. When the state value changes and the component unmounts the client will leave presence tracking:
function App() {

const [isOnline, setIsOnline] = useState<boolean>(true);
const client = new Ably.Realtime.Promise({ authUrl: '/api/token' });

return (
  <>
    <Messages />
    { isOnline && <Presence /> }
    <button onClick={(event:React.MouseEvent<HTMLButtonElement>) => { setIsOnline(!isOnline)}}>Toggle Presence</button>
  </>
  )
}
Reload the application in your browser one more time and now you should see your client’s presence shown in the list.
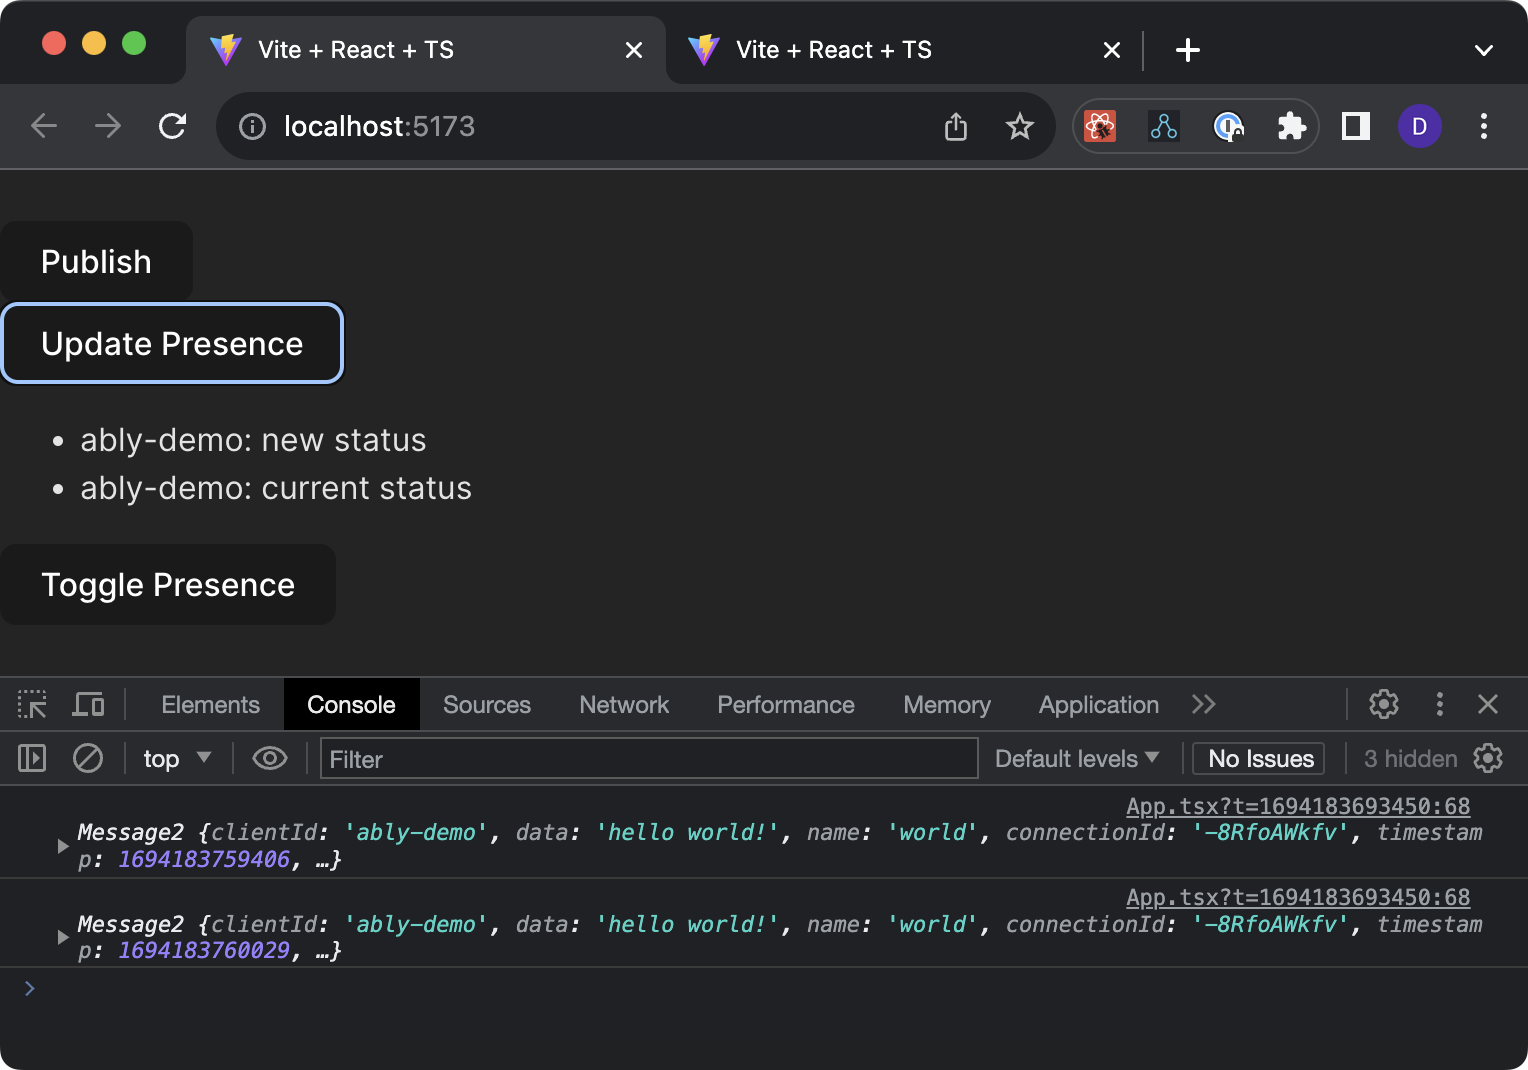
Press the Update Button to update your client's status. You can even open your website in a second browser to see how additional clients are shown in the list.
Congratulations - you’ve built a React application using Ably's new React Hooks!
Resource roundup
Get started with Ably’s React Hooks.
Sign-up for a free account.
Run through the Using Ably React Hooks tutorial.